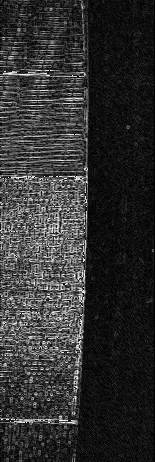
我希望检测图像中间的垂直曲线。您有什么想法如何做到这一点?我想通过这条线将左右两侧分开。我应该使用哪种特征或过滤器?非常感谢您提供检测线的想法。
这是图片链接:
这是图片链接:
顺便提一句:我在Python中使用OpenCV库。
顺便提一句:我在Python中使用OpenCV库。
很抱歉,我对OpenCV并不是很了解。以下是如何实现的概述。同时提供使用Imagemagick和Python Wand代码的示例。请注意,我保存中间图像以展示步骤。
Read the image

Blur it some

Threshold is to binary

Do connected components processing to remove all small regions (see contours or blobs in OpenCV)

Use morphology open and close to smooth the edges

Extract an edge outline of the transition between white and black (there are many edge operators: laplacian, gradients, canny, etc)
输入:

convert img.jpg -blur 0x1 -threshold 9% -type bilevel +write threshold.png \
-define connected-components:mean-color=true \
-define connected-components:area-threshold=10000 \
-connected-components 4 +write ccl.png \
-morphology open disk:5 \
-morphology close disk:5 +write smooth.png \
-morphology edge diamond:1 \
result.png


平滑:

结果:

以下是使用 Python Wand 0.5.6(目前正在开发中)和 Imagemagick 7.0.8.56 的等效代码:
#!/bin/python3.7

from wand.image import Image
from wand.display import display

with Image(filename='curve.jpg') as img:
    img.blur(radius=0, sigma=1)
    img.threshold(threshold=0.09)
    img.connected_components(connectivity=4, area_threshold=1000, mean_color=True)
    img.morphology(method='open', kernel='disk:5')
    img.morphology(method='close', kernel='disk:5')
    img.morphology(method='edge', kernel='diamond:1')
    img.save(filename='0_wand_trim.png')
    display(img)
这里提供一种简单的方法
中值滤波 → 阈值化 → 开操作 → 闭操作 → 边缘检测


import cv2

image = cv2.imread('1.jpg', 0)
blur = cv2.medianBlur(image, 9)
thresh = cv2.threshold(blur, 25, 255, cv2.THRESH_BINARY)[1]
kernel = cv2.getStructuringElement(cv2.MORPH_RECT, (9,9))
opening = cv2.morphologyEx(thresh, cv2.MORPH_OPEN, kernel, iterations=3)
close = cv2.morphologyEx(thresh, cv2.MORPH_CLOSE, kernel, iterations=3)
canny = cv2.Canny(close, 120, 255, 1)

cv2.imshow('canny', canny)
cv2.waitKey()