UIBarButtonItem上没有阴影/浮雕效果

6

我遇到了一个自定义UIBarButtonItem的问题。当我通过以下方式创建自定义UIBarButtonItem时:

 [[UIBarButtonItem alloc]initWithImage:[UIImage imageNamed:@"FilterIcon.png"] style:UIBarButtonItemStyleBordered target:self action:@selector(filterTouched:)];

结果按钮没有系统项目背景图标的"浮雕"外观,这是通过在它们的图标后面放置半透明黑色阴影来实现的。

左边:系统项目,右边:自定义项目

左边是"组织"系统工具栏按钮项,右边是上面代码的结果。

在资源中创建阴影是徒劳的,因为iOS/Cocoa只使用图像的掩码并且丢弃任何颜色信息。

有趣的是,如果我在接口生成器中创建工具栏按钮项,则看起来很好。但是,在我的问题上下文中,我需要在代码中创建按钮项。

3个回答

10

有 James Furey 的脚本的 Objective-C 版本。

- (UIImage *)applyToolbarButtonStyling:(UIImage *)oldImage {
    float shadowOffset = 1;
    float shadowOpacity = .54;
    CGRect imageRect = CGRectMake(0, 0, oldImage.size.width, oldImage.size.height);
    CGRect shadowRect = CGRectMake(0, shadowOffset, oldImage.size.width, oldImage.size.height);
    CGRect newRect = CGRectUnion(imageRect, shadowRect);
    UIGraphicsBeginImageContextWithOptions(newRect.size, NO, oldImage.scale);
    CGContextRef ctx = UIGraphicsGetCurrentContext();
    CGContextScaleCTM(ctx, 1, -1);
    CGContextTranslateCTM(ctx, 0, -(newRect.size.height));
    CGContextSaveGState(ctx);
    CGContextClipToMask(ctx, shadowRect, oldImage.CGImage);
    CGContextSetFillColorWithColor(ctx, [UIColor colorWithWhite:0 alpha:shadowOpacity].CGColor);
    CGContextFillRect(ctx, shadowRect);
    CGContextRestoreGState(ctx);
    CGContextClipToMask(ctx, imageRect, oldImage.CGImage);
    CGContextSetFillColorWithColor(ctx, [UIColor colorWithWhite:1 alpha:1].CGColor);
    CGContextFillRect(ctx, imageRect);
    UIImage *newImage = UIGraphicsGetImageFromCurrentImageContext();
    UIGraphicsEndImageContext();
    return newImage;
}

7
我认为这种情况的原因已经在这些回答中得到了解释:

https://dev59.com/kU_Ta4cB1Zd3GeqPCZ5A#3476424

https://dev59.com/kU_Ta4cB1Zd3GeqPCZ5A#6528603

。UIBarButtonItem的行为取决于您在何处以编程方式附加它们。如果将它们附加到工具栏,则它们将变成白色的“浮雕”图标。如果将它们附加到导航栏,则不会出现这种情况。我花了几个小时编写一个函数,将工具栏UIBarButtonItem的样式应用于UIImages。它是用MonoTouch的C#编写的,但我相信您可以轻松地将其调整为Obj-C...
UIImage ApplyToolbarButtonStyling(UIImage oldImage)
{
    float shadowOffset = 1f;
    float shadowOpacity = .54f;
    RectangleF imageRect = new RectangleF(PointF.Empty, oldImage.Size);
    RectangleF shadowRect = new RectangleF(new PointF(0, shadowOffset), oldImage.Size);
    RectangleF newRect = RectangleF.Union(imageRect, shadowRect);
    UIGraphics.BeginImageContextWithOptions(newRect.Size, false, oldImage.CurrentScale);
    CGContext ctxt = UIGraphics.GetCurrentContext();
    ctxt.ScaleCTM(1f, -1f);
    ctxt.TranslateCTM(0, -newRect.Size.Height);
    ctxt.SaveState();
    ctxt.ClipToMask(shadowRect, oldImage.CGImage);
    ctxt.SetFillColor(UIColor.FromWhiteAlpha(0f, shadowOpacity).CGColor);
    ctxt.FillRect(shadowRect);
    ctxt.RestoreState();
    ctxt.ClipToMask(imageRect, oldImage.CGImage);
    ctxt.SetFillColor(UIColor.FromWhiteAlpha(1f, 1f).CGColor);
    ctxt.FillRect(imageRect);
    UIImage newImage = UIGraphics.GetImageFromCurrentImageContext();
    UIGraphics.EndImageContext();
    return newImage;
}

因此,一个原本长这样的UIBarButtonItem:

Before

现在可以使用上述函数创建成这个样子:

UIBarButtonItem barButtonItem = new UIBarButtonItem(ApplyToolbarButtonStyling(UIImage.FromFile("MusicIcon.png")), UIBarButtonItemStyle.Plain, delegate {});
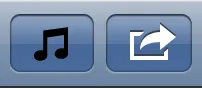
现在的样子应该是这样:

After

希望这能帮助未来的某个人。

谢谢阅读。实际上,这对我来说看起来像是苹果在那里存在一些不一致的问题。我已经检查了一些默认应用程序,导航栏中的少数图标具有凸起的外观(例如联系人中的加号图标或消息中的写按钮)。 - Chris
非常感谢您的精心努力。不幸的是,我没有时间将其纳入我们当前版本的产品中,但会在下一个版本中尝试。再次感谢。 - Chris

0

注意James Furey脚本中的阴影偏移量。 我有以下经验:

float shadowOffset = 1.0f // for a UIBarButtonItem in UINavigationItem
float shadowOffset = 0.0f // for a UIBarButtonItem in UIToolBar

这是在iOS 6.1 SDK下观察到的。

(现在在iOS 7下已经过时)


网页内容由stack overflow 提供, 点击上面的
可以查看英文原文,
原文链接