像iTunes 11一样绘制NSTableView交替行

9

我知道 Stack Overflow 上已经有其他关于更改交替行颜色的问题。这很容易,但不是我想要做的。

我想在基于视图的 NSTableView 中绘制自定义的交替颜色行,看起来像iTunes 11中的那些(行顶部和底部有轻微边框,如此屏幕截图所示):

iTunes 11 截图

注意:

我知道我可以子类化 NSTableRowView 并在那里进行自定义绘制。然而,这并不是一个可接受的答案,因为自定义行只会用于表格中具有数据的行。换句话说,如果表格只有5行,则这5行将使用我的自定义 NSTableRowView 类,但其余的“行”(即空行)将使用标准的交替颜色。在这种情况下,前5行将显示边框,其余行则不会。这样不好。

那么,我该如何修改 NSTableView 以绘制这些样式的交替行,使其适用于填充和空行?


2
由于indragie的问题的解决方案间接地解决了您的问题,因此有关闭此贴的冲动。 - CodaFi
2
我在写我的帖子之前就看到了那篇帖子。问题是他想要为交替行使用 纯色,这很容易实现。但是我想为交替行进行自定义绘制,这是完全不同的问题。我无法使用他的方法,因为我需要绘制边框;而不仅仅是用交替的 NSColors 填充行。 - Bryan
1
那个问题中使用的技巧包括选择颜色和填充矩形(更重要的是,找到正确的方法覆盖来完成它)。但是一旦你能够绘制填充的矩形,有什么阻止你在该矩形顶部绘制白线,在底部绘制灰线呢? - rickster
3个回答

15

作为你所说的“轻微边框”,实际上我们可以通过一些小技巧轻松实现。因为,如果你仔细观察,每个单元格的顶部比深色交替行略微浅一些,底部是暗灰色,你可以创建NSTableView子类,然后重写- (void)drawRow:(NSInteger)row clipRect:(NSRect)clipRect方法:

- (void)drawRow:(NSInteger)row clipRect:(NSRect)clipRect
{
    //Use the drawing code from https://dev59.com/Zm865IYBdhLWcg3wIa7M#5101923, but change the colors to
    //look like iTunes's alternating rows.
    NSRect cellBounds = [self rectOfRow:row];
    NSColor *color = (row % 2) ? [NSColor colorWithCalibratedWhite:0.975 alpha:1.000] : [NSColor colorWithCalibratedRed:0.932 green:0.946 blue:0.960 alpha:1.000];
    [color setFill];
    NSRectFill(cellBounds);

    /* Slightly dark gray color */
    [[NSColor colorWithCalibratedWhite:0.912 alpha:1.000] set];
    /* Get the current graphics context */
    CGContextRef currentContext = [[NSGraphicsContext currentContext]graphicsPort];
    /*Draw a one pixel line of the slightly lighter blue color */
    CGContextSetLineWidth(currentContext,1.0f);
    /* Start the line at the top of our cell*/
    CGContextMoveToPoint(currentContext,0.0f, NSMaxY(cellBounds));
    /* End the line at the edge of our tableview, for multi-columns, this will actually be overkill*/
    CGContextAddLineToPoint(currentContext,NSMaxX(cellBounds), NSMaxY(cellBounds));
    /* Use the context's current color to draw the line */
    CGContextStrokePath(currentContext);

    /* Slightly lighter blue color */
    [[NSColor colorWithCalibratedRed:0.961 green:0.970 blue:0.985 alpha:1.000] set];
    CGContextSetLineWidth(currentContext,1.0f);
    CGContextMoveToPoint(currentContext,0.0f,1.0f);
    CGContextAddLineToPoint(currentContext,NSMaxX(self.bounds), 1.0f);
    CGContextStrokePath(currentContext);

    [super drawRow:row clipRect:clipRect];
}

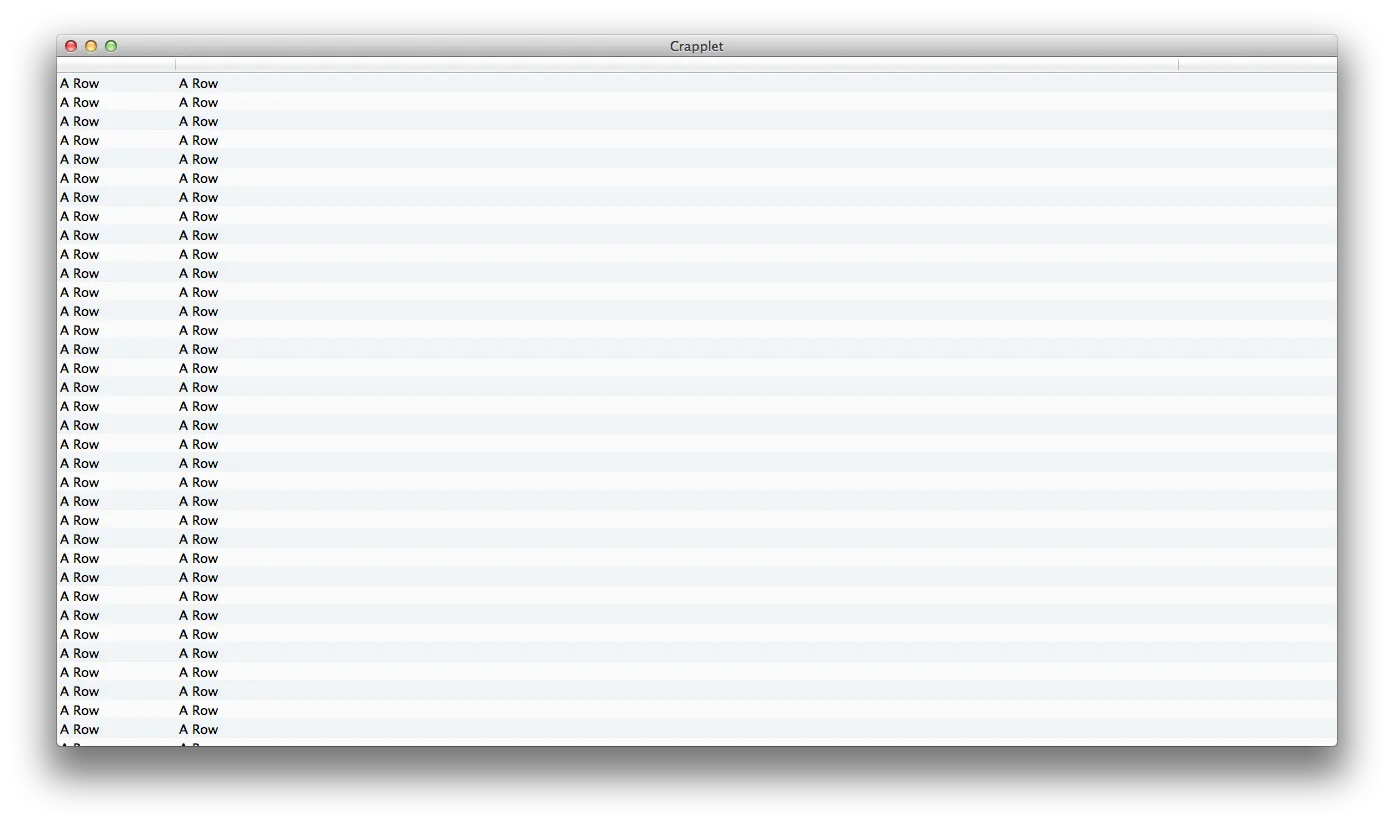
When displayed in a tableview, it will look like this: Nice Bezeling! However, how should we handle the top and bottom of the tableview? They will either be an unattractive white or the default alternating row color. As Apple revealed in a talk titled "View Based NSTableView, Basic To Advanced", you can override -(void)drawBackgroundInClipRect:(NSRect)clipRect and use some calculations to draw the tableview background as extra rows. A quick implementation would look something like this:
-(void)drawBackgroundInClipRect:(NSRect)clipRect
{
    // The super class implementation obviously does something more
    // than just drawing the striped background, because
    // if you leave this out it looks funny
    [super drawBackgroundInClipRect:clipRect];

    CGFloat   yStart   = 0;
    NSInteger rowIndex = -1;

    if (clipRect.origin.y < 0) {
        while (yStart > NSMinY(clipRect)) {
            CGFloat yRowTop = yStart - self.rowHeight;

            NSRect rowFrame = NSMakeRect(0, yRowTop, clipRect.size.width, self.rowHeight);
            NSUInteger colorIndex = rowIndex % self.colors.count;
            NSColor *color = [self.colors objectAtIndex:colorIndex];
            [color set];
            NSRectFill(rowFrame);

            /* Slightly dark gray color */
            [[NSColor colorWithCalibratedWhite:0.912 alpha:1.000] set];
            /* Get the current graphics context */
            CGContextRef currentContext = [[NSGraphicsContext currentContext]graphicsPort];
            /*Draw a one pixel line of the slightly lighter blue color */
            CGContextSetLineWidth(currentContext,1.0f);
            /* Start the line at the top of our cell*/
            CGContextMoveToPoint(currentContext,0.0f, yRowTop + self.rowHeight - 1);
            /* End the line at the edge of our tableview, for multi-columns, this will actually be overkill*/
            CGContextAddLineToPoint(currentContext,NSMaxX(clipRect), yRowTop + self.rowHeight - 1);
            /* Use the context's current color to draw the line */
            CGContextStrokePath(currentContext);

            /* Slightly lighter blue color */
            [[NSColor colorWithCalibratedRed:0.961 green:0.970 blue:0.985 alpha:1.000] set];
            CGContextSetLineWidth(currentContext,1.0f);
            CGContextMoveToPoint(currentContext,0.0f,yRowTop);
            CGContextAddLineToPoint(currentContext,NSMaxX(clipRect), yRowTop);
            CGContextStrokePath(currentContext);

            yStart -= self.rowHeight;
            rowIndex--;
        }
    }
}

但是,这样会使表格视图底部保持相同的丑陋白色!因此,我们还必须覆盖-(void)drawGridInClipRect:(NSRect)clipRect。另一个快速实现如下:

-(void)drawGridInClipRect:(NSRect)clipRect {
    [super drawGridInClipRect:clipRect];

    NSUInteger numberOfRows = self.numberOfRows;
    CGFloat yStart = 0;
    if (numberOfRows > 0) {
        yStart = NSMaxY([self rectOfRow:numberOfRows - 1]);
    }
    NSInteger rowIndex = numberOfRows + 1;

    while (yStart < NSMaxY(clipRect)) {
        CGFloat yRowTop = yStart - self.rowHeight;

        NSRect rowFrame = NSMakeRect(0, yRowTop, clipRect.size.width, self.rowHeight);
        NSUInteger colorIndex = rowIndex % self.colors.count;
        NSColor *color = [self.colors objectAtIndex:colorIndex];
        [color set];
        NSRectFill(rowFrame);

        /* Slightly dark gray color */
        [[NSColor colorWithCalibratedWhite:0.912 alpha:1.000] set];
        /* Get the current graphics context */
        CGContextRef currentContext = [[NSGraphicsContext currentContext]graphicsPort];
        /*Draw a one pixel line of the slightly lighter blue color */
        CGContextSetLineWidth(currentContext,1.0f);
        /* Start the line at the top of our cell*/
        CGContextMoveToPoint(currentContext,0.0f, yRowTop - self.rowHeight);
        /* End the line at the edge of our tableview, for multi-columns, this will actually be overkill*/
        CGContextAddLineToPoint(currentContext,NSMaxX(clipRect), yRowTop - self.rowHeight);
        /* Use the context's current color to draw the line */
        CGContextStrokePath(currentContext);

        /* Slightly lighter blue color */
        [[NSColor colorWithCalibratedRed:0.961 green:0.970 blue:0.985 alpha:1.000] set];
        CGContextSetLineWidth(currentContext,1.0f);
        CGContextMoveToPoint(currentContext,0.0f,yRowTop);
        CGContextAddLineToPoint(currentContext,NSMaxX(self.bounds), yRowTop);
        CGContextStrokePath(currentContext);

        yStart += self.rowHeight;
        rowIndex++;
    }
}

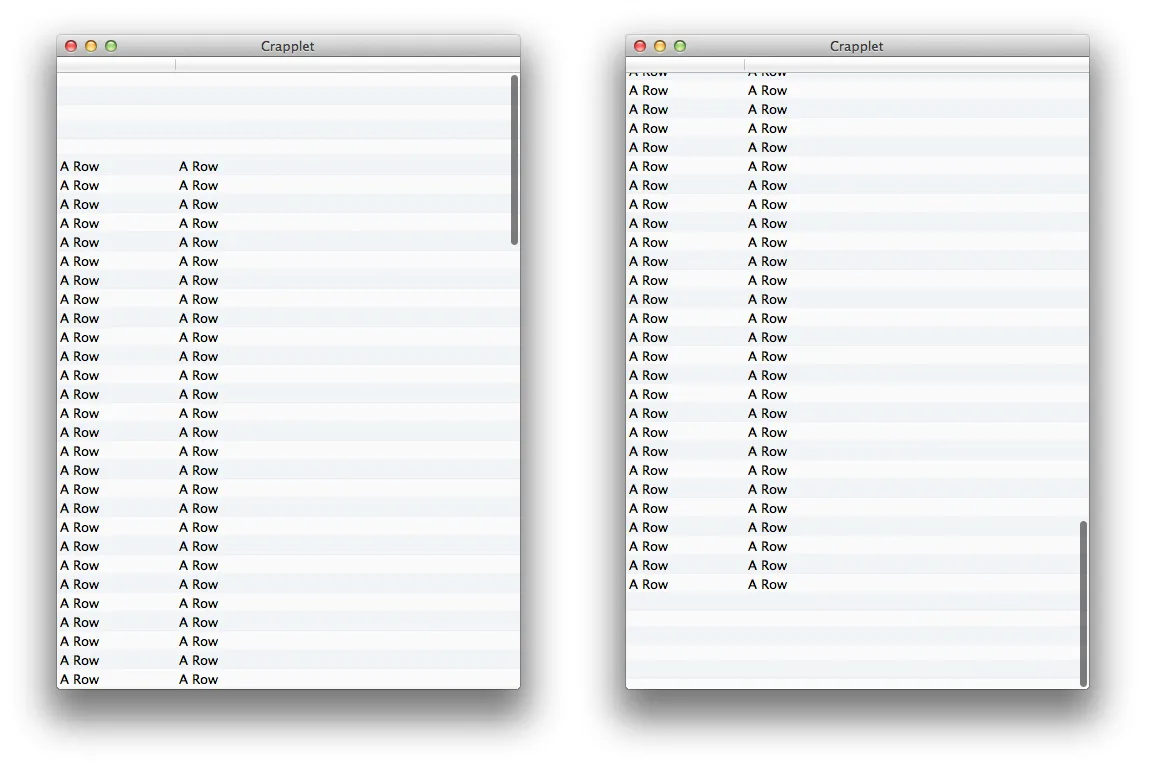
当一切都说完了,我们在剪贴板视图的顶部和底部得到了漂亮的假表格视图单元行,看起来有点像这样:

enter image description here

完整的子类可以在此处找到。

尝试后,这已经接近了。但是,当涉及到的tableView是NSOutlineView时,在展开/折叠树形项目时,绘图会出现问题。显然这与操作clipRects有关。我会继续努力,看看能否调整一些东西来解决这个问题。 - Bryan
1
你没有指定。我必须重新编写轮廓视图的绘图代码。基本上只能使用TableView或者什么都不用。 - CodaFi
1
CodaFi的解决方案接近,但并非完全准确。一些自以为是的技术宅关闭了这个帖子,所以如果将来有人想知道如何做到这一点,我已经找到了一个绝对可靠的方法,如果您联系我,我会分享给您。(我本可以在这里发布,但显然该帖子已关闭。) - Bryan
@Bryan,我很想要一个要点(或者你在链接的要点上发表建议/评论)。或者,Twitter? - CodaFi
好的,我稍后会发布一个要点。解决方案涉及多个角度,包括一些非正式的委托方法来处理NSOutlineView展开/折叠的情况。但是我已经有了一个100%无懈可击且(最重要的是)高效的解决方案。 - Bryan
2
@Bryan - 你有做那个要点吗?我真的很想看看。 - machomeautoguy

1
你可以使用 - (void)setUsesAlternatingRowBackgroundColors:(BOOL)useAlternatingRowColors 使用useAlternatingRowColors为YES来指定标准的交替行背景颜色,为NO来指定单一的颜色。

这是正确的答案。没有必要子类化任何东西。原始的NSTableView类已经提供了它。你可以按照上面所说的编码,也可以在界面构建器中完成:在NSTableView中检查“交替行”,而不是表视图所在的滚动视图。 - Zhigang An

0

我发现你可以在drawBackgroundInClipRect中绘制顶部和底部 -- 实际上是在@CodaFi的解决方案中缺失的else子句中。

因此,这里有一种Swift方法,假设你可以访问backgroundColoralternateBackgroundColor

override func drawBackground(inClipRect clipRect: NSRect) {

    // I didn't find leaving this out changed appearance at all unlike
    // CodaFi stated.
    super.drawBackground(inClipRect: clipRect)

    guard usesAlternatingRowBackgroundColors else { return }

    drawTopAlternatingBackground(inClipRect: clipRect)
    drawBottomAlternatingBackground(inClipRect: clipRect)
}

fileprivate func drawTopAlternatingBackground(inClipRect clipRect: NSRect) {

    guard clipRect.origin.y < 0 else { return }

    let backgroundColor = self.backgroundColor
    let alternateColor = self.alternateBackgroundColor

    let rectHeight = rowHeight + intercellSpacing.height
    let minY = NSMinY(clipRect)
    var row = 0

    while true {

        if row % 2 == 0 {
            backgroundColor.setFill()
        } else {
            alternateColor.setFill()
        }

        let rowRect = NSRect(
            x: 0,
            y: (rectHeight * CGFloat(row) - rectHeight),
            width: NSMaxX(clipRect),
            height: rectHeight)
        NSRectFill(rowRect)
        drawBezel(inRect: rowRect)

        if rowRect.origin.y < minY { break }

        row -= 1
    }
}

fileprivate func drawBottomAlternatingBackground(inClipRect clipRect: NSRect) {

    let backgroundColor = self.backgroundColor
    let alternateColor = self.alternateBackgroundColor

    let rectHeight = rowHeight + intercellSpacing.height
    let maxY = NSMaxY(clipRect)
    var row = rows(in: clipRect).location

    while true {

        if row % 2 == 1 {
            backgroundColor.setFill()
        } else {
            alternateColor.setFill()
        }

        let rowRect = NSRect(
            x: 0,
            y: (rectHeight * CGFloat(row)),
            width: NSMaxX(clipRect),
            height: rectHeight)
        NSRectFill(rowRect)
        drawBezel(inRect: rowRect)

        if rowRect.origin.y > maxY { break }

        row += 1
    }
}

func drawBezel(inRect rect: NSRect) {

    let topLine = NSRect(x: 0, y: NSMaxY(rect) - 1, width: NSWidth(rect), height: 1)
    NSColor(calibratedWhite: 0.912, alpha: 1).set()
    NSRectFill(topLine)

    let bottomLine = NSRect(x: 0, y: NSMinY(rect)   , width: NSWidth(rect), height: 1)
    NSColor(calibratedRed:0.961, green:0.970, blue:0.985, alpha:1).set()
    NSRectFill(bottomLine)
}

如果您没有在NSTableRowView子类中进行绘制:

override func drawRow(_ row: Int, clipRect: NSRect) {

    let rowRect = rect(ofRow: row)
    let color = row % 2 == 0 ? self.backgroundColor : self.alternateBackgroundColor
    color.setFill()
    NSRectFill(rowRect)
    drawBezel(inRect: rowRect)
}

网页内容由stack overflow 提供, 点击上面的
可以查看英文原文,
原文链接