我正在开发一款 iPhone 应用。
我有代表符号的 png 图片。这些符号是全黑的,背景透明。
有没有办法将黑色改成其他颜色呢?我想找一个能帮助我选择颜色的方法,使用这些符号(在 UIImage 中)时,可以让它们显示我选择的颜色。
我搜索了一下,找到了一个叫做 OpenCV 的框架,可以处理图像,但我不知道如何重新上色图片。
非常感谢您提供任何帮助和建议。
谢谢。
我正在开发一款 iPhone 应用。
我有代表符号的 png 图片。这些符号是全黑的,背景透明。
有没有办法将黑色改成其他颜色呢?我想找一个能帮助我选择颜色的方法,使用这些符号(在 UIImage 中)时,可以让它们显示我选择的颜色。
我搜索了一下,找到了一个叫做 OpenCV 的框架,可以处理图像,但我不知道如何重新上色图片。
非常感谢您提供任何帮助和建议。
谢谢。
在处理 UIImageView 时,可以采用以下方法:
Obj-C:
theImageView.image = [theImageView.image imageWithRenderingMode:UIImageRenderingModeAlwaysTemplate];
[theImageView setTintColor:[UIColor redColor]];
Swift:
let theImageView = UIImageView(image: UIImage(named:"foo")!.imageWithRenderingMode(UIImageRenderingMode.AlwaysTemplate))
theImageView.tintColor = UIColor.redColor()
你想要改变/移除其中一个特定颜色,可以使用以下类别...
.h文件:
#import <UIKit/UIKit.h>

@interface UIImage (Color)

+ (UIImage*)setBackgroundImageByColor:(UIColor *)backgroundColor withFrame:(CGRect )rect;


+ (UIImage*) replaceColor:(UIColor*)color inImage:(UIImage*)image withTolerance:(float)tolerance;

+(UIImage *)changeWhiteColorTransparent: (UIImage *)image;

+(UIImage *)changeColorTo:(NSMutableArray*) array Transparent: (UIImage *)image;

//resizing Stuff...
+ (UIImage *)imageWithImage:(UIImage *)image scaledToSize:(CGSize)newSize;

@end
.m文件
#import <QuartzCore/QuartzCore.h>
#import "UIImage+Color.h"

@implementation UIImage (Color)


+ (UIImage* )setBackgroundImageByColor:(UIColor *)backgroundColor withFrame:(CGRect )rect{

    // tcv - temporary colored view
    UIView *tcv = [[UIView alloc] initWithFrame:rect];
    [tcv setBackgroundColor:backgroundColor];


    // set up a graphics context of button's size
    CGSize gcSize = tcv.frame.size;
    UIGraphicsBeginImageContext(gcSize);
    // add tcv's layer to context
    [tcv.layer renderInContext:UIGraphicsGetCurrentContext()];
    // create background image now
    UIImage *image = UIGraphicsGetImageFromCurrentImageContext();
     UIGraphicsEndImageContext();

     return image;
//    [tcv release];

}


+ (UIImage*) replaceColor:(UIColor*)color inImage:(UIImage*)image withTolerance:(float)tolerance {
    CGImageRef imageRef = [image CGImage];

    NSUInteger width = CGImageGetWidth(imageRef);
    NSUInteger height = CGImageGetHeight(imageRef);
    CGColorSpaceRef colorSpace = CGColorSpaceCreateDeviceRGB();

    NSUInteger bytesPerPixel = 4;
    NSUInteger bytesPerRow = bytesPerPixel * width;
    NSUInteger bitsPerComponent = 8;
    NSUInteger bitmapByteCount = bytesPerRow * height;

    unsigned char *rawData = (unsigned char*) calloc(bitmapByteCount, sizeof(unsigned char));

    CGContextRef context = CGBitmapContextCreate(rawData, width, height,
                                                 bitsPerComponent, bytesPerRow, colorSpace,
                                                 kCGImageAlphaPremultipliedLast | kCGBitmapByteOrder32Big);
    CGColorSpaceRelease(colorSpace);

    CGContextDrawImage(context, CGRectMake(0, 0, width, height), imageRef);

    CGColorRef cgColor = [color CGColor];
    const CGFloat *components = CGColorGetComponents(cgColor);
    float r = components[0];
    float g = components[1];
    float b = components[2];
    //float a = components[3]; // not needed

    r = r * 255.0;
    g = g * 255.0;
    b = b * 255.0;

    const float redRange[2] = {
        MAX(r - (tolerance / 2.0), 0.0),
        MIN(r + (tolerance / 2.0), 255.0)
    };

    const float greenRange[2] = {
        MAX(g - (tolerance / 2.0), 0.0),
        MIN(g + (tolerance / 2.0), 255.0)
    };

    const float blueRange[2] = {
        MAX(b - (tolerance / 2.0), 0.0),
        MIN(b + (tolerance / 2.0), 255.0)
    };

    int byteIndex = 0;

    while (byteIndex < bitmapByteCount) {
        unsigned char red   = rawData[byteIndex];
        unsigned char green = rawData[byteIndex + 1];
        unsigned char blue  = rawData[byteIndex + 2];

        if (((red >= redRange[0]) && (red <= redRange[1])) &&
            ((green >= greenRange[0]) && (green <= greenRange[1])) &&
            ((blue >= blueRange[0]) && (blue <= blueRange[1]))) {
            // make the pixel transparent
            //
            rawData[byteIndex] = 0;
            rawData[byteIndex + 1] = 0;
            rawData[byteIndex + 2] = 0;
            rawData[byteIndex + 3] = 0;
        }

        byteIndex += 4;
    }

    UIImage *result = [UIImage imageWithCGImage:CGBitmapContextCreateImage(context)];

    CGContextRelease(context);
    free(rawData);

    return result;
}

+(UIImage *)changeWhiteColorTransparent: (UIImage *)image
{
    CGImageRef rawImageRef=image.CGImage;

    const float colorMasking[6] = {222, 255, 222, 255, 222, 255};

    UIGraphicsBeginImageContext(image.size);
    CGImageRef maskedImageRef=CGImageCreateWithMaskingColors(rawImageRef, colorMasking);
    {
        //if in iphone
        CGContextTranslateCTM(UIGraphicsGetCurrentContext(), 0.0, image.size.height);
        CGContextScaleCTM(UIGraphicsGetCurrentContext(), 1.0, -1.0);
    }

    CGContextDrawImage(UIGraphicsGetCurrentContext(), CGRectMake(0, 0, image.size.width, image.size.height), maskedImageRef);
    UIImage *result = UIGraphicsGetImageFromCurrentImageContext();
    CGImageRelease(maskedImageRef);
    UIGraphicsEndImageContext();
    return result;
}


+(UIImage *)changeColorTo:(NSMutableArray*) array Transparent: (UIImage *)image
{
    CGImageRef rawImageRef=image.CGImage;

//    const float colorMasking[6] = {222, 255, 222, 255, 222, 255};

     const float colorMasking[6] = {[[array objectAtIndex:0] floatValue], [[array objectAtIndex:1] floatValue], [[array objectAtIndex:2] floatValue], [[array objectAtIndex:3] floatValue], [[array objectAtIndex:4] floatValue], [[array objectAtIndex:5] floatValue]};


    UIGraphicsBeginImageContext(image.size);
    CGImageRef maskedImageRef=CGImageCreateWithMaskingColors(rawImageRef, colorMasking);
    {
        //if in iphone
        CGContextTranslateCTM(UIGraphicsGetCurrentContext(), 0.0, image.size.height);
        CGContextScaleCTM(UIGraphicsGetCurrentContext(), 1.0, -1.0);
    }

    CGContextDrawImage(UIGraphicsGetCurrentContext(), CGRectMake(0, 0, image.size.width, image.size.height), maskedImageRef);
    UIImage *result = UIGraphicsGetImageFromCurrentImageContext();
    CGImageRelease(maskedImageRef);
    UIGraphicsEndImageContext();
    return result;
}

+ (UIImage *)imageWithImage:(UIImage *)image scaledToSize:(CGSize)newSize {
    //UIGraphicsBeginImageContext(newSize);
    UIGraphicsBeginImageContextWithOptions(newSize, NO, 0.0);
    [image drawInRect:CGRectMake(0, 0, newSize.width, newSize.height)];
    UIImage *newImage = UIGraphicsGetImageFromCurrentImageContext();
    UIGraphicsEndImageContext();
    return newImage;
}


@end
我用下面的代码将移除的白色更改为透明...
调用将会是...
self.rawImage.image=[UIImage changeWhiteColorTransparent:originalStateImage];
我希望这个想法能对你有所帮助...
changeColorTo方法的使用例子吗?例如,数组参数应该包含什么? - TysonchangeColorTo 方法是否满足我的需求? - TysonUIGraphicsBeginImageContextWithOptions()。 - Devfly你好,使用这个类文件来改变整张图片的颜色....
.h文件:
#import <UIKit/UIKit.h>

@interface UIImage (AddtionalFunctionalities)

//TintColor...
- (UIImage *)imageWithTint:(UIColor *)tintColor;
//scale and resize...
-(UIImage*)scaleToSize:(CGSize)size;

@end
.m文件:
#import "UIImage+AddtionalFunctionalities.h"

@implementation UIImage (AddtionalFunctionalities)


- (UIImage *)imageWithTint:(UIColor *)tintColor
{
    // Begin drawing
    CGRect aRect = CGRectMake(0.f, 0.f, self.size.width, self.size.height);
    CGImageRef alphaMask;

    //
    // Compute mask flipping image
    //
    {
        UIGraphicsBeginImageContext(aRect.size);
        CGContextRef c = UIGraphicsGetCurrentContext();

        // draw image
        CGContextTranslateCTM(c, 0, aRect.size.height);
        CGContextScaleCTM(c, 1.0, -1.0);
        [self drawInRect: aRect];

        alphaMask = CGBitmapContextCreateImage(c);

        UIGraphicsEndImageContext();
    }

    //
    UIGraphicsBeginImageContext(aRect.size);

    // Get the graphic context
    CGContextRef c = UIGraphicsGetCurrentContext();

    // Draw the image
    [self drawInRect:aRect];

    // Mask
    CGContextClipToMask(c, aRect, alphaMask);

    // Set the fill color space
    CGColorSpaceRef colorSpace = CGColorSpaceCreateDeviceRGB();
    CGContextSetFillColorSpace(c, colorSpace);

    // Set the fill color
    CGContextSetFillColorWithColor(c, tintColor.CGColor);

    UIRectFillUsingBlendMode(aRect, kCGBlendModeNormal);

    UIImage *img = UIGraphicsGetImageFromCurrentImageContext();
    UIGraphicsEndImageContext();

    // Release memory
    CGColorSpaceRelease(colorSpace);
    CGImageRelease(alphaMask);

    return img;
}


-(UIImage*)scaleToSize:(CGSize)size
{
    // Create a bitmap graphics context
    // This will also set it as the current context
    UIGraphicsBeginImageContext(size);

    // Draw the scaled image in the current context
    [self drawInRect:CGRectMake(0, 0, size.width, size.height)];

    // Create a new image from current context
    UIImage* scaledImage = UIGraphicsGetImageFromCurrentImageContext();

    // Pop the current context from the stack
    UIGraphicsEndImageContext();

    // Return our new scaled image
    return scaledImage;
}

@end
该方法的调用将是:
self.outputImage.image=[sourceImage imageWithTint:[UIColor redColor]];
如果你想使用图片,请使用这个:
self.outputImage.image=[sourceImage imageWithTint:[UIColor colorWithPatternImage:[UIImage imageNamed: @"red.jpg"]]];
希望这可以帮到您...
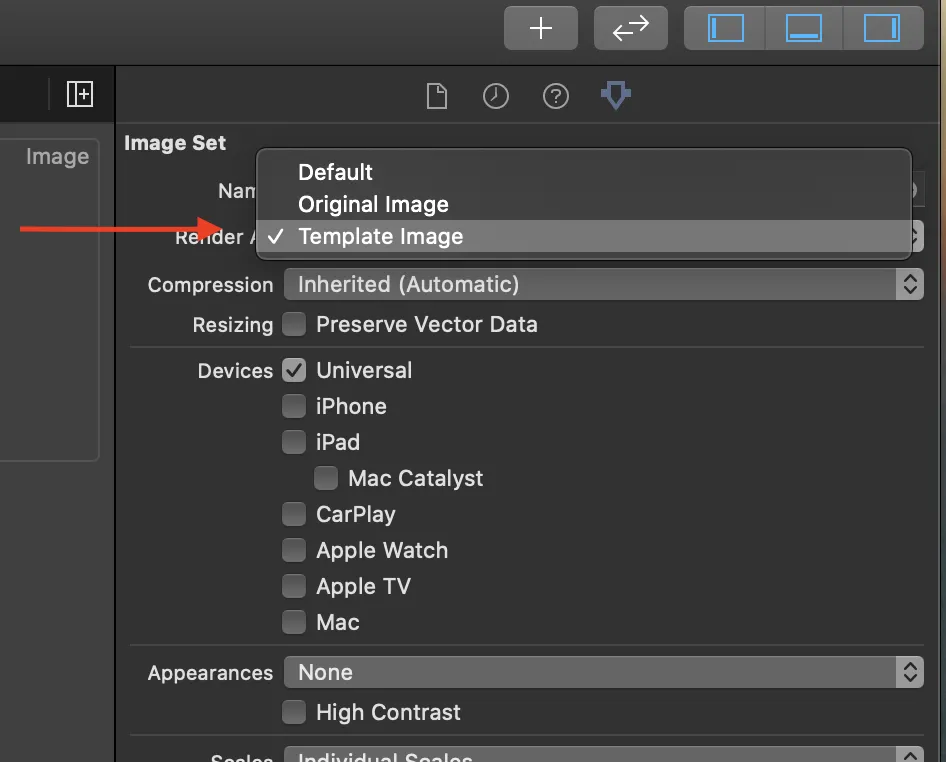
设置图像渲染模式,然后使用tintcolor属性进行颜色处理。
yourImageView.image = [image imageWithRenderingMode:UIImageRenderingModeAlwaysTemplate];
[yourImageView setTintColor:[UIColor redColor]];
// use extension UIImage
newImageView = createNewImageView(x: 100)
newImageView.image =  UIImage(named: "Apple")?.imageWithColor(newColor: UIColor.blue)

// use extension UIImageView
newImageView = createNewImageView(x: 160)
newImageView.image =  UIImage(named: "Apple")
newImageView.imageColor = UIColor.green
您可以创建一个包含UIImageView的UIView,并更改UIView的背景颜色。
UIView *viewForImage = ....;
UIImageView *imageView = .....;
...

[viewForImage addSubview: imageView];
[self.view addSubview:viewForImage];
...
然后可以使用例如
[viewForImage setBackgroundColor: [UIColor redColor]];
如果使用Objective-C来处理图像,主要需要使用Quartz 2D/CoreGraphics框架。我认为这将是您完成任务最简单的方式。
Quartz 2D指南的链接在这里,该指南非常详尽。只需在位图填充颜色方面查看即可。
此外,在我的博客中有一些关于图像处理的记录,您可以浏览,这可能会有所帮助。 http://levonp.blogspot.de/2012/05/quartz-getting-diff-images-of-two.html
当然,您也可以使用更高级的东西,如OpenGL、OpenCV等。
iOS 13.0
Obj-C:
self.yourImageView.image = [self.yourImageView.image imageWithTintColor:[UIColor.redColor]];
Swift:
yourImageView.image = yourImageView.image.withTintColor(UIColor.red);