如何更改Material UI TextField的边框颜色

125

我似乎无法弄清如何更改带轮廓的变体TextField的轮廓颜色。

我在GitHub问题中查看了一下,人们似乎指向使用TextField的“InputProps”属性,但这似乎没有任何作用。

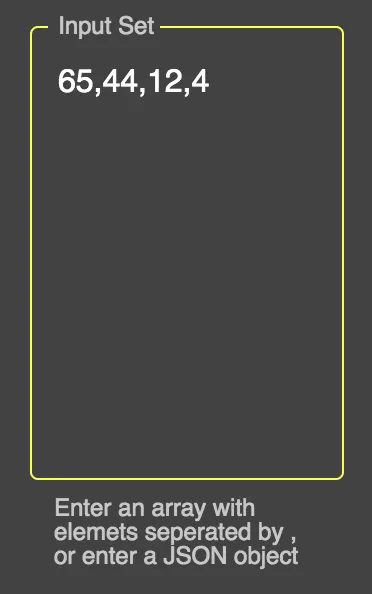
This is the field

这是我的代码目前的状态

import React from 'react';
import { withStyles } from '@material-ui/core/styles';
import TextField from '@material-ui/core/TextField';
import PropTypes from 'prop-types';

const styles = theme => ({
  field: {
    marginLeft: theme.spacing.unit,
    marginRight: theme.spacing.unit,
    height: '30px !important'
  },
});

class _Field extends React.Component {
      render() {
          const { classes, fieldProps } = this.props;
             return (
                <TextField
                {...fieldProps}
                label={this.props.label || "<Un-labeled>"}
                InputLabelProps={{ shrink: true }} // stop from animating.
                inputProps={{ className: classes.fieldInput }}
                className={classes.field}
                margin="dense"
               variant="outlined"
            />
        );
    }
}

_Field.propTypes = {
    label: PropTypes.string,
    fieldProps: PropTypes.object,
    classes: PropTypes.object.isRequired
}

export default withStyles(styles)(_Field);
23个回答

103

https://codesandbox.io/s/6rx8p

<CssTextField
  label="Username"
  className="username"
  name="username"
  onChange={this.onChange}
  type="text"
  autoComplete="current-password"
  margin="normal"
  inputProps={{ style: { fontFamily: 'nunito', color: 'white' } }}
/>

//declare the const and add the material UI style
const CssTextField = withStyles({
  root: {
    '& label.Mui-focused': {
      color: 'white',
    },
    '& .MuiInput-underline:after': {
      borderBottomColor: 'yellow',
    },
    '& .MuiOutlinedInput-root': {
      '& fieldset': {
        borderColor: 'white',
      },
      '&:hover fieldset': {
        borderColor: 'white',
      },
      '&.Mui-focused fieldset': {
        borderColor: 'yellow',
      },
    },
  },
})(TextField);

非常有帮助,谢谢 =) - jonathasborges1
你的颜色属性是否正常工作? - Priyen Mehta

66

35

如果有人想使用styled-components进行此操作:

import styled from "styled-components";
import {TextField} from "@material-ui/core";

const WhiteBorderTextField = styled(TextField)`
  & label.Mui-focused {
    color: white;
  }
  & .MuiOutlinedInput-root {
    &.Mui-focused fieldset {
      border-color: white;
    }
  }
`;

我花了太多时间才弄清楚这个问题,希望它能帮助到有需要的人。


你真是个救命稻草。 - zazvorniki
你真是救命恩人。 - undefined

28
const styles = theme => ({
  notchedOutline: {
    borderWidth: "1px",
    borderColor: "yellow !important"
  }
});

 <TextField
              variant="outlined"
              rows="10"
              fullWidth
              InputProps={{
                classes: {
                  notchedOutline: classes.notchedOutline
                }
              }}
              id="standard-textarea"
              label="Input Set"
              helperText="Enter an array with elemets seperated by , or enter a JSON object"
              placeholder="Placeholder"
              multiline
              value={"" + this.props.input}
              onChange={this.props.handleChangeValue("input")}
              className={classes.textField}
              margin="normal"
            />

输入图像描述


27

(此答案是针对 Material-UI v4 编写的,但我认为通常思路也适用于 v5。)

输入框边框的问题在于您想要设置的颜色比 Material-UI(MUI)设置的原始样式具有更低的具体性

例如,当聚焦时,MUI 设置了这个类:

.MuiOutlinedInput-root.Mui-focused .MuiOutlinedInput-notchedOutline {
    border-color: (some color);
}

比如说,这个选择器比自定义选择器更具体。
.Component-cssNotchedOutline {
    border-color: #f0f;
}

解决方案A (不推荐)

您可以在颜色上添加!important的例外,但这是'不良实践'

import React from 'react';
import { createStyles, TextField, WithStyles, withStyles } from '@material-ui/core';
interface IProps extends WithStyles<typeof styles> {}

const styles = createStyles({
    notchedOutline: { borderColor: '#f0f !important' },
});

export const TryMuiA = withStyles(styles)((props: IProps) => {
    const { classes } = props;
    return ( <TextField variant={ 'outlined' } label={ 'my label' }
        InputProps={ {
            classes: {
                notchedOutline: classes.notchedOutline,
            },
        } }
    /> );
});

解决方案 B (推荐)

正式 MUI 示例 使用其他方法来增加特异性。

“诀窍”是不直接对元素进行样式设置,比如:

.someChildElement { border-color: #f0f }

但是要添加一些额外的选择器(比MUI多的),例如:
.myRootElement.someExtra { border-color: #f0f }

或者:

.myRootElement .someChildElement { border-color: #f0f }

*(实际上,可能只需要使用与MUI相同的选择器, 因为如果选择器的特异性相同, 则使用“后面”的选择器。但在SSR的情况下,CSS规则的顺序可能会在重新加载后发生变化。)

包括父元素:您可能已经注意到,设置notchedOutline 确实为未聚焦的元素设置了颜色,但对于聚焦的元素没有设置。 这是因为MUI样式包括输入框的父元素.MuiOutlinedInput-root.Mui-focused)。 所以您需要同时包括父元素。

import React from 'react';
import { withStyles } from '@material-ui/core/styles';
import TextField from '@material-ui/core/TextField';

const styles = {
    root: {                           // - The TextField-root
        border: 'solid 3px #0ff',     // - For demonstration: set the TextField-root border
        padding: '3px',               // - Make the border more distinguishable

        // (Note: space or no space after `&` matters. See SASS "parent selector".)
        '& .MuiOutlinedInput-root': {  // - The Input-root, inside the TextField-root
            '& fieldset': {            // - The <fieldset> inside the Input-root
                borderColor: 'pink',   // - Set the Input border
            },
            '&:hover fieldset': {
                borderColor: 'yellow', // - Set the Input border when parent has :hover
            },
            '&.Mui-focused fieldset': { // - Set the Input border when parent is focused 
                borderColor: 'green',
            },
        },
    },
};

export const TryMui = withStyles(styles)(function(props) {
    const { classes } = props;
    return (<TextField label="my label" variant="outlined"
        classes={ classes }
    />);
})

请注意,您可以以不同的方式增加特定性,例如,这种方法也可以(有点不同):
    '& fieldset.MuiOutlinedInput-notchedOutline': {
        borderColor: 'green',
    },

备注:只为增加特异性而添加选择器可能看起来有点“不干净”,当你实际上并不“需要”它们时。我认为确实如此,但这种解决方法有时是自从CSS被发明以来唯一的解决方案,因此被认为是“可以接受的”。

15

对于最新的MUI v5.2.2版本: 更改TextField颜色属性的两种主要方法如下:

第一种是通过使用InputProps和InputLabelProps: 首先,您可以创建一个some.module.css文件,在其中创建您的类:

.input-border {
    border-color: #3E68A8 !important;
}

.inputLabel {
    color: #3E68A8 !important;
}

.helper-text {
    text-transform: initial;
    font-size: 1rem !important;
}

之后你可以像这样应用它们:

            <TextField
              sx={{
                textTransform: 'uppercase',
              }}
              FormHelperTextProps={{
                classes: {
                  root: classes['helper-text'],
                },
              }}
              InputProps={{
                classes: {
                  notchedOutline: classes['input-border'],
                },
              }}
              InputLabelProps={{
                classes: {
                  root: classes.inputLabel,
                  focused: classes.inputLabel,
                },
              }}
            />

请注意,上述内容还显示了如何更改FormHelperText的颜色!

但是,如果您有多个输入字段,则最好的方法是使用@mui/material/styles中的createTheme覆盖所需的组件。

下面的示例显示了一些组件,其余的可以在开发工具中检查,在主题文件中,只需按Ctrl + Space即可显示所有可用的组件。示例:

import { createTheme, responsiveFontSizes } from '@mui/material/styles';

const theme = createTheme({
  components: {
    // CTRL + SPACE to find the component you would like to override.
    // For most of them you will need to adjust just the root...
    MuiTextField: {
      styleOverrides: {
        root: {
          '& label': {
            color: '#3E68A8',
          },
          '& label.Mui-focused': {
            color: '#3E68A8',
          },
          '& .MuiInput-underline:after': {
            borderBottomColor: '#3E68A8',
          },
          '& .MuiOutlinedInput-root': {
            '& fieldset': {
              borderColor: '#3E68A8',
            },
            '&:hover fieldset': {
              borderColor: '#3E68A8',
              borderWidth: '0.15rem',
            },
            '&.Mui-focused fieldset': {
              borderColor: '#3E68A8',
            },
          },
        },
      },
    },
    MuiFormHelperText: {
      styleOverrides: {
        root: {
          textTransform: 'initial',
          fontSize: '1rem',
        },
      },
    },
  },
});

export default responsiveFontSizes(theme);


仍在摸索createTheme()语法。这是一个完美的5.x版本语法示例,让我达到了需要的效果。非常感谢!+1 - None
非常感谢您的回答,但您能否分享一下我可以找到类名的参考资料?例如 .MuiOutlinedInput-root . & fieldset 这样的类名在哪里可以找到? - undefined

9
使用此覆盖CSS属性。
.MuiFormLabel-root.Mui-focused {
  color: red !important;
}
.MuiOutlinedInput-root.Mui-focused .MuiOutlinedInput-notchedOutline {
  border-color: red !important;
}


8
  inputProps={{ style: { fontFamily: 'nunito', color: 'white'}}}
(输入属性)是通过对文本字段中输入的输入数据进行样式处理来工作的,我们还可以使用className来自定义颜色。
      const CssTextField = withStyles({
     root: {
    '& label.Mui-focused': {
     color: 'white',
      },
     '& .MuiInput-underline:after': {
      borderBottomColor: 'yellow',
     },
    '& .MuiOutlinedInput-root': {
     '& fieldset': {
     borderColor: 'white',
     },
     '&:hover fieldset': {
      borderColor: 'white',
       },
     '&.Mui-focused fieldset': {
       borderColor: 'yellow',
     },
     },
    },

这种const样式作用于文本字段的外部部分...

Material UI的外部部分样式被要求修改...


5

以下是我为TextField组件的悬停状态和聚焦状态所做的操作:

MuiTextField: {
  styleOverrides: {
    root: {
      "& .MuiOutlinedInput-root:hover .MuiOutlinedInput-notchedOutline": {
        borderColor: "#ffb535",
      },
      "& .MuiOutlinedInput-root.Mui-focused  .MuiOutlinedInput-notchedOutline":
        {
          borderColor: "#ffb535",
        },
    },
  },
},

标签颜色怎么样? - gausoft

4

这是我解决问题的方法。

我想改变TextField在聚焦时的颜色。正如您已经知道的那样,Material Ui textField在聚焦时的默认颜色是蓝色。蓝色是主要颜色。

所以这就是我的修改方法。我进入外层组件App,然后定义了一个名为createMuiTheme的函数。这个函数返回一个称为palette的对象。在palette对象内可以提供您的颜色覆盖。您将使用material ui的ThemeProvider将新定义的颜色主题应用于您的应用程序,示例如下。有关更多澄清,请访问此链接https://material-ui.com/customization/palette/

import {createMuiTheme, ThemeProvider} from '@material-ui/core';
import FormInput from './FormInput';

const theme = createMuiTheme({
  palette: {
    primary: {
      main: "your own color", //this overide blue color
      light: "your own color", //overides light blue
      dark: "your own color", //overides dark blue color
    },
  },
});


//apply your new color theme to your app component
function App(){
return(
<ThemeProvider theme={theme}> //applies custom theme
   <FormInput/>
</ThemeProvider>
)
}

网页内容由stack overflow 提供, 点击上面的
可以查看英文原文,
原文链接