如何在UICollectionView中实现类似UITableView的滑动删除功能

24

我想问一下如何在UICollectionView中实现类似UITableView的滑动删除功能。我正在尝试寻找教程,但找不到。

此外,我正在使用PSTCollectionView包装器来支持iOS 5。

谢谢!

编辑: 滑动识别器已经很好了。 现在我需要的是与UITableView相同的功能,即取消删除模式,例如当用户点击单元格或表格视图中的空白区域时(也就是当用户点击删除按钮之外的区域)。 UITapGestureRecognizer不起作用,因为它仅检测触摸释放时的轻拍。 UITableView在手势开始时检测触摸(而不是在释放时),并立即取消删除模式。

7个回答

18

有一种更简单的解决方案可以避免使用手势识别器。这个方案是基于UIScrollViewUIStackView的组合。

  1. 首先,您需要创建两个容器视图 - 一个用于单元格的可见部分,另一个用于隐藏部分。将这些视图添加到UIStackView中,stackView将作为内容视图。确保这些视图具有相等的宽度,使用stackView.distribution = .fillEqually

  2. stackView嵌入启用分页的UIScrollView中。将scrollView限制在单元格的边缘。然后将stackView的宽度设置为scrollView的宽度的2倍,以便每个容器视图都具有单元格的宽度。

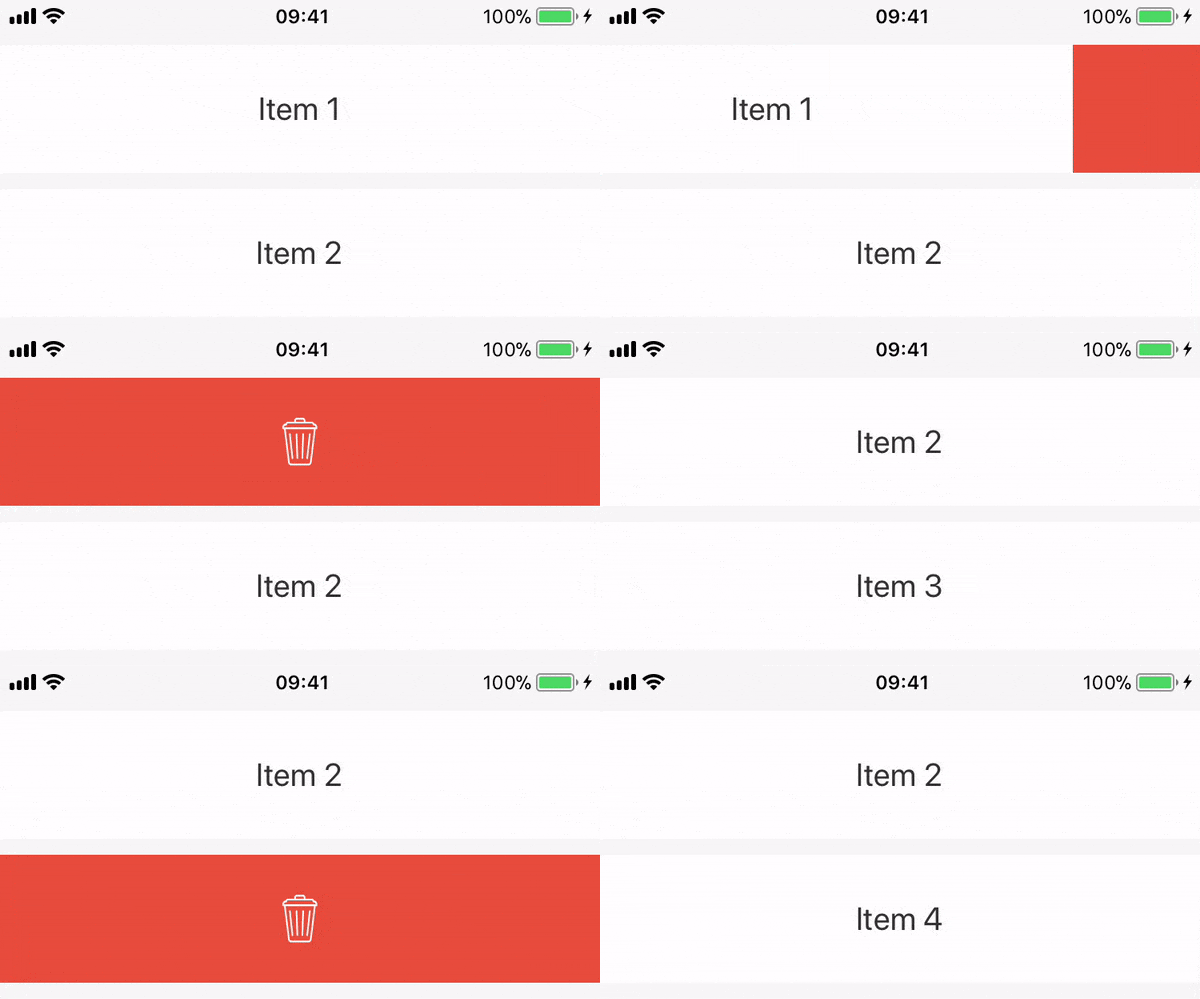
通过这个简单的实现,您已经创建了一个带有可见和隐藏视图的基本单元格。使用可见视图向单元格添加内容,在隐藏视图中可以添加删除按钮。这样您就可以实现以下效果:

滑动删除

我在GitHub上创建了一个示例项目。你也可以在这里阅读更多关于这个解决方案的信息
这个解决方案最大的优点是简单易用,而且你不必处理约束和手势识别。


很好的解决方案。这种方法使得可以同时滑动多个单元格来显示隐藏视图。你如何启用单个单元格选择?将 scrollView.setContentOffset 设置为零似乎没有帮助。 - Plutovman
此外,当在网格上实现时,意外删除一个单元格会导致一些重新排列的单元格打开(即显示删除按钮)。有什么见解吗?谢谢! - Plutovman
@Plutovman,删除单元格后,集合视图将重新加载单元格,并且将重用已打开删除按钮的单元格。您需要记住当前打开的单元格的indexPath,在出列单元格时,您需要检查indexPath是否与已打开单元格的indexPath匹配,并通过设置scrollView的contentOffset来打开它。当它被删除时,将indexPath设置为nil。 - Amer Hukic
你是绝对正确的。再次,优秀的解决方案做得很好。感觉UICollectionView应该内置此功能。 - Plutovman
@AmerHukic 嘿,很棒的解决方案。但是,我不确定你所说的将indexPath设置为nil是什么意思,能否详细说明一下?因为每次删除和重用单元格时,视图都停留在hiddenview上。我正在努力找出如何修复它。谢谢。 - xdai1091
@AmerHukic,我已经解决了。只需在prepareForReuse方法中将scrollView的contentOffset设置为0即可。谢谢。 - xdai1091

14
很简单。您需要在customContentView后面添加customBackgroundView,并将customContentView向左移动,当用户从右向左滑动时,移动视图使customBackgroundView可见。
让我们编写代码:
首先,您需要为UICollectionView添加panGesture。
   override func viewDidLoad() {
        super.viewDidLoad()
        self.panGesture = UIPanGestureRecognizer(target: self, action: #selector(self.panThisCell))
        panGesture.delegate = self
        self.collectionView.addGestureRecognizer(panGesture)

    }

现在将选择器实现为

  func panThisCell(_ recognizer:UIPanGestureRecognizer){

        if recognizer != panGesture{  return }

        let point = recognizer.location(in: self.collectionView)
        let indexpath = self.collectionView.indexPathForItem(at: point)
        if indexpath == nil{  return }
        guard let cell = self.collectionView.cellForItem(at: indexpath!) as? CustomCollectionViewCell else{

            return

        }
        switch recognizer.state {
        case .began:

            cell.startPoint =  self.collectionView.convert(point, to: cell)
            cell.startingRightLayoutConstraintConstant  = cell.contentViewRightConstraint.constant
            if swipeActiveCell != cell && swipeActiveCell != nil{

                self.resetConstraintToZero(swipeActiveCell!,animate: true, notifyDelegateDidClose: false)
            }
            swipeActiveCell = cell

        case .changed:

            let currentPoint =  self.collectionView.convert(point, to: cell)
            let deltaX = currentPoint.x - cell.startPoint.x
            var panningleft = false

            if currentPoint.x < cell.startPoint.x{

                panningleft = true

            }
            if cell.startingRightLayoutConstraintConstant == 0{

                if !panningleft{

                    let constant = max(-deltaX,0)
                    if constant == 0{

                        self.resetConstraintToZero(cell,animate: true, notifyDelegateDidClose: false)

                    }else{

                        cell.contentViewRightConstraint.constant = constant

                    }
                }else{

                    let constant = min(-deltaX,self.getButtonTotalWidth(cell))
                    if constant == self.getButtonTotalWidth(cell){

                        self.setConstraintsToShowAllButtons(cell,animate: true, notifyDelegateDidOpen: false)

                    }else{

                        cell.contentViewRightConstraint.constant = constant
                        cell.contentViewLeftConstraint.constant = -constant
                    }
                }
            }else{

                let adjustment = cell.startingRightLayoutConstraintConstant - deltaX;
                if (!panningleft) {

                    let constant = max(adjustment, 0);
                    if (constant == 0) {

                        self.resetConstraintToZero(cell,animate: true, notifyDelegateDidClose: false)

                    } else {

                        cell.contentViewRightConstraint.constant = constant;
                    }
                } else {
                    let constant = min(adjustment, self.getButtonTotalWidth(cell));
                    if (constant == self.getButtonTotalWidth(cell)) {

                        self.setConstraintsToShowAllButtons(cell,animate: true, notifyDelegateDidOpen: false)
                    } else {

                        cell.contentViewRightConstraint.constant = constant;
                    }
                }
                cell.contentViewLeftConstraint.constant = -cell.contentViewRightConstraint.constant;

            }
            cell.layoutIfNeeded()
        case .cancelled:

            if (cell.startingRightLayoutConstraintConstant == 0) {

                self.resetConstraintToZero(cell,animate: true, notifyDelegateDidClose: true)

            } else {

                self.setConstraintsToShowAllButtons(cell,animate: true, notifyDelegateDidOpen: true)
            }

        case .ended:

            if (cell.startingRightLayoutConstraintConstant == 0) {
                //Cell was opening
                let halfOfButtonOne = (cell.swipeView.frame).width / 2;
                if (cell.contentViewRightConstraint.constant >= halfOfButtonOne) {
                    //Open all the way
                    self.setConstraintsToShowAllButtons(cell,animate: true, notifyDelegateDidOpen: true)
                } else {
                    //Re-close
                    self.resetConstraintToZero(cell,animate: true, notifyDelegateDidClose: true)
                }
            } else {
                //Cell was closing
                let buttonOnePlusHalfOfButton2 = (cell.swipeView.frame).width
                if (cell.contentViewRightConstraint.constant >= buttonOnePlusHalfOfButton2) {
                    //Re-open all the way
                    self.setConstraintsToShowAllButtons(cell,animate: true, notifyDelegateDidOpen: true)
                } else {
                    //Close
                    self.resetConstraintToZero(cell,animate: true, notifyDelegateDidClose: true)
                }
            }

        default:
            print("default")
        }
    }

更新约束的辅助方法

 func getButtonTotalWidth(_ cell:CustomCollectionViewCell)->CGFloat{

        let width = cell.frame.width - cell.swipeView.frame.minX
        return width

    }

    func resetConstraintToZero(_ cell:CustomCollectionViewCell, animate:Bool,notifyDelegateDidClose:Bool){

        if (cell.startingRightLayoutConstraintConstant == 0 &&
            cell.contentViewRightConstraint.constant == 0) {
            //Already all the way closed, no bounce necessary
            return;
        }
        cell.contentViewRightConstraint.constant = -kBounceValue;
        cell.contentViewLeftConstraint.constant = kBounceValue;
        self.updateConstraintsIfNeeded(cell,animated: animate) {
            cell.contentViewRightConstraint.constant = 0;
            cell.contentViewLeftConstraint.constant = 0;

            self.updateConstraintsIfNeeded(cell,animated: animate, completionHandler: {

                cell.startingRightLayoutConstraintConstant = cell.contentViewRightConstraint.constant;
            })
        }
        cell.startPoint = CGPoint()
        swipeActiveCell = nil
    }

    func setConstraintsToShowAllButtons(_ cell:CustomCollectionViewCell, animate:Bool,notifyDelegateDidOpen:Bool){

        if (cell.startingRightLayoutConstraintConstant == self.getButtonTotalWidth(cell) &&
            cell.contentViewRightConstraint.constant == self.getButtonTotalWidth(cell)) {
            return;
        }
        cell.contentViewLeftConstraint.constant = -self.getButtonTotalWidth(cell) - kBounceValue;
        cell.contentViewRightConstraint.constant = self.getButtonTotalWidth(cell) + kBounceValue;

        self.updateConstraintsIfNeeded(cell,animated: animate) {
            cell.contentViewLeftConstraint.constant =  -(self.getButtonTotalWidth(cell))
            cell.contentViewRightConstraint.constant = self.getButtonTotalWidth(cell)

            self.updateConstraintsIfNeeded(cell,animated: animate, completionHandler: {(check) in

                cell.startingRightLayoutConstraintConstant = cell.contentViewRightConstraint.constant;
            })
        }
    }

    func setConstraintsAsSwipe(_ cell:CustomCollectionViewCell, animate:Bool,notifyDelegateDidOpen:Bool){

        if (cell.startingRightLayoutConstraintConstant == self.getButtonTotalWidth(cell) &&
            cell.contentViewRightConstraint.constant == self.getButtonTotalWidth(cell)) {
            return;
        }
        cell.contentViewLeftConstraint.constant = -self.getButtonTotalWidth(cell) - kBounceValue;
        cell.contentViewRightConstraint.constant = self.getButtonTotalWidth(cell) + kBounceValue;

        self.updateConstraintsIfNeeded(cell,animated: animate) {
            cell.contentViewLeftConstraint.constant =  -(self.getButtonTotalWidth(cell))
            cell.contentViewRightConstraint.constant = self.getButtonTotalWidth(cell)

            self.updateConstraintsIfNeeded(cell,animated: animate, completionHandler: {(check) in

                cell.startingRightLayoutConstraintConstant = cell.contentViewRightConstraint.constant;
            })
        }
    }


    func updateConstraintsIfNeeded(_ cell:CustomCollectionViewCell, animated:Bool,completionHandler:@escaping ()->()) {
        var duration:Double = 0
        if animated{

            duration = 0.1

        }
        UIView.animate(withDuration: duration, delay: 0, options: [.curveEaseOut], animations: {

            cell.layoutIfNeeded()

            }, completion:{ value in

                if value{ completionHandler() }
        })
    }

我用Swift 3创建了一个示例项目这里

这是这个教程的改编版本。


1
优秀的示例,这是您应该在Swift 3和2017+中使用的示例。 - Aleksandar Vacić
感觉与UITableView完全不同。它还存在故障,可以出现多个单元格处于滑动状态的情况。然后当点击第一个被滑动的单元格时,会崩溃。我不建议在没有正确修复它的情况下采用和使用这个解决方案。iOS 14增加了本地API,请查看leadingSwipeActionsConfigurationProvidertrailingSwipeActionsConfigurationProvider - Ortwin Gentz

13
在iOS的《集合视图编程指南》中,在整合手势支持一节中,文档中写道:
您应该始终将手势识别器附加到集合视图本身,而不是特定的单元格或视图。
因此,我认为向UICollectionViewCell添加识别器不是一个好的实践。

3
我采用了与@JacekLampart类似的方法,但决定将UISwipeGestureRecognizer添加到UICollectionViewCell的awakeFromNib函数中,以便仅添加一次。
UICollectionViewCell.m
- (void)awakeFromNib {
    UISwipeGestureRecognizer* swipeGestureRecognizer = [[UISwipeGestureRecognizer alloc] initWithTarget:self action:@selector(swipeToDeleteGesture:)];
    swipeGestureRecognizer.direction = UISwipeGestureRecognizerDirectionLeft;
    [self addGestureRecognizer:swipeGestureRecognizer];
}

- (void)swipeToDeleteGesture:(UISwipeGestureRecognizer *)swipeGestureRecognizer {
    if (swipeGestureRecognizer.state == UIGestureRecognizerStateEnded) {
        // update cell to display delete functionality
    }
}

关于退出删除模式,我创建了一个包含UIView数组的自定义UIGestureRecognizer。我从这个问题中借鉴了@iMS的想法: UITapGestureRecognizer - make it work on touch down, not touch up? 在touchesBegan中,如果触摸点不在任何UIView内,则手势成功并退出删除模式。
通过这种方式,我能够将单元格中的删除按钮(和其他任何视图)传递给UIGestureRecognizer,并且如果触摸点在按钮的框架内,删除模式将不会退出。
TouchDownExcludingViewsGestureRecognizer.h
#import <UIKit/UIKit.h>

@interface TouchDownExcludingViewsGestureRecognizer : UIGestureRecognizer

@property (nonatomic) NSArray *excludeViews;

@end

TouchDownExcludingViewsGestureRecognizer.m

#import "TouchDownExcludingViewsGestureRecognizer.h"
#import <UIKit/UIGestureRecognizerSubclass.h>

@implementation TouchDownExcludingViewsGestureRecognizer

- (void)touchesBegan:(NSSet *)touches withEvent:(UIEvent *)event {
    if (self.state == UIGestureRecognizerStatePossible) {
        BOOL touchHandled = NO;
        for (UIView *view in self.excludeViews) {
            CGPoint touchLocation = [[touches anyObject] locationInView:view];
            if (CGRectContainsPoint(view.bounds, touchLocation)) {
                touchHandled = YES;
                break;
            }
        }

        self.state = (touchHandled ? UIGestureRecognizerStateFailed : UIGestureRecognizerStateRecognized);
    }
}

- (void)touchesMoved:(NSSet *)touches withEvent:(UIEvent *)event {
    self.state = UIGestureRecognizerStateFailed;
}

-(void)touchesEnded:(NSSet *)touches withEvent:(UIEvent *)event {
    self.state = UIGestureRecognizerStateFailed;
}


@end

在包含UICollectionView的UIViewController中的实现:

#import "TouchDownExcludingViewsGestureRecognizer.h"

TouchDownExcludingViewsGestureRecognizer *touchDownGestureRecognizer = [[TouchDownExcludingViewsGestureRecognizer alloc] initWithTarget:self action:@selector(exitDeleteMode:)];
touchDownGestureRecognizer.excludeViews = @[self.cellInDeleteMode.deleteButton];
[self.view addGestureRecognizer:touchDownGestureRecognizer];

- (void)exitDeleteMode:(TouchDownExcludingViewsGestureRecognizer *)touchDownGestureRecognizer {
    // exit delete mode and disable or remove TouchDownExcludingViewsGestureRecognizer
}

2
您可以尝试为每个集合单元格添加UISwipeGestureRecognizer,像这样:
-(UICollectionViewCell *)collectionView:(UICollectionView *)collectionView
             cellForItemAtIndexPath:(NSIndexPath *)indexPath
{
    CollectionViewCell *cell = ...

    UISwipeGestureRecognizer* gestureRecognizer = [[UISwipeGestureRecognizer alloc] initWithTarget:self action:@selector(userDidSwipe:)];
    [gestureRecognizer setDirection:UISwipeGestureRecognizerDirectionRight];
    [cell addGestureRecognizer:gestureRecognizer];
}

接下来是:

- (void)userDidSwipe:(UIGestureRecognizer *)gestureRecognizer {
    if (gestureRecognizer.state == UIGestureRecognizerStateEnded) {
        //handle the gesture appropriately
    }
}

感谢您的回复!不过,UITableView的滑动删除功能允许用户在触摸屏幕时取消删除。我似乎无法正确实现这一点。您有什么建议吗? - MiuMiu
同样的方式:在“适当处理手势”部分创建一个UITapGestureRecognizer。 - Jacek Lampart

2
使用iOS 14,您可以将UICollectionViewLayoutListConfigurationUICollectionViewCompositionalLayout结合使用,从而免费获得此功能,无需自定义单元格或手势识别。
如果您的最低部署目标是>= iOS 14.x,则从现在开始,这可能是首选方法,并且它还将让您采用现代单元格配置UIContentViewUIContentConfiguration

1

实现此功能的更标准的解决方案是使用与 UITableView 提供的非常相似的行为。

为此,您将使用一个 UIScrollView 作为单元格的根视图,然后在滚动视图内部定位单元格内容和删除按钮。您的单元格类中的代码应该类似于以下内容:

override init(frame: CGRect) {
    super.init(frame: frame)

    addSubview(scrollView)
    scrollView.addSubview(viewWithCellContent)
    scrollView.addSubview(deleteButton)
    scrollView.isPagingEnabled = true
    scrollView.showsHorizontalScrollIndicator = false
}

在这段代码中,我们将属性isPagingEnabled设置为true,使滚动视图仅在其内容边界处停止滚动。此单元格的布局子视图应该类似于:
override func layoutSubviews() {
    super.layoutSubviews()

    scrollView.frame = bounds
    // make the view with the content to fill the scroll view
    viewWithCellContent.frame = scrollView.bounds
    // position the delete button just at the right of the view with the content.
    deleteButton.frame = CGRect(
        x: label.frame.maxX, 
        y: 0, 
        width: 100, 
        height: scrollView.bounds.height
    )

    // update the size of the scrolleable content of the scroll view
    scrollView.contentSize = CGSize(width: button.frame.maxX, height: scrollView.bounds.height)
}

有了这段代码,如果你运行应用程序,你会发现滑动删除功能按预期工作,但是我们失去了选择单元格的能力。问题在于,由于滚动视图填充整个单元格,所有的触摸事件都由它处理,因此集合视图将永远没有机会选择单元格(这类似于当我们在单元格内部有一个按钮时,因为该按钮上的触摸不会触发选择过程,而是直接由按钮处理)。要解决这个问题,我们只需要告诉滚动视图忽略由它处理而不是由它的子视图处理的触摸事件。为了实现这一点,只需创建UIScrollView的一个子类并重写以下函数:
override func hitTest(_ point: CGPoint, with event: UIEvent?) -> UIView? {
    let result = super.hitTest(point, with: event)
    return result != self ? result : nil
}

现在你的单元格中应该使用这个新子类的实例,而不是标准的UIScrollView

如果你现在运行应用程序,你会发现我们已经恢复了单元格选择,但是这次滑动不起作用。由于我们忽略了直接由滚动视图处理的触摸,那么它的平移手势识别器将无法开始识别触摸事件。然而,这可以通过指示滚动视图其平移手势识别器将由单元格而不是滚动处理来轻松解决。你可以在单元格的init(frame: CGRect)底部添加以下行来完成此操作:

addGestureRecognizer(scrollView.panGestureRecognizer)

这可能看起来有点像hacky,但它并不是。按设计,包含手势识别器的视图和该识别器的目标对象不必是同一个对象。
进行此更改后,所有内容应如预期工作。您可以在此存储库中查看此想法的完整实现。

网页内容由stack overflow 提供, 点击上面的
可以查看英文原文,
原文链接