我回答这个问题已经太晚了,但是最终,我使用了一些Android本地代码和当然还有Flutter代码来实现。那么,让我们从头开始一步步来。
1.) 打开你的build.gradle文件 (路径:android>app>build.gradle),添加Firebase消息依赖,之后通过Android Studio同步该文件。
implementation 'com.google.firebase:firebase-messaging'
2.) 在 MainActivity 的文件路径下创建一个名为 MyApplication.java 的新文件 (路径 android>app>src>main>kotlin>com>yourpackage>MyApplication.java)
import android.app.NotificationChannel;
import android.app.NotificationManager;
import android.content.Context;
import android.os.Build;

import io.flutter.app.FlutterApplication;
import io.flutter.plugin.common.PluginRegistry;
import io.flutter.plugins.firebasemessaging.FlutterFirebaseMessagingService;
import io.flutter.plugins.pathprovider.PathProviderPlugin;

public class MyApplication extends FlutterApplication implements PluginRegistry.PluginRegistrantCallback {

    @Override
    public void onCreate() {
        super.onCreate();
        this.createChannel();
        FlutterFirebaseMessagingService.setPluginRegistrant(this);
    }

    @Override
    public void registerWith(PluginRegistry registry) {
        io.flutter.plugins.firebasemessaging.FirebaseMessagingPlugin.registerWith(registry.registrarFor("io.flutter.plugins.firebasemessaging.FirebaseMessagingPlugin"));
        PathProviderPlugin.registerWith(registry.registrarFor("io.flutter.plugins.pathprovider.PathProviderPlugin"));
    }

    private void createChannel(){
        if (Build.VERSION.SDK_INT >= Build.VERSION_CODES.O) {
            String name = getString(R.string.default_notification_channel_id);
            NotificationChannel channel = new NotificationChannel(name, "default", NotificationManager.IMPORTANCE_HIGH);
            NotificationManager notificationManager = (NotificationManager) getSystemService(Context.NOTIFICATION_SERVICE);
            notificationManager.createNotificationChannel(channel);
        }
    }
}
3.) 前往你的Android应用清单文件 (路径为 android>app>src>main>AndroidManifest.xml),将<application android:name标签替换为".MyApplication",如下所示:
<application
        android:name=".MyApplication" //replace your name with .MyApplication
        android:label="helpwise"
        android:icon="@mipmap/ic_launcher">
4.) 现在您需要在Flutter项目中添加Firebase消息传送依赖项。因此,请在pubspec.yaml中添加。
firebase_messaging: ^6.0.9
5.) 将Firebase代码添加到您的main.dart文件中
Future<dynamic> myBackgroundMessageHandler(Map<String, dynamic> message) {
if (message.containsKey('data')) {
final dynamic data = message['data'];
print('Notification data is ');
print(message['data']);
}
if (message.containsKey('notification')) {
final dynamic notification = message['notification'];
}
}
class SelectMailbox extends StatefulWidget {
static const routeName = '/mailbox-screen';
@override
_SelectMailboxState createState() => _SelectMailboxState();
}
class _SelectMailboxState extends State<SelectMailbox> {
final FirebaseMessaging _firebaseMessaging = FirebaseMessaging();
@override
void initState() {
_firebaseMessaging.getToken().then((token) async{
SharedPreferences preferences = await SharedPreferences.getInstance();
final String userData = preferences.get('userData');
final String authToken=jsonDecode(userData)['token'];
print("Device token is $token");
await http.post("https://your_domain/mobile/save-token",
headers: {"Content-Type": "application/json"},
body: jsonEncode({"device_token": token,"type":"android","token":authToken}));
});
_firebaseMessaging.configure(
onMessage: (Map<String, dynamic> message) async {
}, onBackgroundMessage: Platform.isAndroid?myBackgroundMessageHandler:null,
onResume: (Map<String, dynamic> message) async {
print("onBackground Message $message");
_selectIdsNotification(message['data']['thread_id'],message['data']['mailbox_id'],14,message['data']['mailboxType'],"All",context);
}, onLaunch: (Map<String, dynamic> message) async {
print("onLaunch Message $message");
_selectIdsNotification(message['data']['thread_id'],message['data']['mailbox_id'],14,message['data']['mailboxType'],"All",context);
});
super.initState();
}
_selectIdsNotification(threadID,mailboxId,subBox,mailboxType,mailboxTab,myContext) async {
Navigator.push(
myContext,
MaterialPageRoute(
builder: (context) => ThreadDetail(threadID, mailboxType,notificationMailboxId: mailboxId),
),
);
}
6.) 再次进入你的AndroidManifest文件,在activity标签和metadata标签代码闭合标签之后添加intent filter代码
    <application
            android:name=".MyApplication"
            android:label="helpwise"
            android:icon="@mipmap/ic_launcher">
            <activity
                android:name=".MainActivity"
                android:launchMode="singleTop"
                android:theme="@style/LaunchTheme"
                android:configChanges="orientation|keyboardHidden|keyboard|screenSize|smallestScreenSize|locale|layoutDirection|fontScale|screenLayout|density|uiMode"
                android:hardwareAccelerated="true"
                android:windowSoftInputMode="adjustResize">

                <meta-data
                  android:name="io.flutter.embedding.android.NormalTheme"
                  android:resource="@style/NormalTheme"
                  />
                <meta-data
                  android:name="io.flutter.embedding.android.SplashScreenDrawable"
                  android:resource="@drawable/launch_background"
                  />
                <intent-filter>
                    <action android:name="android.intent.action.MAIN"/>
                    <category android:name="android.intent.category.LAUNCHER"/>
                </intent-filter>
    <-- ADD THIS INTENT FILTER IN YOUR CODE -->
                <intent-filter>
                    <action android:name="FLUTTER_NOTIFICATION_CLICK" />
                    <category android:name="android.intent.category.DEFAULT" />
                </intent-filter>

            </activity>
            <meta-data
                android:name="flutterEmbedding"
                android:value="2" />
 <-- ADD THIS META DATA TAG IN YOUR CODE -->
            <meta-data android:name="com.google.firebase.messaging.default_notification_channel_id"
                       android:value="@string/default_notification_channel_id" />
        </application>
7.) 现在前往安卓value文件夹路径(android>app>src>main>res>values>strings.xml)。如果您没有看到strings.xml文件,则在相同路径下创建一个文件,并添加以下代码
<?xml version="1.0" encoding="utf-8"?>
<resources>
    <string name="default_notification_channel_id">default_notification_channel_id</string>
</resources>
10.) 就是这样了,现在您需要重新启动应用程序并调用Firebase消息通知API到设备令牌。
ar axios = require('axios');
var data = JSON.stringify(
{
"to": "your_mobile_device_token",
"data": {
"mailbox_id": "11111",
"thread_id": "1111",
"mailboxType": "email",
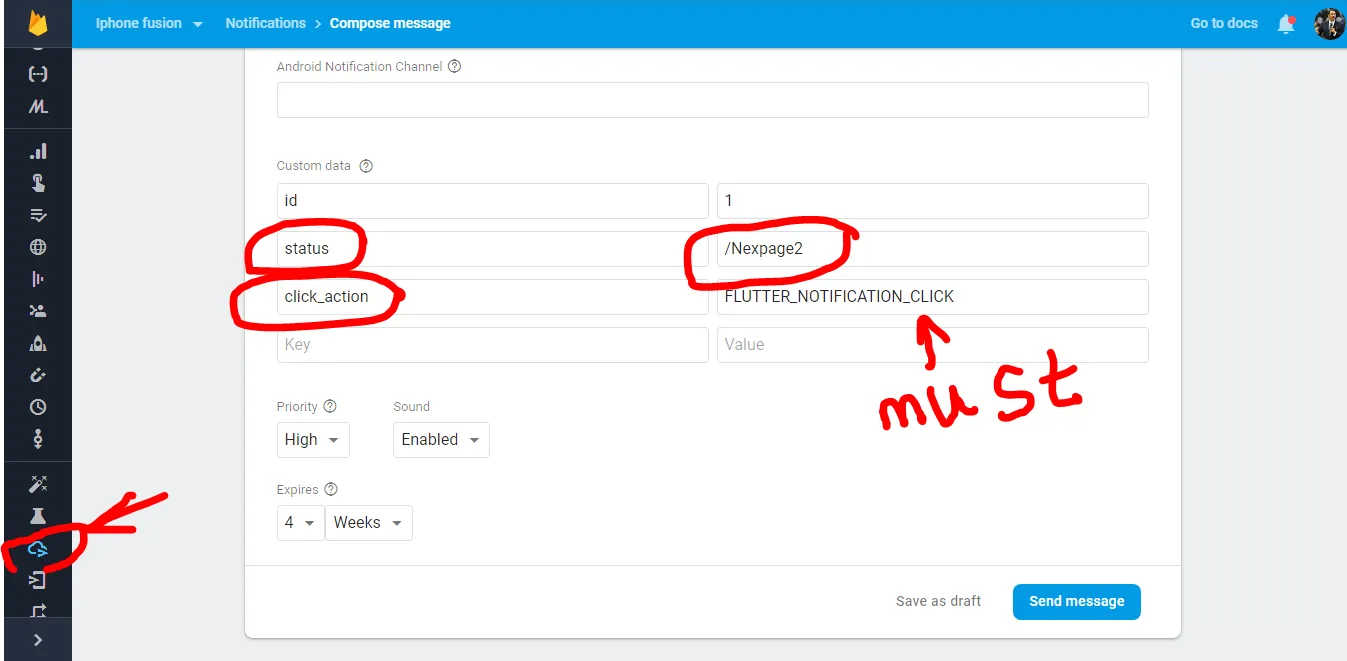
"click_action": "FLUTTER_NOTIFICATION_CLICK"
},
"priority": "high",
"notification": {
"body": "Hi, You have received new Message",
"title": "Flutter",
"image": "your_image_cdn_path"
},
"click_action": "FLUTTER_NOTIFICATION_CLICK"
});
var config = {
method: 'post',
url: 'https://fcm.googleapis.com/fcm/send',
headers: {
'Authorization': 'key=your_firebase_server_key',
'Content-Type': 'application/json'
},
data : data
};
axios(config)
.then(function (response) {
console.log(JSON.stringify(response.data));
})
.catch(function (error) {
console.log(error);
});