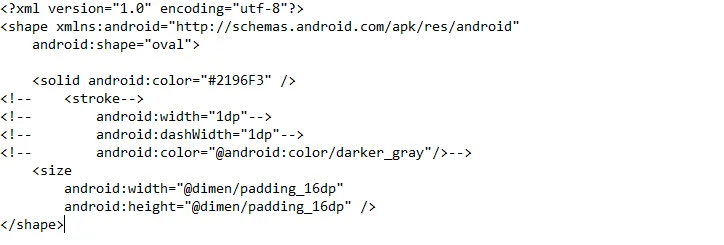
有没有一种简单的方法从现有的矢量图中生成一个圆形的Vector Drawable,其中包含图标?
示例:


我建议像这样:
<layer-list xmlns:android="http://schemas.android.com/apk/res/android">
    <item
    android:gravity="fill"
    android:drawable="@drawable/ic_brightness_1_black_24dp"

    />
    <item
        android:gravity="center"
        android:drawable="@drawable/ic_call_black_24dp"
        android:top="20dp"
        android:bottom="20dp"
        android:left="20dp"
        android:right="20dp"
        />

</layer-list>
id为ic_brightness_1_black_24dp和ic_call_black_24dp的资源是导入的矢量可绘制图像。
ic_brightness_1_black_24dp:
<vector xmlns:android="http://schemas.android.com/apk/res/android"
        android:width="24dp"
        android:height="24dp"
        android:viewportWidth="24.0"
        android:viewportHeight="24.0">
    <path
        android:fillColor="#303F9F"
        android:pathData="M12,12m-10,0a10,10 0,1 1,20 0a10,10 0,1 1,-20 0"/>
</vector>
和ic_call_black_24dp:
<vector xmlns:android="http://schemas.android.com/apk/res/android"
        android:width="24dp"
        android:height="24dp"
        android:viewportWidth="24.0"
        android:viewportHeight="24.0">
    <path
        android:fillColor="#FFFFFF"
        android:pathData="M6.62,10.79c1.44,2.83 3.76,5.14 6.59,6.59l2.2,-2.2c0.27,-0.27 0.67,-0.36 1.02,-0.24 1.12,0.37 2.33,0.57 3.57,0.57 0.55,0 1,0.45 1,1V20c0,0.55 -0.45,1 -1,1 -9.39,0 -17,-7.61 -17,-17 0,-0.55 0.45,-1 1,-1h3.5c0.55,0 1,0.45 1,1 0,1.25 0.2,2.45 0.57,3.57 0.11,0.35 0.03,0.74 -0.25,1.02l-2.2,2.2z"/>
</vector>
因为没有人提到如何使用矢量图形来完成此操作,所以在此介绍一种方法。
<vector xmlns:android="http://schemas.android.com/apk/res/android"
    android:width="144dp"
    android:height="144dp"
    android:viewportWidth="144"
    android:viewportHeight="144">

  <path
      android:pathData="M72,72m-50,0a50,50 0,1 1,100 0a50,50 0,1 1,-100 0"
      android:strokeWidth="9"
      android:fillColor="#00000000"
      android:strokeColor="#fff"/>

 </vector>


M72,72m -> circle's center coordinates
50` -> the circle's radius
100` -> circle's diameter
strokeWidth -> the ring's thickness
如果要制作一个圆盘而不是一个环,请更改fillColor
如果要使您的圆形大小减半,请将所有50出现的位置更改为25,将所有100出现的位置更改为50。根据需要更改其他大小。
要在视口内移动圆,请更改圆的坐标(即72个数字)
这些数字显然与视口大小有关。 72是此示例中定义的144的中心。要在200视口大小中将其居中,您需要使用100
实际上很简单,您只需要将这两个路径包含在一个向量中,因此对于您的路径,它应该如下所示:
<vector xmlns:android="http://schemas.android.com/apk/res/android"
        android:width="24dp"
        android:height="24dp"
        android:viewportWidth="24.0"
        android:viewportHeight="24.0">

    <path
        android:fillColor="#303F9F"
        android:pathData="M12,12m-10,0a10,10 0,1 1,20 0a10,10 0,1 1,-20 0"/>

    <path
        android:fillColor="#FFFFFF"
        android:pathData="M6.62,10.79c1.44,2.83 3.76,5.14 6.59,6.59l2.2,-2.2c0.27,-0.27 0.67,-0.36 1.02,-0.24 1.12,0.37 2.33,0.57 3.57,0.57 0.55,0 1,0.45 1,1V20c0,0.55 -0.45,1 -1,1 -9.39,0 -17,-7.61 -17,-17 0,-0.55 0.45,-1 1,-1h3.5c0.55,0 1,0.45 1,1 0,1.25 0.2,2.45 0.57,3.57 0.11,0.35 0.03,0.74 -0.25,1.02l-2.2,2.2z"/>

</vector>
显然,结果将取决于路径在彼此之间的大小关系,由于在没有图形工具的情况下对它们进行缩放是一件痛苦的事情,因此使用 DimDim 的解决方案 与 layer-list 更容易实现。
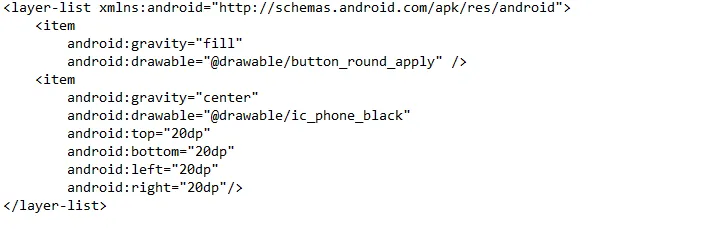
 对于button_round: