在WPF中,我如何为
FrameworkElement应用多个样式?例如,我有一个已经有样式的控件。我还有一个单独的样式,我希望将其添加到控件中而不会覆盖原来的样式。这些样式具有不同的TargetTypes,因此我不能仅仅使用一个样式来扩展另一个样式。FrameworkElement应用多个样式?例如,我有一个已经有样式的控件。我还有一个单独的样式,我希望将其添加到控件中而不会覆盖原来的样式。这些样式具有不同的TargetTypes,因此我不能仅仅使用一个样式来扩展另一个样式。我认为简单的答案是,在这个版本的WPF中,你至少不能做你想做的事情。
也就是说,对于任何特定的元素,只能应用一个样式。
然而,正如其他人在上面所述,也许你可以使用BasedOn来帮助你。请查看下面这段松散的XAML代码。在其中,您将看到我有一个基础样式,它设置了一个存在于我要应用两种样式的元素的基类上的属性。在第二个样式中,它是基于基础样式的,我设置了另一个属性。
因此,这里的想法是...如果你可以以元素的继承层次结构为依据,以某种方式分离出你想设置的属性...你可能会有一种解决方法。
<Page xmlns="http://schemas.microsoft.com/winfx/2006/xaml/presentation" xmlns:x="http://schemas.microsoft.com/winfx/2006/xaml">
    <Page.Resources>
        <Style x:Key="baseStyle" TargetType="FrameworkElement">
            <Setter Property="HorizontalAlignment" Value="Left"/>
        </Style>
        <Style TargetType="Button" BasedOn="{StaticResource baseStyle}">
            <Setter Property="Content" Value="Hello World"/>
        </Style>
    </Page.Resources>
    <Grid>
        <Button Width="200" Height="50"/>
    </Grid>
</Page>
Note:
需要特别注意的是,如果在第一个xaml样式集合中更改第二个样式中的TargetType为ButtonBase,则这两个样式将不会被应用。然而,请查看下面的xaml代码以解决这个限制。基本上,这意味着您需要给样式指定一个键,并使用该键引用它。
<Page xmlns="http://schemas.microsoft.com/winfx/2006/xaml/presentation" xmlns:x="http://schemas.microsoft.com/winfx/2006/xaml">
    <Page.Resources>
        <Style x:Key="baseStyle" TargetType="FrameworkElement">
            <Setter Property="HorizontalAlignment" Value="Left"/>
        </Style>
        <Style x:Key="derivedStyle" TargetType="ButtonBase" BasedOn="{StaticResource baseStyle}">
            <Setter Property="Content" Value="Hello World"/>
        </Style>
    </Page.Resources>
    <Grid>
        <Button Width="200" Height="50" Style="{StaticResource derivedStyle}"/>
    </Grid>
</Page>
derivedStyle必须在baseStyle之后。 - SliverNinja - MSFTBea Stollnitz在博客中就如何使用标记扩展设置多个WPF样式发表了一篇好的文章,标题为“如何在WPF中设置多个样式?”
那个博客现在已经关闭,所以我在这里重现了这篇文章:
WPF and Silverlight both offer the ability to derive a Style from another Style through the “BasedOn” property. This feature enables developers to organize their styles using a hierarchy similar to class inheritance. Consider the following styles:
<Style TargetType="Button" x:Key="BaseButtonStyle">
    <Setter Property="Margin" Value="10" />
</Style>
<Style TargetType="Button" x:Key="RedButtonStyle" BasedOn="{StaticResource BaseButtonStyle}">
    <Setter Property="Foreground" Value="Red" />
</Style>
With this syntax, a Button that uses RedButtonStyle will have its Foreground property set to Red and its Margin property set to 10.
This feature has been around in WPF for a long time, and it’s new in Silverlight 3.
What if you want to set more than one style on an element? Neither WPF nor Silverlight provide a solution for this problem out of the box. Fortunately there are ways to implement this behavior in WPF, which I will discuss in this blog post.
WPF and Silverlight use markup extensions to provide properties with values that require some logic to obtain. Markup extensions are easily recognizable by the presence of curly brackets surrounding them in XAML. For example, the {Binding} markup extension contains logic to fetch a value from a data source and update it when changes occur; the {StaticResource} markup extension contains logic to grab a value from a resource dictionary based on a key. Fortunately for us, WPF allows users to write their own custom markup extensions. This feature is not yet present in Silverlight, so the solution in this blog is only applicable to WPF.
Others have written great solutions to merge two styles using markup extensions. However, I wanted a solution that provided the ability to merge an unlimited number of styles, which is a little bit trickier.
Writing a markup extension is straightforward. The first step is to create a class that derives from MarkupExtension, and use the MarkupExtensionReturnType attribute to indicate that you intend the value returned from your markup extension to be of type Style.
[MarkupExtensionReturnType(typeof(Style))]
public class MultiStyleExtension : MarkupExtension
{
}
Specifying inputs to the markup extension
We’d like to give users of our markup extension a simple way to specify the styles to be merged. There are essentially two ways in which the user can specify inputs to a markup extension. The user can set properties or pass parameters to the constructor. Since in this scenario the user needs the ability to specify an unlimited number of styles, my first approach was to create a constructor that takes any number of strings using the “params” keyword:
public MultiStyleExtension(params string[] inputResourceKeys)
{
}
My goal was to be able to write the inputs as follows:
<Button Style="{local:MultiStyle BigButtonStyle, GreenButtonStyle}" … />Notice the comma separating the different style keys. Unfortunately, custom markup extensions don’t support an unlimited number of constructor parameters, so this approach results in a compile error. If I knew in advance how many styles I wanted to merge, I could have used the same XAML syntax with a constructor taking the desired number of strings:
public MultiStyleExtension(string inputResourceKey1, string inputResourceKey2)
{
}
As a workaround, I decided to have the constructor parameter take a single string that specifies the style names separated by spaces. The syntax isn’t too bad:
<Button Style="{local:MultiStyle BigButtonStyle GreenButtonStyle}" … />private string[] resourceKeys; public MultiStyleExtension(string inputResourceKeys) { if (inputResourceKeys == null) { throw new ArgumentNullException("inputResourceKeys"); } this.resourceKeys = inputResourceKeys.Split(new char[] { ' ' }, StringSplitOptions.RemoveEmptyEntries); if (this.resourceKeys.Length == 0) { throw new ArgumentException("No input resource keys specified."); } }Calculating the output of the markup extension
To calculate the output of a markup extension, we need to override a method from MarkupExtension called “ProvideValue”. The value returned from this method will be set in the target of the markup extension.
I started by creating an extension method for Style that knows how to merge two styles. The code for this method is quite simple:
public static void Merge(this Style style1, Style style2)
{
    if (style1 == null)
    {
        throw new ArgumentNullException("style1");
    }
    if (style2 == null)
    {
        throw new ArgumentNullException("style2");
    }

    if (style1.TargetType.IsAssignableFrom(style2.TargetType))
    {
        style1.TargetType = style2.TargetType;
    }

    if (style2.BasedOn != null)
    {
        Merge(style1, style2.BasedOn);
    }

    foreach (SetterBase currentSetter in style2.Setters)
    {
        style1.Setters.Add(currentSetter);
    }

    foreach (TriggerBase currentTrigger in style2.Triggers)
    {
        style1.Triggers.Add(currentTrigger);
    }

    // This code is only needed when using DynamicResources.
    foreach (object key in style2.Resources.Keys)
    {
        style1.Resources[key] = style2.Resources[key];
    }
}
With the logic above, the first style is modified to include all information from the second. If there are conflicts (e.g. both styles have a setter for the same property), the second style wins. Notice that aside from copying styles and triggers, I also took into account the TargetType and BasedOn values as well as any resources the second style may have. For the TargetType of the merged style, I used whichever type is more derived. If the second style has a BasedOn style, I merge its hierarchy of styles recursively. If it has resources, I copy them over to the first style. If those resources are referred to using {StaticResource}, they’re statically resolved before this merge code executes, and therefore it isn’t necessary to move them. I added this code in case we’re using DynamicResources.
The extension method shown above enables the following syntax:
style1.Merge(style2);This syntax is useful provided that I have instances of both styles within ProvideValue. Well, I don’t. All I get from the constructor is a list of string keys for those styles. If there was support for params in the constructor parameters, I could have used the following syntax to get the actual style instances:
<Button Style="{local:MultiStyle {StaticResource BigButtonStyle}, {StaticResource GreenButtonStyle}}" … />public MultiStyleExtension(params Style[] styles) { }But that doesn’t work. And even if the params limitation didn’t exist, we would probably hit another limitation of markup extensions, where we would have to use property-element syntax instead of attribute syntax to specify the static resources, which is verbose and cumbersome (I explain this bug better in a previous blog post). And even if both those limitations didn’t exist, I would still rather write the list of styles using just their names – it is shorter and simpler to read than a StaticResource for each one.
The solution is to create a StaticResourceExtension using code. Given a style key of type string and a service provider, I can use StaticResourceExtension to retrieve the actual style instance. Here is the syntax:
Style currentStyle = new StaticResourceExtension(currentResourceKey).ProvideValue(serviceProvider) as Style;Now we have all the pieces needed to write the ProvideValue method:
public override object ProvideValue(IServiceProvider serviceProvider)
{
    Style resultStyle = new Style();

    foreach (string currentResourceKey in resourceKeys)
    {
        Style currentStyle = new StaticResourceExtension(currentResourceKey).ProvideValue(serviceProvider) as Style;

        if (currentStyle == null)
        {
            throw new InvalidOperationException("Could not find style with resource key " + currentResourceKey + ".");
        }

        resultStyle.Merge(currentStyle);
    }
    return resultStyle;
}
Here is a complete example of the usage of the MultiStyle markup extension:
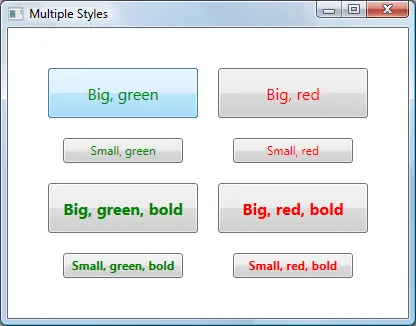
<Window.Resources>
    <Style TargetType="Button" x:Key="SmallButtonStyle">
        <Setter Property="Width" Value="120" />
        <Setter Property="Height" Value="25" />
        <Setter Property="FontSize" Value="12" />
    </Style>

    <Style TargetType="Button" x:Key="GreenButtonStyle">
        <Setter Property="Foreground" Value="Green" />
    </Style>

    <Style TargetType="Button" x:Key="BoldButtonStyle">
        <Setter Property="FontWeight" Value="Bold" />
    </Style>
</Window.Resources>

<Button Style="{local:MultiStyle SmallButtonStyle GreenButtonStyle BoldButtonStyle}" Content="Small, green, bold" />
style1吗? - Daniel Möller但是你可以从另一个扩展... 看一下BasedOn属性
<Style TargetType="TextBlock">
      <Setter Property="Margin" Value="3" />
</Style>

<Style x:Key="AlwaysVerticalStyle" TargetType="TextBlock"
       BasedOn="{StaticResource {x:Type TextBlock}}">
     <Setter Property="VerticalAlignment" Value="Top" />
</Style>
WPF/XAML本身不提供这种功能,但它提供了扩展性以允许您实现自己想要的功能。
我们也遇到了同样的需求,最终创建了自己的XAML标记扩展(我们称之为“MergedStylesExtension”),允许我们从两个其他样式(如果需要,可以连续多次使用以继承更多的样式)创建新的Style。
由于WPF/XAML存在一个bug,我们需要使用属性元素语法来使用它,但除此之外似乎都能正常工作。例如:
<Button
    Content="This is an example of a button using two merged styles">
    <Button.Style>
      <ext:MergedStyles
                BasedOn="{StaticResource FirstStyle}"
                MergeStyle="{StaticResource SecondStyle}"/>
   </Button.Style>
</Button>
我最近在这里写了关于它的内容: http://swdeveloper.wordpress.com/2009/01/03/wpf-xaml-multiple-style-inheritance-and-markup-extensions/
使用AttachedProperty来设置多个样式,如下代码:
public static class Css
{

    public static string GetClass(DependencyObject element)
    {
        if (element == null)
            throw new ArgumentNullException("element");

        return (string)element.GetValue(ClassProperty);
    }

    public static void SetClass(DependencyObject element, string value)
    {
        if (element == null)
            throw new ArgumentNullException("element");

        element.SetValue(ClassProperty, value);
    }


    public static readonly DependencyProperty ClassProperty =
        DependencyProperty.RegisterAttached("Class", typeof(string), typeof(Css),
            new PropertyMetadata(null, OnClassChanged));

    private static void OnClassChanged(DependencyObject d, DependencyPropertyChangedEventArgs e)
    {
        var ui = d as FrameworkElement;
        Style newStyle = new Style();

        if (e.NewValue != null)
        {
            var names = e.NewValue as string;
            var arr = names.Split(new char[] { ' ' }, StringSplitOptions.RemoveEmptyEntries);
            foreach (var name in arr)
            {
                Style style = ui.FindResource(name) as Style;
                foreach (var setter in style.Setters)
                {
                    newStyle.Setters.Add(setter);
                }
                foreach (var trigger in style.Triggers)
                {
                    newStyle.Triggers.Add(trigger);
                }
            }
        }
        ui.Style = newStyle;
    }
}
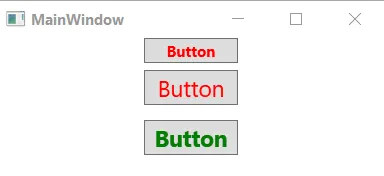
使用方法: (将 xmlns:local="clr-namespace:style_a_class_like_css" 指向正确的名称空间)
<Window x:Class="MainWindow"
        xmlns="http://schemas.microsoft.com/winfx/2006/xaml/presentation"
        xmlns:x="http://schemas.microsoft.com/winfx/2006/xaml"
        xmlns:d="http://schemas.microsoft.com/expression/blend/2008"
        xmlns:mc="http://schemas.openxmlformats.org/markup-compatibility/2006"
        xmlns:local="clr-namespace:style_a_class_like_css"
        mc:Ignorable="d"
        Title="MainWindow" Height="150" Width="325">
    <Window.Resources>

        <Style TargetType="TextBlock" x:Key="Red" >
            <Setter Property="Foreground" Value="Red"/>
        </Style>

        <Style TargetType="TextBlock" x:Key="Green" >
            <Setter Property="Foreground" Value="Green"/>
        </Style>

        <Style TargetType="TextBlock" x:Key="Size18" >
            <Setter Property="FontSize" Value="18"/>
            <Setter Property="Margin" Value="6"/>
        </Style>

        <Style TargetType="TextBlock" x:Key="Bold" >
            <Setter Property="FontWeight" Value="Bold"/>
        </Style>

    </Window.Resources>
    <StackPanel>

        <Button Content="Button" local:Css.Class="Red Bold" Width="75"/>
        <Button Content="Button" local:Css.Class="Red Size18" Width="75"/>
        <Button Content="Button" local:Css.Class="Green Size18 Bold" Width="75"/>

    </StackPanel>
</Window>
通过创建一个辅助类来使用和包装你的样式,可以实现这一点。CompoundStyle在这里有提到如何实现。有多种方法,但最简单的是按照以下步骤操作:
<TextBlock Text="Test"
    local:CompoundStyle.StyleKeys="headerStyle,textForMessageStyle,centeredStyle"/>
[ContentProperty("Styles")]
[MarkupExtensionReturnType(typeof(Style))]
public class MultiStyle : MarkupExtension
{
    public List<Style> Styles { get; set; } = new List<Style>();

    public override object ProvideValue(IServiceProvider serviceProvider)
    {
        var resultStyle = new Style();

        foreach (var style in Styles)
        {
            if (style == null)
                continue;

            MergeWithStyle(resultStyle, style);
        }

        return resultStyle;
    }
    private static void MergeWithStyle(Style style, Style mergeStyle)
    {
        // Recursively merge with any Styles this Style
        // might be BasedOn.
        if (mergeStyle.BasedOn != null)
            MergeWithStyle(style, mergeStyle.BasedOn);

        // Merge the Setters...
        foreach (var setter in mergeStyle.Setters)
            style.Setters.Add(setter);

        // Merge the Triggers...
        foreach (var trigger in mergeStyle.Triggers)
            style.Triggers.Add(trigger);
    }
}
然后是XAML:
<Style x:Key="Style1" TargetType="Button">
    <!--setters here-->
    <Setter Property="FontWeight" Value="Bold"/>
</Style>
<Style x:Key="Style2" TargetType="Button">
    <!--setters here-->
        <Setter Property="FontStyle" Value="Italic" />
    </Style>
<v:MultiStyle x:Key="MergedStyle">
    <Style BasedOn="{StaticResource Style1}"/>
    <Style BasedOn="{StaticResource Style2}"/>
</v:MultiStyle>
<Button Style="{StaticResource MergedStyle}" Content="Hello World"/>
你可以将它作为新样式的基础,像这样使用(确保在继承它的样式之前声明合并的样式)
<Style x:Key="DerivedStyle" TargetType="Button" BasedOn="{StaticResource MergedStyle}">
    <Setter Property="Background" Value="Red"/>
</Style>
编辑:添加如何将合并的样式用作另一个样式的基本样式
如果将此应用于项目集合,则可以通过使用StyleSelector获得类似的内容。我曾经使用过这种方法来解决类似的问题,即根据树中绑定对象类型在TreeViewItems上使用不同的样式。您可能需要稍微修改下面的类以适应您的特定方法,但希望这能为您提供起点。
public class MyTreeStyleSelector : StyleSelector
{
    public Style DefaultStyle
    {
        get;
        set;
    }

    public Style NewStyle
    {
        get;
        set;
    }

    public override Style SelectStyle(object item, DependencyObject container)
    {
        ItemsControl ctrl = ItemsControl.ItemsControlFromItemContainer(container);

        //apply to only the first element in the container (new node)
        if (item == ctrl.Items[0])
        {
            return NewStyle;
        }
        else
        {
            //otherwise use the default style
            return DefaultStyle;
        }
    }
}
然后你这样应用
 <TreeView>
     <TreeView.ItemContainerStyleSelector
         <myassembly:MyTreeStyleSelector DefaultStyle="{StaticResource DefaultItemStyle}"
                                         NewStyle="{StaticResource NewItemStyle}" />
     </TreeView.ItemContainerStyleSelector>
  </TreeView>
    public override Style SelectStyle(object item, DependencyObject container)
    {

        PropertyInfo p = item.GetType().GetProperty("GroupBy", BindingFlags.NonPublic | BindingFlags.Instance);

        PropertyGroupDescription propertyGroupDescription = (PropertyGroupDescription)p.GetValue(item);

        if (propertyGroupDescription != null && propertyGroupDescription.PropertyName == "Title" )
        {
            return this.TitleStyle;
        }

        if (propertyGroupDescription != null && propertyGroupDescription.PropertyName == "Date")
        {
            return this.DateStyle;
        }

        return null;
    }