实现Android应用内购买看起来相当复杂。我该如何做呢?SDK提供的示例应用只有一个Activity,这对于像我这样有多个Activity的应用程序来说过于简化了。
如何在Android应用中实现应用内购买?
75
- Shlomo Zalman Heigh
5
14Android的示例非常复杂,涵盖了所有功能,分层很多。建议从更简单的项目入手,但是现在没有任何文档可用。我已经用一个精简版本的这个示例做出了一些成果。请说明你遇到了什么问题,基本上你需要将Activity绑定到一个计费服务并进行调用。广播接收器会完成其余工作。 - sebastianf182
@sfratini,你能发一下你的例子吗?谢谢! - Shlomo Zalman Heigh
它很难让它正常工作。如果没有其他问题,调试和正确设置需要数小时。我有一个项目设置,就像一个工作的hello world。请尝试使用http://mcondev.wordpress.com/2011/06/26/integrate-in-app-billing-just-3-lines-of-code-in-your-app/。 - Siddharth
1我认为这个教程(https://youtu.be/El7q_1a_WVc)是最适合应用内购买的。它教授如何在5分钟内实现应用内购买功能! - Zohab Ali
这已经过时了。 - Keith Loughnane
8个回答
42
我会尝试解释一下我的经验。虽然我不认为自己是这方面的专家,但我已经花了好几天时间来研究它。
首先,我很难理解示例和应用程序的工作流程。我觉得最好从一个简单的例子开始,但是把代码分成小块并不容易,也不知道是否会出现问题。我会告诉你我拥有什么以及我从示例中更改了哪些内容以使其正常工作。
我有一个单一的活动,所有我的购买都来自于它。它被称为Pro。
首先,您应该在Security类中更新变量base64EncodedPublicKey,使用您的公共市场开发人员密钥,否则您将看到一个漂亮的异常。
好吧,我像这样将我的活动绑定到我的BillingService:
      public class Pro extends TrackedActivity implements OnItemClickListener {

            private BillingService mBillingService;
            private BillingPurchaseObserver mBillingPurchaseObserver;
            private Handler mHandler;

            @Override
            protected void onCreate(Bundle savedInstanceState) {
                super.onCreate(savedInstanceState);
                setContentView(R.layout.pro);


                //Do my stuff

                mBillingService = new BillingService();
                mBillingService.setContext(getApplicationContext());

                mHandler = new Handler();
                mBillingPurchaseObserver = new BillingPurchaseObserver(mHandler);

            }

        }


    @Override
    protected void onStart() {
       //Register the observer to the service
        super.onStart();
        ResponseHandler.register(mBillingPurchaseObserver);
    }


    @Override
    protected void onStop() {
        //Unregister the observer since you dont need anymore
        super.onStop();
        ResponseHandler.unregister(mBillingPurchaseObserver);
    }

    @Override
    protected void onDestroy() {
       //Unbind the service
        super.onDestroy();
        mBillingService.unbind();
    }
这样,所有的购买都与此服务交流,然后该服务将向市场发送JSON请求。你可能认为购买是在同一时刻进行的,但实际上并不是这样。你发送请求,购买可能会在几分钟或几小时后到来。我认为这主要是由于服务器过载和信用卡批准原因。
然后我有一个包含我的物品的ListView,并在每个物品上打开AlertDialog,邀请他们购买该物品。当他们点击一个物品时,我执行以下操作:
  private class BuyButton implements DialogInterface.OnClickListener {

       private BillingItem item = null;
       private String developerPayload;

       public BuyButton(BillingItem item, String developerPayload) {
        this.item = item;
        this.developerPayload = developerPayload;
        }

            @Override
            public void onClick(DialogInterface dialog, int which) {

                if (GeneralHelper.isOnline(getApplicationContext())){
                    //I track the buy here with GA SDK.

        mBillingService.requestPurchase(this.item.getSku(), this.developerPayload);
                } else {
                    Toast.makeText(getApplicationContext(), R.string.msg_not_online, Toast.LENGTH_SHORT).show();
                }

            }

        }
好的,您应该看到市场开放并且用户完成或取消购买。
接下来重要的是我的 PurChaseObserver(购买观察器),它处理市场发送的所有事件。这是它的简化版本,但您应该能够理解(请参见代码中的注释):
private class BillingPurchaseObserver extends PurchaseObserver {
        public BillingPurchaseObserver(Handler handler) {
            super(Pro.this, handler);
        }

        @Override
        public void onBillingSupported(boolean supported) {

            if (supported) {
                //Enable buy functions. Not required, but you can do stuff here. The market first checks if billing is supported. Maybe your country is not supported, for example.
            } else {
                Toast.makeText(getApplicationContext(), R.string.billing_not_supported, Toast.LENGTH_LONG).show();
            }
        }

        @Override
        public void onPurchaseStateChange(PurchaseState purchaseState, String itemId,
                int quantity, long purchaseTime, String developerPayload) {

//This is the method that is called when the buy is completed or refunded I believe.
// Here you can do something with the developerPayload. Its basically a Tag you can use to follow your transactions. i dont use it.

        BillingItem item = BillingItem.getBySku(getApplicationContext(), itemId);

        if (purchaseState == PurchaseState.PURCHASED) {
            if (item != null){
//This is my own implementation that sets the item purchased in my database. BillingHelper is a class with methods I use to check if the user bought an option and update the UI. You should also check for refunded. You can see the Consts class to find what you need to check for.

                    boolean resu = item.makePurchased(getApplicationContext());
                    if (resu){
                        Toast.makeText(getApplicationContext(), R.string.billing_item_purchased, Toast.LENGTH_LONG).show();
                    }
                }
            }
        }

        private void trackPurchase(BillingItem item, long purchaseTime) {
            //My code to track the purchase in GA
        }

        @Override
        public void onRequestPurchaseResponse(RequestPurchase request,
                ResponseCode responseCode) {

               //This is the callback that happens when you sent the request. It doesnt mean you bought something. Just that the Market received it.

            if (responseCode == ResponseCode.RESULT_OK) {

                Toast.makeText(getApplicationContext(), R.string.billing_item_request_sent, Toast.LENGTH_SHORT).show();

            } else if (responseCode == ResponseCode.RESULT_USER_CANCELED) {
                //The user canceled the item.
            } else {
            //If it got here, the Market had an unexpected problem.
            }
        }

        @Override
        public void onRestoreTransactionsResponse(RestoreTransactions request,
                ResponseCode responseCode) {
            if (responseCode == ResponseCode.RESULT_OK) {
//Restore transactions should only be run once in the lifecycle of your application unless you reinstalled the app or wipe the data.

                SharedPreferences.Editor edit = PreferencesHelper.getInstance().getDefaultSettings(getApplicationContext()).edit();
                edit.putBoolean(Consts.DB_INITIALIZED, true);
                edit.commit();

            } else {
    //Something went wrong
            }
        }
    }
我相信您不需要编辑其他任何内容,其余代码“有效”。 您可以首先尝试在自己的项目中使用示例SKU“android.test.purchased”。到目前为止,我已经测试过这个并且它能够工作,但是我仍然需要覆盖所有内容,例如退款状态。在这种情况下,我让用户保留功能,但我想确保在修改之前它能够完美地工作。
希望这对您和其他人有所帮助。
- sebastianf182
5
1赞 +1 给提供简化示例的人,你观察到了我也观察到的事情。但是...你不按照“官方”的示例严格执行,你难道不在冒险吗?毕竟,那些错误检查和无数的“可能情况”都是有原因的,不是吗? - Bill The Ape
@BillTheApe 好的,我刚刚让它更简单了。当你试图理解这个示例时,所有那些额外的行用来记录一些东西,会让代码看起来更加困难和冗长。毕竟,添加一个日志行足够容易了。 - sebastianf182
@Sfratini 谢谢,很不错,但是当我按照你的步骤制作应用程序演示时,出现了错误。我没有导入任何东西。你能告诉我哪里出了问题吗? - kyogs
4没有BillingService或BillingPurchaseObserver这样的东西。为什么没有好的关于这个主题的教程! - Bisclavret
可能是因为我在最初的版本中使用了这个。也许他们改变了API。我再也没有用过它,抱歉。 - sebastianf182
13
V3:这是一个快速入门教程..他使用了谷歌示例(Trivial Drive)中的辅助类..作为第一个“Hello Billing”很好..
http://www.techotopia.com/index.php/Integrating_Google_Play_In-app_Billing_into_an_Android_Application_%E2%80%93_A_Tutorial
- Alexander Sidikov Pfeif
7
这里提供了一个详细的Android In-App Billing v3实例教程,步骤清晰且配有截图。请查看以下教程:使用ServiceConnection类的Android In-App Billing v3示例教程,希望对您有所帮助。
若需要更多解释,请参考该教程:在Version 3 API中实现In-app Billing。
要将In-app Billing库集成到我们的项目中,请按照以下步骤进行:
1. 更新AndroidManifest.xml文件。
2. 创建ServiceConnection并将其绑定到IInAppBillingService。
3. 从应用程序向IInAppBillingService发送In-app Billing请求。
4. 处理来自Google Play的In-app Billing响应。
5. 更新AndroidManifest.xml文件。
在Manifest.xml文件中添加权限。
将AIDL文件添加到您的项目中。
构建应用程序。您应该在项目的/gen目录中看到一个名为IInAppBillingService.java的生成文件。
更新build.gradle文件中的依赖项。
若需要更多解释,请参考该教程:在Version 3 API中实现In-app Billing。
要将In-app Billing库集成到我们的项目中,请按照以下步骤进行:
1. 更新AndroidManifest.xml文件。
2. 创建ServiceConnection并将其绑定到IInAppBillingService。
3. 从应用程序向IInAppBillingService发送In-app Billing请求。
4. 处理来自Google Play的In-app Billing响应。
5. 更新AndroidManifest.xml文件。
<uses-permission android:name="com.android.vending.BILLING" />
在Manifest.xml文件中添加权限。
将AIDL文件添加到您的项目中。
构建应用程序。您应该在项目的/gen目录中看到一个名为IInAppBillingService.java的生成文件。
更新build.gradle文件中的依赖项。
apply plugin: 'com.android.application'
android {
    compileSdkVersion 24
    buildToolsVersion "24.0.0"
    defaultConfig {
        applicationId "com.inducesmile.androidinapppurchase"
        minSdkVersion 14
        targetSdkVersion 24
        versionCode 2
        versionName "1.1"
    }
    buildTypes {
        release {
            minifyEnabled false
            proguardFiles getDefaultProguardFile('proguard-android.txt'), 'proguard-rules.pro'
        }
    }
}
dependencies {
    compile fileTree(dir: 'libs', include: ['*.jar'])
    testCompile 'junit:junit:4.12'
    compile 'com.android.support:appcompat-v7:24.1.1'
    compile 'com.intuit.sdp:sdp-android:1.0.3'
    compile 'com.android.support:support-annotations:24.1.1'
    compile 'org.jetbrains:annotations-java5:15.0'
}
InAppPurchaseActivity.java和activity_in_app_purchase.xml
这是我们为应用用户提供进行应用内购买的机会的地方。在布局文件中,我们将为用户提供以不同面额进行购买的机会。
InAppPurchaseActivity.java
注意:应该在非UI线程中调用getAllUserPurchase()和itemPurchaseAvailability()方法,以避免应用程序崩溃。
public class InAppPurchaseActivity extends AppCompatActivity {
    private static final String TAG = InAppPurchaseActivity.class.getSimpleName();
    private IInAppBillingService mService;
    private CustomSharedPreference customSharedPreference;
    String[] productIds = new String[]{Helper.ITEM_ONE_ID, Helper.ITEM_TWO_ID, Helper.ITEM_THREE_ID};
    private ImageView buyOneButton, buyTwoButton, buyThreeButton;
    private static final char[] symbols = new char[36];
    static {
        for (int idx = 0; idx < 10; ++idx)
            symbols[idx] = (char) ('0' + idx);
        for (int idx = 10; idx < 36; ++idx)
            symbols[idx] = (char) ('a' + idx - 10);
    }
    private String appPackageName;
    @Override
    protected void onCreate(Bundle savedInstanceState) {
        super.onCreate(savedInstanceState);
        setContentView(R.layout.activity_in_app_purchase);
        appPackageName = this.getPackageName();
        Intent serviceIntent = new Intent("com.android.vending.billing.InAppBillingService.BIND");
        serviceIntent.setPackage("com.android.vending");
        bindService(serviceIntent, mServiceConn, Context.BIND_AUTO_CREATE);
        customSharedPreference = new CustomSharedPreference(InAppPurchaseActivity.this);
        buyOneButton = (ImageView)findViewById(R.id.buy_one);
        buyOneButton.setVisibility(View.GONE);
        assert buyOneButton != null;
        buyOneButton.setOnClickListener(new View.OnClickListener() {
            @Override
            public void onClick(View view) {
                if(!isBillingSupported()){
                    Helper.displayMessage(InAppPurchaseActivity.this, getString(R.string.in_app_support));
                    return;
                }
                purchaseItem(Helper.ITEM_ONE_ID);
            }
        });
        buyTwoButton = (ImageView)findViewById(R.id.buy_two);
        buyTwoButton.setVisibility(View.GONE);
        assert buyTwoButton != null;
        buyTwoButton.setOnClickListener(new View.OnClickListener() {
            @Override
            public void onClick(View view) {
                if(!isBillingSupported()){
                    Helper.displayMessage(InAppPurchaseActivity.this, getString(R.string.in_app_support));
                    return;
                }
                purchaseItem(Helper.ITEM_TWO_ID);
            }
        });
        buyThreeButton = (ImageView)findViewById(R.id.buy_three);
        buyThreeButton.setVisibility(View.GONE);
        assert buyThreeButton != null;
        buyThreeButton.setOnClickListener(new View.OnClickListener() {
            @Override
            public void onClick(View view) {
                if(!isBillingSupported()){
                    Helper.displayMessage(InAppPurchaseActivity.this, getString(R.string.in_app_support));
                    return;
                }
                purchaseItem(Helper.ITEM_THREE_ID);
            }
        });
    }
    ServiceConnection mServiceConn = new ServiceConnection() {
        @Override
        public void onServiceDisconnected(ComponentName name) {
            mService = null;
        }
        @Override
        public void onServiceConnected(ComponentName name, IBinder service) {
            mService = IInAppBillingService.Stub.asInterface(service);
            AvailablePurchaseAsyncTask mAsyncTask = new AvailablePurchaseAsyncTask(appPackageName);
            mAsyncTask.execute();
        }
    };
    private void purchaseItem(String sku){
        String generatedPayload = getPayLoad();
        customSharedPreference.setDeveloperPayLoad(generatedPayload);
        try {
            Bundle buyIntentBundle = mService.getBuyIntent(3, getPackageName(), sku, "inapp", generatedPayload);
            PendingIntent pendingIntent = buyIntentBundle.getParcelable("BUY_INTENT");
            try {
                startIntentSenderForResult(pendingIntent.getIntentSender(), Helper.RESPONSE_CODE, new Intent(), Integer.valueOf(0), Integer.valueOf(0), Integer.valueOf(0));
            } catch (IntentSender.SendIntentException e) {
                e.printStackTrace();
            }
        } catch (RemoteException e) {
            e.printStackTrace();
        }
    }
    @Override
    protected void onActivityResult(int requestCode, int resultCode, Intent data) {
        if (requestCode == Helper.RESPONSE_CODE) {
            int responseCode = data.getIntExtra("RESPONSE_CODE", 0);
            String purchaseData = data.getStringExtra("INAPP_PURCHASE_DATA");
            String dataSignature = data.getStringExtra("INAPP_DATA_SIGNATURE");
            if (resultCode == RESULT_OK) {
                try {
                    JSONObject purchaseJsonObject = new JSONObject(purchaseData);
                    String sku = purchaseJsonObject.getString("productId");
                    String developerPayload = purchaseJsonObject.getString("developerPayload");
                    String purchaseToken = purchaseJsonObject.getString("purchaseToken");
                    //the developerPayload value is better stored in remote database but in this tutorial
                    //we will use a shared preference
                    for(int i = 0; i < productIds.length; i++){
                        if(productIds[i].equals(sku) && developerPayload.equals(customSharedPreference.getDeveloperPayload())){
                            customSharedPreference.setPurchaseToken(purchaseToken);
                            //access to private content
                            Intent contentIntent = new Intent(InAppPurchaseActivity.this, PrivateContentActivity.class);
                            startActivity(contentIntent);
                        }
                    }
                }
                catch (JSONException e) {
                    e.printStackTrace();
                }
            }
        }
    }
    private String getPayLoad(){
        RandomString randomString = new RandomString(36);
        String payload = randomString.nextString();
        return payload;
    }
    public class RandomString {
        private final Random random = new Random();
        private final char[] buf;
        public RandomString(int length) {
            if (length < 1)
                throw new IllegalArgumentException("length < 1: " + length);
            buf = new char[length];
        }
        public String nextString() {
            for (int idx = 0; idx < buf.length; ++idx)
                buf[idx] = symbols[random.nextInt(symbols.length)];
            return new String(buf);
        }
    }
    public final class SessionIdentifierGenerator {
        private SecureRandom random = new SecureRandom();
        public String nextSessionId() {
            return new BigInteger(130, random).toString(32);
        }
    }
    private class AvailablePurchaseAsyncTask extends AsyncTask<Void, Void, Bundle> {
        String packageName;
        public AvailablePurchaseAsyncTask(String packageName){
            this.packageName = packageName;
        }
        @Override
        protected Bundle doInBackground(Void... voids) {
            ArrayList<String> skuList = new ArrayList<String>();
            skuList.add(Helper.ITEM_ONE_ID);
            skuList.add(Helper.ITEM_TWO_ID);
            skuList.add(Helper.ITEM_THREE_ID);
            Bundle query = new Bundle();
            query.putStringArrayList(Helper.ITEM_ID_LIST, skuList);
            Bundle skuDetails = null;
            try {
                skuDetails = mService.getSkuDetails(3, packageName, "inapp", query);
            } catch (RemoteException e) {
                e.printStackTrace();
            }
            return skuDetails;
        }
        @Override
        protected void onPostExecute(Bundle skuDetails) {
            List<AvailablePurchase> canPurchase = new ArrayList<AvailablePurchase>();
            int response = skuDetails.getInt("RESPONSE_CODE");
            if (response == 0) {
                ArrayList<String> responseList = skuDetails.getStringArrayList("DETAILS_LIST");
                if(responseList != null){
                    for (String thisResponse : responseList) {
                        JSONObject object = null;
                        try {
                            object = new JSONObject(thisResponse);
                            String sku = object.getString("productId");
                            String price = object.getString("price");
                            canPurchase.add(new AvailablePurchase(sku, price));
                        } catch (JSONException e) {
                            e.printStackTrace();
                        }
                    }
                }
            }
            if(checkIfPurchaseIsAvailable(canPurchase, productIds[0])){
                buyOneButton.setVisibility(View.VISIBLE);
            }else{
                buyOneButton.setVisibility(View.GONE);
            }
            if(checkIfPurchaseIsAvailable(canPurchase, productIds[1])){
                buyTwoButton.setVisibility(View.VISIBLE);
            }else{
                buyTwoButton.setVisibility(View.GONE);
            }
            if(checkIfPurchaseIsAvailable(canPurchase, productIds[2])){
                buyThreeButton.setVisibility(View.VISIBLE);
            }else{
                buyThreeButton.setVisibility(View.GONE);
            }
        }
    }
    @org.jetbrains.annotations.Contract("null, _ -> false")
    private boolean checkIfPurchaseIsAvailable(List<AvailablePurchase> all, String productId){
        if(all == null){ return false;}
        for(int i = 0; i < all.size(); i++){
            if(all.get(i).getSku().equals(productId)){
                return true;
            }
        }
        return false;
    }
    public boolean isBillingSupported(){
        int response = 1;
        try {
            response = mService.isBillingSupported(3, getPackageName(), "inapp");
        } catch (RemoteException e) {
            e.printStackTrace();
        }
        if(response > 0){
            return false;
        }
        return true;
    }
    public void consumePurchaseItem(String purchaseToken){
        try {
            int response = mService.consumePurchase(3, getPackageName(), purchaseToken);
            if(response != 0){
                return;
            }
        } catch (RemoteException e) {
            e.printStackTrace();
        }
    }
    public Bundle getAllUserPurchase(){
        Bundle ownedItems = null;
        try {
            ownedItems = mService.getPurchases(3, getPackageName(), "inapp", null);
        } catch (RemoteException e) {
            e.printStackTrace();
        }
        return ownedItems;
    }
    public List<UserPurchaseItems> extractAllUserPurchase(Bundle ownedItems){
        List<UserPurchaseItems> mUserItems = new ArrayList<UserPurchaseItems>();
        int response = ownedItems.getInt("RESPONSE_CODE");
        if (response == 0) {
            ArrayList<String> ownedSkus = ownedItems.getStringArrayList("INAPP_PURCHASE_ITEM_LIST");
            ArrayList<String>  purchaseDataList = ownedItems.getStringArrayList("INAPP_PURCHASE_DATA_LIST");
            ArrayList<String>  signatureList = ownedItems.getStringArrayList("INAPP_DATA_SIGNATURE_LIST");
            String continuationToken = ownedItems.getString("INAPP_CONTINUATION_TOKEN");
            if(purchaseDataList != null){
                for (int i = 0; i < purchaseDataList.size(); ++i) {
                    String purchaseData = purchaseDataList.get(i);
                    assert signatureList != null;
                    String signature = signatureList.get(i);
                    assert ownedSkus != null;
                    String sku = ownedSkus.get(i);
                    UserPurchaseItems allItems = new UserPurchaseItems(sku, purchaseData, signature);
                    mUserItems.add(allItems);
                }
            }
        }
        return mUserItems;
    }
    @Override
    public void onDestroy() {
        super.onDestroy();
        if (mService != null) {
            unbindService(mServiceConn);
        }
    }
}
创建助手包目录
创建一个新的包文件夹并将其命名为helpers。在包内,创建一个新的java文件Helper.java。
Helper.java
public class Helper {
    public static final String ITEM_ID_LIST = "ITEM_ID_LIST";
    public static final String ITEM_ONE_ID = "productone";
    public static final String ITEM_TWO_ID = "producttwo";
    public static final String ITEM_THREE_ID = "productthree";
    public static final int RESPONSE_CODE = 1001;
    public static final String SHARED_PREF = "shared_pref";
    public static final String DEVELOPER_PAYLOAD = "developer_payload";
    public static final String PURCHASE_TOKEN = "purchase_token";
    public static void displayMessage(Context context, String message){
        Toast.makeText(context.getApplicationContext(), message, Toast.LENGTH_LONG).show();
    }
}
测试应用内购买
- 创建一个Google+账号(不要使用主账号)。
- 将要测试该应用程序的用户添加到您的组或社区中。
在应用内购买测试期间可能遇到的错误
所请求的项目无法购买。
解决方法-根据Stackoverflow上的AndreiBogdan所说,请参考此链接。
所有荣誉归Inducesmile,感谢他的教程
Android开发者博客还推荐了一个有关销售应用内产品的培训课程。为了看到完整的实现并学习如何测试应用程序,请查看“销售应用内产品”教程。
- SkyWalker
4
第一个链接,你应该将大部分代码添加到答案中,以防链接失效。 - Zoe stands with Ukraine
@LunarWatcher 我已经更新了答案。所有的代码都已添加,请检查。 - SkyWalker
2@SkyWalker,我在哪里可以获取
customSharedPreference类? - TheQ@SkyWalker,使用谷歌应用内购买的缺点是什么? - Wini
6
为了更好地理解使用Google Play计费库的应用内购买工作原理,请参考下面的流程图:
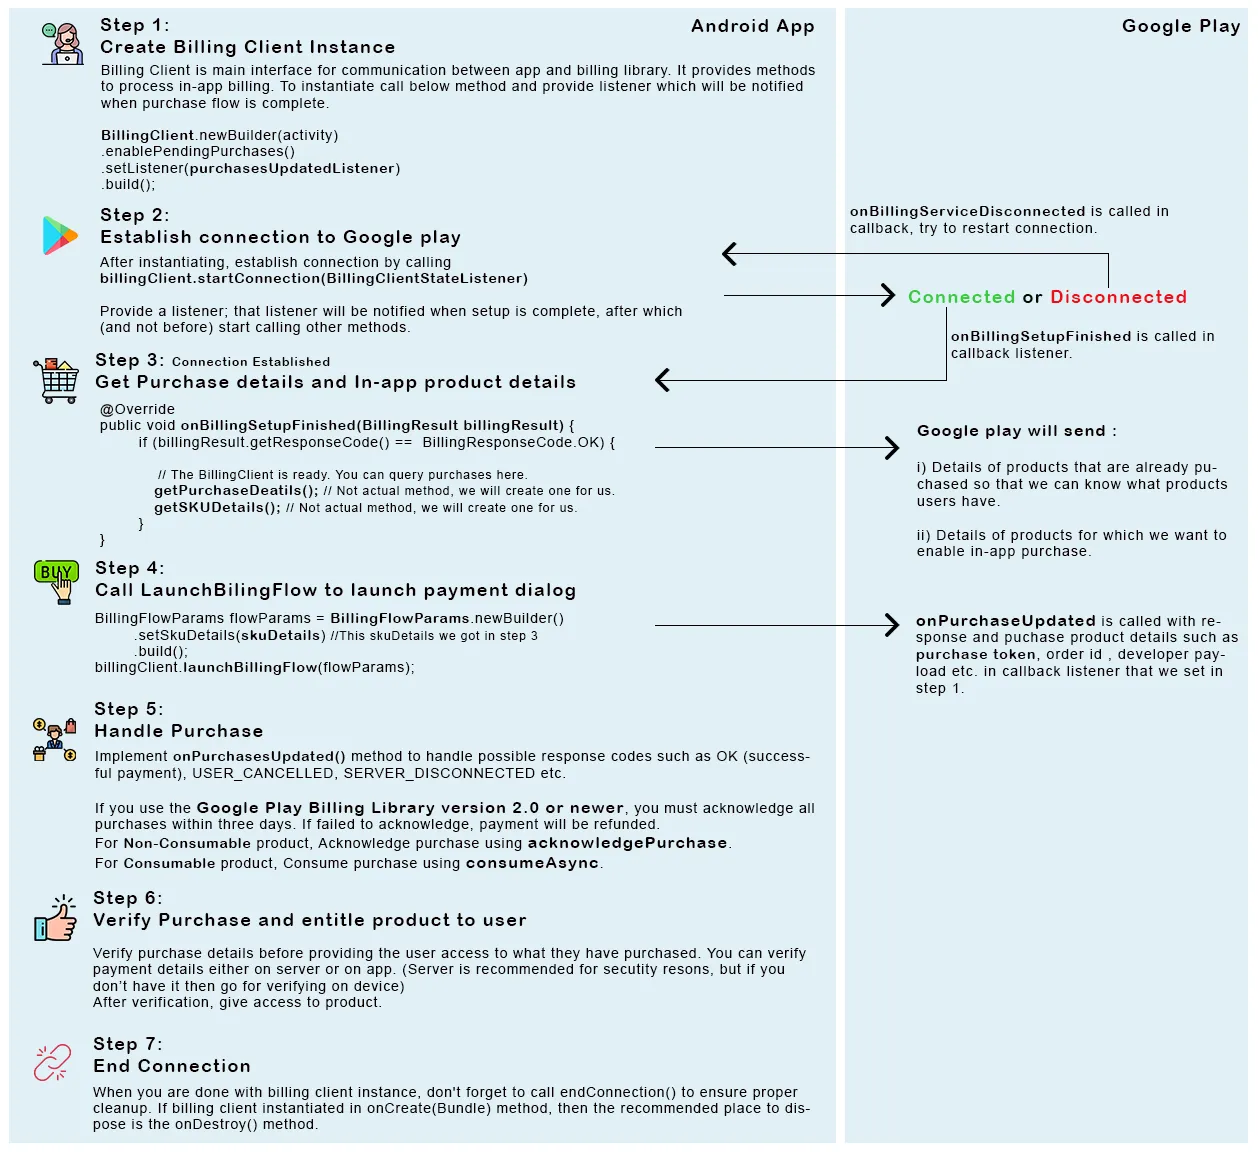 您可以按照我在这篇文章中解释的集成步骤一步步操作:
https://medium.com/@surabhichoudhary/in-app-purchasing-with-google-play-billing-library-6a72e289a78e
如果您需要演示,这是项目链接:
https://github.com/surabhi6/InAppPurchaseDemo
您可以按照我在这篇文章中解释的集成步骤一步步操作:
https://medium.com/@surabhichoudhary/in-app-purchasing-with-google-play-billing-library-6a72e289a78e
如果您需要演示,这是项目链接:
https://github.com/surabhi6/InAppPurchaseDemo
您可以按照我在这篇文章中解释的集成步骤一步步操作:
https://medium.com/@surabhichoudhary/in-app-purchasing-with-google-play-billing-library-6a72e289a78e
如果您需要演示,这是项目链接:
https://github.com/surabhi6/InAppPurchaseDemo
- Surabhi Choudhary
6
好的,这是一件在线文档不太多的事情,所以我会尽力逐步解释所有内容。这些内容来自于我的博客文章,在The Millibit上点击这里可以查看更详细的版本(含有截图)。废话不多说,
第一步:权限
这是最简单的一步。进入你的manifest.xml文件,在你的<manifest>标签下添加以下行:
<uses-permission android:name="com.android.vending.BILLING" />
这将使您的应用程序获得访问应用内购买的权限。如果您的目标版本高于API 22,则需要确保在运行时授予此权限。
第二步:Play Console 现在,您需要将应用程序上传到Google Play控制台。我们还没有将应用程序发布到公共场所(不要担心),我们只是将其上传到BETA RELEASE部分,以便我们可以测试应用内购买。我们之所以需要这样做,是因为Google需要上传您的APK的某个版本才能使计费流程实际起作用。
1.进入https://play.google.com/apps/publish/ 2.创建应用程序 3.按照设置应用程序的步骤进行操作 4.转到应用程序发布 5.导航到Beta 6.在Android Studio中创建应用程序的APK,并将其上传到Play Console的Beta生产环境中
(在发布之前,请确保已填写商店列表、内容评级和定价以及分发)
- 点击魔法按钮(发布!)
第三步:设置项目 好的,这一部分需要你复制并粘贴一堆文件。
首先,获取this文件,下载它,并将其放置在src/main下。它应该自动构建成一个文件夹。
接下来,获取this entire工具文件夹,并将其粘贴到src/java folder.然后重新构建您的项目以解决错误。
Util文件夹包含以下类:
- IabBroadcastReceiver
- IabException
- IabHelper
- IabResult
- Inventory
- Purchase
- Security
- SkuDetails
第四步:创建产品
创建托管产品
点击保存并创建“定价模板”
在这里,您将选择此产品的价格。您可以为不同国家选择价格,或者如果您只选择所有国家下的价格,则可以自动调整:
- 确保应用内购买产品已激活,并在控制台中与正确的应用程序链接。
最后,注意您的产品ID。我们将在接下来的几个步骤中使用此ID。
- 获取您的Base64EncodedString
转到“服务和API”,获取您的Base64EncodedString。将其复制并粘贴到某个记事本中,以便您可以访问它。不要与任何人分享此内容,他们将能够进行恶意操作。
第五步:终于!我们可以开始编码: 首先,绑定应用内购买库,并查询用户已购买/未购买的内容。然后,我们将购买之前设置的产品。
首先,导入我们之前设置的所有内容:
import util.*;
现在我们将使用一个名为mHelper的IabHelper对象,并且我们将用它来完成所有操作。
base64EncodedPublicKey = ""; //PUT YOUR BASE64KEY HERE

mHelper = new IabHelper(this, base64EncodedPublicKey);
mHelper.enableDebugLogging(false); //set to false in real app


mHelper.startSetup(new IabHelper.OnIabSetupFinishedListener() {
    public void onIabSetupFinished(IabResult result) {
        if (!result.isSuccess()) {
            // Oh no, there was a problem.

            if (result.getResponse() == 3) {
                new AlertDialog.Builder(MainActivity.this)
                        .setTitle("In app billing")
                        .setMessage("This device is not compatible with In App Billing, so" +
                                " you may not be able to buy the premium version on your phone. ")
                        .setPositiveButton("Okay", null)
                        .show();
            }

            Log.v(TAG, "Problem setting up In-app Billing: " + result);
        } else {
            Log.v(TAG, "YAY, in app billing set up! " + result);
            try {
                mHelper.queryInventoryAsync(mGotInventoryListener); //Getting inventory of purchases and assigning listener
            } catch (IabHelper.IabAsyncInProgressException e) {
                e.printStackTrace();
            }
        }
    }
});
好的,让我解释一下这里发生了什么。基本上,我们调用“startSetup”来初始化我们的“IabHelper”。如果设置成功,我们查询用户已经拥有的购买物品并将响应存储在mGotInventoryListener中,接下来我们将编写代码:
IabHelper.QueryInventoryFinishedListener mGotInventoryListener
        = new IabHelper.QueryInventoryFinishedListener() {
    public void onQueryInventoryFinished(IabResult result,
                                         Inventory inventory) {

        i = inventory;

        if (result.isFailure()) {
            // handle error here

            Log.v(TAG, "failure in checking if user has purchases");
        } else {
            // does the user have the premium upgrade?
            if (inventory.hasPurchase("premium_version")) {

                premiumEditor.putBoolean("hasPremium", true);
                premiumEditor.commit();

                Log.v(TAG, "Has purchase, saving in storage");

            } else {

                premiumEditor.putBoolean("hasPremium", false);
                premiumEditor.commit();

                Log.v(TAG, "Doesn't have purchase, saving in storage");

            }
        }
    }
};
上面的代码非常易于理解。基本上,它只是检查用户已经购买了哪些商品。既然我们知道用户是否已经购买了我们的产品,我们就知道是否要请他们购买我们的物品!如果他们以前从未购买过我们的产品,让我们启动一个购买请求:
public void buyPremium() {
    try {

     mHelper.flagEndAsync();//If any async is going, make sure we have it stop eventually
     mHelper.launchPurchaseFlow(this, "premium_version", 9, mPurchaseFinishedListener, "SECURITYSTRING"); //Making purchase request and attaching listener
    } catch (Exception e) {
        e.printStackTrace();

mHelper.flagEndAsync();//If any async is going, make sure we have it stop eventually


        new AlertDialog.Builder(MainActivity.this)
                .setTitle("Error")
                .setMessage("An error occurred in buying the premium version. Please try again.")
                .setPositiveButton("Okay", null)
                .show();
    }
}


    @Override

protected void onActivityResult(int requestCode, int resultCode, Intent data) {

    Log.d(TAG, "onActivityResult(" + requestCode + "," + resultCode + "," + data);

    // Pass on the activity result to the helper for handling

    if (!mHelper.handleActivityResult(requestCode, resultCode, data)) {

    }

    else
        Log.d(TAG, "onActivityResult handled by IABUtil.");
    }

}

IabHelper.OnIabPurchaseFinishedListener mPurchaseFinishedListener
        = new IabHelper.OnIabPurchaseFinishedListener() {
    public void onIabPurchaseFinished(IabResult result, Purchase purchase) {

        Log.v(TAG, "purchase finished");

        if (purchase != null) {

            if (purchase.getSku().equals("premium_version")) {

                Toast.makeText(MainActivity.this, "Purchase successful!", Toast.LENGTH_SHORT).show();

                premiumEditor.putBoolean("hasPremium", true);
                premiumEditor.commit();
            }
        } else {
            return;
        }
        if (result.isFailure()) {
            return;
        }
    }
};
在此,我们使用以下方式购买该物品(使用之前在Play控制台生成的ID):
mHelper.launchPurchaseFlow(this, "premium_version", 9, mPurchaseFinishedListener, "SECURITYSTRING"); //Making purchase request and attaching listener
注意我们将
mPurchaseFinishedListener传递到参数中。这意味着购买的结果将返回给此侦听器。然后,我们只需检查购买是否为空,如果不为空,则授予用户他们购买的任何功能。不要让侦听器泄露!当应用程序销毁时,我们必须销毁它们。
@Override
public void onDestroy() {
    super.onDestroy();
    if (mHelper != null)
        try {
            mHelper.dispose();
            mHelper = null;

        } catch (IabHelper.IabAsyncInProgressException e) {
            e.printStackTrace();
        }
}
最后,如果您想消费您的购买,使其再次可供购买,您可以轻松地这样做。例如,如果用户为虚拟汽车购买了汽油,而它用完了。他们需要再次购买相同的产品,您可以通过消费它使其可供第二次购买:
public void consume(){

    //MAKING A QUERY TO GET AN ACCURATE INVENTORY
    try {
        mHelper.flagEndAsync(); //If any async is going, make sure we have it stop eventually

        mHelper.queryInventoryAsync(mGotInventoryListener); //Getting inventory of purchases and assigning listener

        if(i.getPurchase("gas")==null){
            Toast.makeText(this, "Already consumed!", Toast.LENGTH_SHORT).show();
        }
    } catch (IabHelper.IabAsyncInProgressException e) {
        e.printStackTrace();

        Toast.makeText(this, "Error, try again", Toast.LENGTH_SHORT).show();
        mHelper.flagEndAsync();//If any async is going, make sure we have it stop eventually
    }

    //ACTUALLY CONSUMING
    try {
        mHelper.flagEndAsync();//If any async is going, make sure we have it stop eventually

        this.mHelper.consumeAsync(this.i.getPurchase("gas"), new IabHelper.OnConsumeFinishedListener() {
            public void onConsumeFinished(Purchase paramAnonymousPurchase, IabResult paramAnonymousIabResult) {
//resell the gas to them
            }
        });

        return;
    } catch (IabHelper.IabAsyncInProgressException localIabAsyncInProgressException) {
        localIabAsyncInProgressException.printStackTrace();
        Toast.makeText(this, "ASYNC IN PROGRESS ALREADY!!!!" +localIabAsyncInProgressException, Toast.LENGTH_LONG).show();
        Log.v("myTag", "ASYNC IN PROGRESS ALREADY!!!");

        mHelper.flagEndAsync();
    }
}
就这样!现在你可以开始赚钱了。就是这么简单!
如果你想要更详细的教程,包含截图和图片,请访问原始帖子。如果你还有任何问题,请在评论区留言告诉我。
- Ruchir Baronia
7
感谢您的出色工作!该代码存在许多小错误,很容易修复。但是我还收到了以下错误信息:
error: flagEndAsync()在IabHelper中不是公共的,无法从包外访问。 - Dmitry仅仅将其公开似乎不太合适。它并不是打算从包外使用的。 - Dmitry
代码的第二个严重问题是:
无法销毁活动java.lang.IllegalArgumentException: Service not registered. 它发生在模拟器中长按“切换应用程序”系统按钮时。 - Dmitry最糟糕的是,捕获子句没有起到作用,应用程序崩溃了。 - Dmitry
修复方法:在 mContext.bindService() 附近添加 serviceBound = true,然后在 if (serviceBound) { mContext.unbindService(mServiceConn); } 中进行解绑。 - Dmitry
显示剩余2条评论
5
如果你想使用一个易于使用的库在Google Play和Amazon Appstore上发布应用程序,你可以选择RoboBillingLibrary。它将两者的细节抽象成一个易于使用的库。详细的说明在Github页面上。
- Christopher Perry
1
我已经开发了 Android In app 计费库,它使用 "com.android.billingclient:billing:2.1.0"。
以下是其属性:
以下是其属性:
- 库支持 "INAPP"
- 订阅将在以后支持!
- 库使用 Roomdb 来管理您的产品,您不需要实现来检查产品的状态
- 库使用共享依赖项。您的应用程序大小将更小,无需多 dex
- 每次应用启动时,库都会检查您的产品状态。您可以获得状态(已购买或未购买)!
- 客户购买的每个产品都需要在成功状态下 "确认"。库正在为您完成此操作!
- 库支持(立即购买、响应延迟购买成功、响应延迟购买拒绝、用户取消购买)
- Ucdemir
-1
基本上你需要在两个地方购买代码
首先,在你的MainActivity中,这是你的应用程序每次打开的地方,所以要检查购买状态。需要实现purchasesupdated监听器。
其次,当点击按钮以启动购买时。因此,您的按钮所在的活动需要实现purchasesupdated监听器。 如果您的按钮位于MainActivity下,则只需在一个位置即MainActivity处购买代码。
更多信息,请参阅我的工作教程:
- Ideal Developer
1
1欢迎提供解决方案的链接,但请确保您的答案在没有链接的情况下也是有用的:请添加链接周围的上下文,以便您的同行用户知道它是什么以及为什么存在,并引用您链接的页面中最相关的部分,以防目标页面不可用。 仅充当链接的答案可能会被删除。 - cigien
网页内容由stack overflow 提供, 点击上面的可以查看英文原文,
原文链接
原文链接