阴影仅在左侧和上侧裁剪。是什么原因造成的?

3
我正在尝试实现一项功能,允许向透明按钮添加阴影。为此,我正在创建一个图层来遮挡视图内的阴影。然而,我的阴影在左侧和上方被剪切,但在右侧和下方未被剪切。
以下是它的外观(这不是透明按钮,但它们也正常工作,除了阴影像这样被剪切之外)。

enter image description here

这是我实现它的代码:

private func applyShadow() {
    layer.masksToBounds = false

    if shouldApplyShadow && shadowLayer == nil {
        shadowLayer = CAShapeLayer()

        let shapePath = CGPath(roundedRect: bounds, cornerWidth: cornerRadi, cornerHeight: cornerRadi, transform: nil)

        shadowLayer.path = shapePath
        shadowLayer.fillColor = backgroundColor?.cgColor
        shadowLayer.shadowPath = shadowLayer.path
        shadowLayer.shadowRadius = shadowRadius ?? 8
        shadowLayer.shadowColor = (shadowColor ?? .black).cgColor
        shadowLayer.shadowOffset = shadowOffset ?? CGSize(width: 0, height: 0)
        shadowLayer.shadowOpacity = shadowOpacity ?? 0.8

        layer.insertSublayer(shadowLayer!, at: 0)

        /// If there's background color, there is no need to mask inner shadows.
        if backgroundColor != .none && !(innerShadows ?? false) {
            let maskLayer = CAShapeLayer()
            maskLayer.path = { () -> UIBezierPath in
                let path = UIBezierPath()
                path.append(UIBezierPath(cgPath: shapePath))
                path.append(UIBezierPath(rect: UIScreen.main.bounds))
                path.usesEvenOddFillRule = true
                return path
            }().cgPath

            maskLayer.fillRule = .evenOdd
            shadowLayer.mask = maskLayer
        }
    }
}

我认为这与偶奇填充规则算法有关,但我不确定。但是我该如何克服这个剪切问题呢?
提前感谢您。
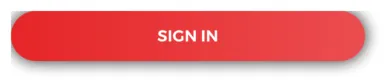
编辑:这是一个透明按钮,带有边框和文本,当应用阴影时它看起来是这样的..这不是我想要的。
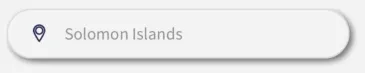
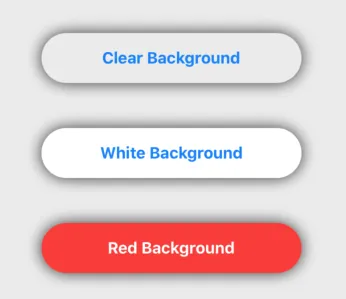
enter image description here

它应该看起来像这样。没有阴影,但也具有清晰的背景色。(除了剪裁的顶部和左侧):

enter image description here


为什么不直接将阴影添加到按钮层而不是添加子层。 - Yoel Jimenez del valle
有多种方法可以添加阴影...您能演示一下如何使用“内部阴影”使透明按钮看起来像什么样子吗? - DonMag
感谢回复。我更新了我的问题。@kjoe第一张图片展示了当您直接向透明层添加阴影时会发生什么。 - Unal Celik
@DonMag 后面的图片是我想要实现的,就像我之前说的,唯一的问题是在顶部和左侧剪切。虽然在这个例子中不太明显,但在上面的红色按钮上是可见的。 - Unal Celik
1个回答

1
我认为有几个问题...
1. 你将UIBezierPath(rect: UIScreen.main.bounds)添加到路径中,但这会将左上角放在层的左上角...这会“裁剪”左上角的阴影。 2. 如果您有背景颜色,则还需要剪切这些角,否则它们将“渗出”到圆角之外。
尝试一下这个(稍微修改了一下)。 它被指定为@IBDesignable,因此您可以在Storyboard / Interface Builder中查看其外观(我没有将任何属性设置为可检查 - 如果您想这样做,则由您决定):
@IBDesignable
class MyRSButton: UIButton {

    var shouldApplyShadow: Bool = true
    var innerShadows: Bool?

    var cornerRadi: CGFloat = 8.0

    var shadowLayer: CAShapeLayer!
    var shadowRadius: CGFloat?
    var shadowColor: UIColor?
    var shadowOffset: CGSize?
    var shadowOpacity: Float?

    override func layoutSubviews() {
        super.layoutSubviews()
        applyShadow()
    }

    private func applyShadow() {

        // needed to prevent background color from bleeding past
        // the rounded corners
        cornerRadi = bounds.size.height * 0.5
        layer.cornerRadius = cornerRadi

        layer.masksToBounds = false

        if shouldApplyShadow && shadowLayer == nil {
            shadowLayer = CAShapeLayer()

            let shapePath = CGPath(roundedRect: bounds, cornerWidth: cornerRadi, cornerHeight: cornerRadi, transform: nil)

            shadowLayer.path = shapePath
            shadowLayer.fillColor = backgroundColor?.cgColor
            shadowLayer.shadowPath = shadowLayer.path
            shadowLayer.shadowRadius = shadowRadius ?? 8
            shadowLayer.shadowColor = (shadowColor ?? .black).cgColor
            shadowLayer.shadowOffset = shadowOffset ?? CGSize(width: 0, height: 0)
            shadowLayer.shadowOpacity = shadowOpacity ?? 0.8

            layer.insertSublayer(shadowLayer!, at: 0)

            /// If there's background color, there is no need to mask inner shadows.
            if backgroundColor != .none && !(innerShadows ?? false) {
                let maskLayer = CAShapeLayer()
                maskLayer.path = { () -> UIBezierPath in
                    let path = UIBezierPath()
                    path.append(UIBezierPath(cgPath: shapePath))

                    // define a rect that is 80-pts wider and taller
                    // than the button... this will "expand" it from center
                    let r = bounds.insetBy(dx: -40, dy: -40)

                    path.append(UIBezierPath(rect: r))

                    path.usesEvenOddFillRule = true
                    return path
                    }().cgPath

                maskLayer.fillRule = .evenOdd
                shadowLayer.mask = maskLayer
            }
        }

    }

}

结果:

enter image description here


谢谢@DonMag!这实际上是一个小技巧,但它解决了我99%的问题。 - Unal Celik

网页内容由stack overflow 提供, 点击上面的
可以查看英文原文,
原文链接