如何在d3.js中创建一个“facetplot”?

3
假设我有一个数据集,其中包含不同运动员在不同的测试日进行的测试。每天,他们会进行几次试验/运行。我想使用d3.js可视化每个运动员在这些日子里的发展情况,但是我不知道如何完成这项任务。
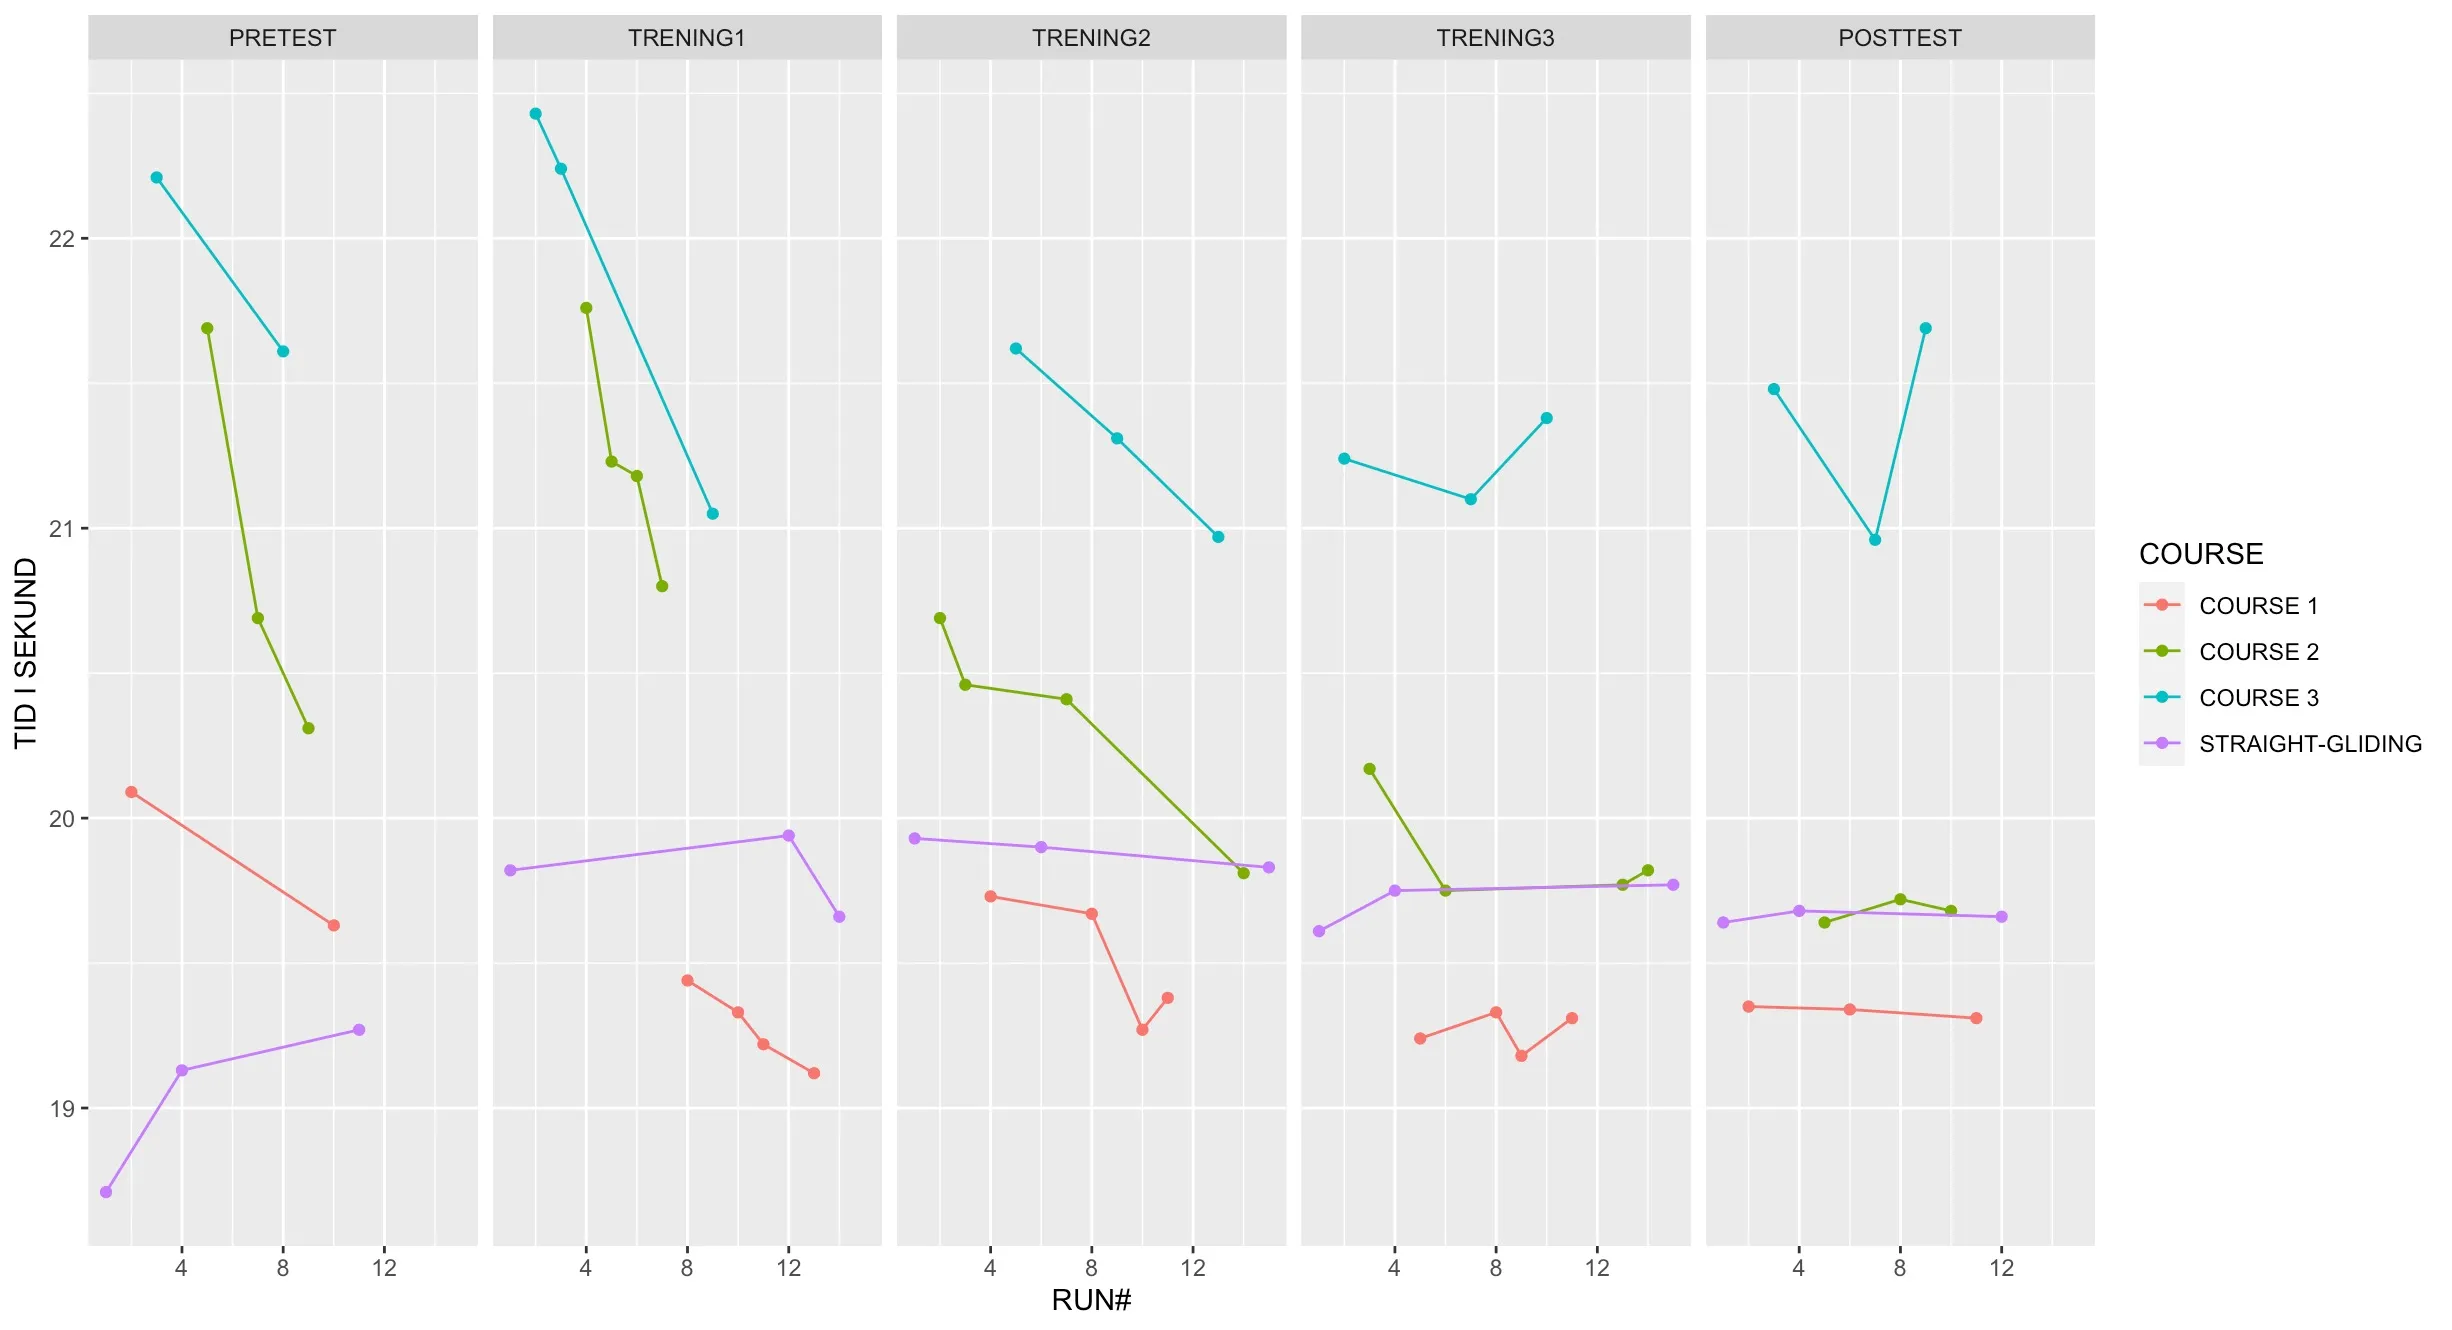
在Python中使用seaborn或在R中使用ggplot2,我会使用一个facetplot,其中每一天都是一个facet。在这些facets中,我会将试验放在x轴上,将表现放在I轴上。但是我该如何在d3.js中实现这一点呢? d3.group和group允许我按运动员对数据集进行分组,并且我了解如何遍历每个运动员的值。但我不知道如何从这里开始实际创建一个facetplot。
我已经尝试在observable上搜索相关的教程,但没有什么好运气。一个有趣且相关的可视化是[Trumps Golfs bt Bostock]。另一个是这个scatterplot

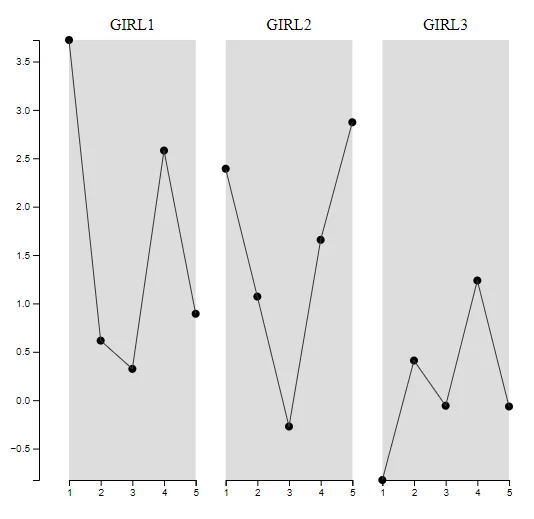
请问有人能指引我正确的方向吗?我创建了一个简单的数据集和散点图,可以作为入门资料。

const data = d3.range(10).map(i => ({
        bib: Math.floor(i / 5) + 1,
        ratio: -1 + Math.random() * 5,
        run: [1, 2, 3, 4, 5][i % 5],
        run: [1, 2, 3, 4, 5][i % 5],
        name: ['GIRL1', 'GIRL2', 'GIRL3', 'GIRL4'][Math.floor(i / 5)]
        }));

        const width = 250;
        const height = 150;
       
        const svg = d3.select('svg')
            .attr('width', width)
            .attr('height', height)

        const margin = {
            top: 20,
            right: 20,
            bottom: 20,
            left: 50
        }

        const innerWidth = width - margin.left - margin.right;
        const innerHeight = height - margin.top - margin.bottom;

        const xScale = d3.scaleLinear()
            .domain(d3.extent(data, d => d.run))
            .range([0, innerWidth])
     
        const yScale = d3.scaleLinear()
            .domain(d3.extent(data, d => d.ratio))
            .range([0, innerHeight])

        const g = svg.append('g')
            .attr('transform', `translate(${margin.left},${margin.top})`)

        g.selectAll('circle')
            .data(data)
            .join('circle')
            .attr('r', 3)
            .attr('cx', d => xScale(d.run))
            .attr('cy', d => yScale(d.ratio))

            g.append("g")
                .call(d3.axisBottom(xScale))
                .attr('transform', `translate(0,${innerHeight})`);;
            
            g.append("g")
                .call(d3.axisLeft(yScale))
<script src="https://unpkg.com/d3@6.2.0/dist/d3.min.js"></script>
<svg></svg>

R中的示例绘图:

enter image description here

2个回答

4
今天 @AndrewReid 又一次比我更快地回答了问题,当然他的答案非常完美 (我喜欢这个图示)。
无论如何,这是我的答案。我们之间的主要区别在于,我使用了 d3.scaleBand (和数据绑定) 来排列每个子线图,而他则较为手动。

<!DOCTYPE html>

<html>
  <head>
    <script src="https://d3js.org/d3.v6.min.js"></script>
    <style>
       svg {
        font-family: arial
      }
      .tick line {
        stroke: white;
        stroke-opacity: 0.7;
        shape-rendering: crispEdges;
      }
    </style>
  </head>

  <body>
    <svg></svg>
    <script>
      let data = [],
        tests = ['PRETEST', 'TRENING1', 'TRENING2', 'TRENING3', 'POSTTEST'],
        courses = ['COURSE 1', 'COURSE 2', 'COURSE 3', 'STRAIGHT-GLIDING'];

      tests.forEach((i) => {
        courses.forEach((j) => {
          d3.range(5).map((k) => {
            data.push({
              test: i,
              course: j,
              run: k,
              ratio: -1 + Math.random() * 5,
            });
          });
        });
      });

      const width = 1100;
      const height = 350;

      const margin = {
        top: 20,
        right: 10,
        bottom: 20,
        left: 30,
      };

      // place wrapper g with margins
      const svg = d3
        .select('svg')
        .attr('width', width)
        .attr('height', height)
        .append('g')
        .attr('transform', 'translate(' + margin.left + ',' + margin.top + ')');

      // calculate the outer scale band for each line graph
      const outerXScale = d3
        .scaleBand()
        .domain(tests)
        .range([0, width - margin.left - margin.right]);

      // inner dimensions of chart based on bandwidth of outer scale
      const innerWidth = outerXScale.bandwidth() - margin.left - margin.right;
      const innerHeight = height - margin.top - margin.bottom;

      // g for each inner chart
      const testG = svg
        .selectAll('.outer')
        .data(d3.group(data, (d) => d.test))
        .enter()
        .append('g')
        .attr('class', 'outer')
        .attr('transform', function (d, i) {
          return 'translate(' + outerXScale(d[0]) + ',' + 0 + ')';
        });

      // some styling
      testG
        .append('rect')
        .attr('width', innerWidth)
        .attr('height', innerHeight)
        .attr('fill', '#f2f2f2');

      testG
        .append('rect')
        .attr('width', innerWidth)
        .attr('height', 17)
        .attr('transform', 'translate(' + 0 + ',' + -17 + ')')
        .attr('fill', '#e6e6e6');

      // header
      testG
        .append('text')
        .text(function (d) {
          return d[0];
        })
        .attr('text-anchor', 'middle')
        .attr('transform', 'translate(' + innerWidth / 2 + ',' + -2 + ')');

      // inner scales
      const innerXScale = d3
        .scaleLinear()
        .domain(d3.extent(data, (d) => d.run))
        .range([0, innerWidth]);

      const innerYScale = d3
        .scaleLinear()
        .domain(d3.extent(data, (d) => d.ratio))
        .range([innerHeight, 0]);

      testG
        .append('g')
        .call(d3.axisBottom(innerXScale).tickSize(-innerHeight))
        .attr('transform', `translate(0,${innerHeight})`);

      testG.append('g').call(d3.axisLeft(innerYScale).tickSize(-innerWidth));

      testG
        .selectAll('.line')
        .data(function (d) {
          return d3.group(d[1], (d) => d.course);
        })
        .enter()
        .append('path')
        .attr('d', function (d) {
          return d3
            .line()
            .x((d) => innerXScale(d.run))
            .y((d) => innerYScale(d.ratio))(d[1]);
        })
        .attr('fill', 'none')
        .attr('stroke', function (d, i) {
          return d3.schemeCategory10[i];
        })
        .attr('stroke-width', 1);
    </script>
  </body>
</html>


哈,糟糕,看到你的评论就等了一会儿。可能不够长吧。如果SO能说出谁开始回答就好了,这周我就可以省些时间了。好的一面是,如果我们继续回答相同的问题,也许我可以获得体育精神徽章。 - Andrew Reid
@AndrewReid,别担心,如果我有冒犯你的地方请原谅。实际上,我一直很喜欢看到我们微妙不同的方法。 - Mark
没有踩到任何人的脚趾头,总是很喜欢看到你的答案,我也喜欢能够比较我们不同的方法。 - Andrew Reid

4

设置SVG

首先,让我们制定一个约定,以便我们可以对页面进行间距和结构的设置。只有一行图表时,这会稍微容易些。

输入图像描述

我们需要定义上面图片中的变量,然后我们就可以导出每个图的宽度和高度:

const height = 500;
const width = 500;
const margin = {
   top: 50,
   left: 50,
   right: 50,
   bottom: 50
}
const padding = 10; // labelled `pad` in image due to space constraints

const plotWidth = (width-padding)/numberOfPlots - padding;
const plotHeight = height-padding*2;

当然,你可以自己安排布局,我包含这部分内容主要是为了使回答的其余部分更易于理解。

下面我使用 g 来保存边距所形成的区域,从而使后续定位更容易。

现在我们有两个不同的比例尺,你已经在你的代码中完成了这个,但是我们现在可以使用上述间距约定来定义 plotWidthplotHeight 的范围。

绘制数据

现在我们准备好创建图表了。为此,我们将创建一个嵌套数据集:我们希望按图表对数据进行分组,并如你所指出的那样,我们可以使用 d3.group:

 const grouped = d3.group(data,d=>d.bib);

对于每个分组,我们将创建一个 g 并使用基于上述结构的翻译进行定位。
 const plots = g.selectAll(".plot")
  .data(grouped)
  .enter()
  .append("g")
  .attr("transform", function(d,i) {
     return "translate("+[i*(padding+plotWidth)+padding,padding]+")";
   })
  

现在我们已经准备好使用嵌套数据进行绘图:

   plots.selectAll(null)
     .data(d=>d[1])
     .enter()
     .append("circle")
     ... // and so forth.

下面的代码片段使用d=>d[1],因为该组所属物品的数组位于此处。d[0]是该组的标识符。如果我的数据数组是一个数组的数组,我将简单地使用d=>d;
现在我们可以在每个图上附加x轴:
 plots.append("g")
   .attr("transform","translate("+[0,plotHeight]+")")
   .call(d3.axisBottom(x));

还有一个y轴:

 g.append("g")
   .attr("transform","translate("+[0,padding]+")");
   .call(d3.axisLeft(y));

我没有添加父x轴,根据您的使用情况,您可能想要标记它,也可能不需要。我还注意到,我按bib而非run对数据进行了分组,但原则仍然相同:分组数据,输入和定位父级图,然后将数据点添加到父级图中。

示例

// Data and manipluation:
const data = d3.range(15).map(i => ({
        bib: Math.floor(i / 5) + 1,
        ratio: -1 + Math.random() * 5,
        run: [1, 2, 3, 4, 5][i % 5],
        run: [1, 2, 3, 4, 5][i % 5],
        name: ['GIRL1', 'GIRL2', 'GIRL3', 'GIRL4'][Math.floor(i / 5)]
        }));
        
const grouped = d3.group(data,d=>d.bib);


// Dimensions:
const height = 500;
const width = 500;
const margin = {
       top: 10,
       left: 50,
       right: 50,
       bottom: 50
    }
const padding = 30; // labelled `pad` in image due to space constraints

const plotWidth = (width-padding)/grouped.size - padding;
const plotHeight = height-padding*2;

const svg = d3.select("body")
  .append("svg")
  .attr("width", margin.left+width+margin.right)
  .attr("height", margin.top+height+margin.bottom);
  
const g = svg.append("g")
  .attr("transform","translate("+[margin.left,margin.top]+")");

//Scales:
 const xScale = d3.scaleLinear()
   .domain(d3.extent(data, d => d.run))
   .range([0, plotWidth]);
     
const yScale = d3.scaleLinear()
   .domain(d3.extent(data, d => d.ratio))
   .range([plotHeight, 0]);
   
// Place plots:
const plots = g.selectAll(null)
  .data(grouped)
  .enter()
  .append("g")
  .attr("transform", function(d,i) {
     return "translate("+[i*(padding+plotWidth)+padding,padding]+")";
   })
   
//Optional plot background:
plots.append("rect")
  .attr("width",plotWidth)
  .attr("height",plotHeight)
  .attr("fill","#ddd");
   

// Plot actual data
plots.selectAll(null)
     .data(d=>d[1])
     .enter()
     .append("circle")
     .attr("r", 4)
     .attr("cy", d=>yScale(d.ratio))
     .attr("cx", d=>xScale(d.run))

// Plot line if needed:
plots.append("path")
  .attr("d", function(d) {
    return d3.line()
               .x(d=>xScale(d.run))
               .y(d=>yScale(d.ratio))
               (d[1])
   })
   .attr("stroke", "#333")
   .attr("stroke-width", 1)
   .attr("fill","none")
   
// Plot names if needed:
plots.append("text")
  .attr("x", plotWidth/2)
  .attr("y", -10)
  .text(function(d) {
    return d[1][0].name;
  })
  .attr("text-anchor","middle");
   
// Plot axes     
 plots.append("g")
   .attr("transform","translate("+[0,plotHeight]+")")
   .call(d3.axisBottom(xScale).ticks(4));


 g.append("g")
   .attr("transform","translate("+[0,padding]+")")
   .call(d3.axisLeft(yScale))
<script src="https://cdnjs.cloudflare.com/ajax/libs/d3/6.1.0/d3.min.js"></script>

这应该会生成:

输入图像描述


感谢您抽出时间创建这个逐步教程。现在我真正理解如何做了。不过有一件事:plots.selectAll(null)背后的逻辑是什么?这个我没明白。 - Cmagelssen
1
selectAll(null) 确保了一个空选择,以便为数据数组中的每个项目输入一个元素。由于 plots 是一组空的 g 元素的选择,我们也可以使用 selectAll("circle") 或任何选择器。由于在 g 元素中没有要选择的内容,因此我们将始终拥有一个空选择。 - Andrew Reid
如果你也想要多行,你该怎么做呢? :) - Cmagelssen

网页内容由stack overflow 提供, 点击上面的
可以查看英文原文,
原文链接