旋转矩形光栅化算法

11
简而言之:我想实现一种非近似的Bresenham线算法版本,但是针对的是矩形而不是线,并且其点不一定对齐网格。
给定一个正方形网格和由四个未对齐网格的点组成的矩形,我要找到被矩形完全或部分覆盖的所有网格方块的列表。
Bresenham线算法是近似的-并没有识别出所有部分覆盖的方块。我正在寻找一种“完美”的算法,它没有误判或漏判。

现在如何将矩形光栅化?(请参见https://dev59.com/cmLVa4cB1Zd3GeqPwXN5#19078088)。如果使用一组平行线来填充区域,则会出现伪影(透明度的孔或过度着色的区域)。如果您不想实现多边形光栅化,有一些技巧可以处理孔。只需为内部线设置2或3个像素而不是1个像素即可。如果Bresenham对您不好,请使用DDA(我一直使用整数版本,没有任何直接除法或乘法)。 - Spektre
为什么你确切地要将矩形进行光栅化呢?你可以使用任何可用的多边形光栅化方法,速度相当快。所以,你确定要为矩形设计自定义算法吗? - minorlogic
4个回答

4

这是一个老问题,但我已经解决了这个问题(C++)。

https://github.com/feelinfine/tracer
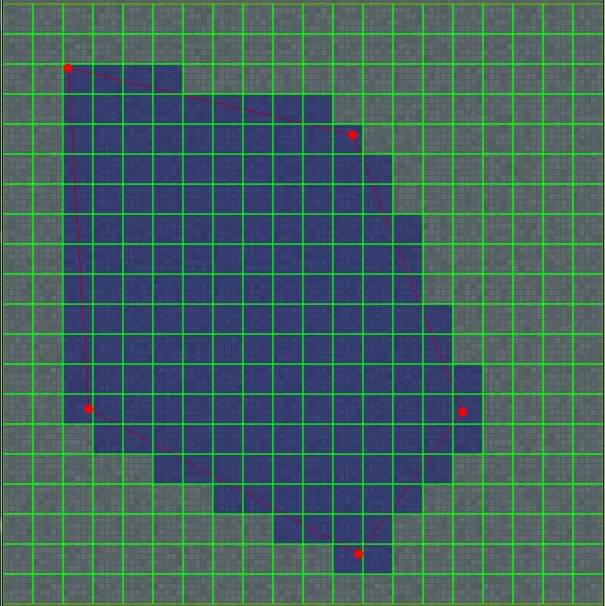
也许对某些人有用。

(抱歉我的英语不好)

示例图片

单行跟踪

template <typename PointType>
std::set<V2i> trace_line(const PointType& _start_point, const PointType& _end_point, size_t _cell_size)
{   
    auto point_to_grid_fnc = [_cell_size](const auto& _point)
    {
        return V2i(std::floor((double)_point.x / _cell_size), std::floor((double)_point.y / _cell_size));
    };

    V2i start_cell = point_to_grid_fnc(_start_point);
    V2i last_cell = point_to_grid_fnc(_end_point);

    PointType direction = _end_point - _start_point;

    //Moving direction (cells)
    int step_x = (direction.x >= 0) ? 1 : -1;
    int step_y = (direction.y >= 0) ? 1 : -1;

    //Normalize vector
    double hypot = std::hypot(direction.x, direction.y);
    V2d norm_direction(direction.x / hypot, direction.y / hypot);

    //Distance to the nearest square side
    double near_x = (step_x >= 0) ? (start_cell.x + 1)*_cell_size - _start_point.x : _start_point.x - (start_cell.x*_cell_size);    
    double near_y = (step_y >= 0) ? (start_cell.y + 1)*_cell_size - _start_point.y : _start_point.y - (start_cell.y*_cell_size);

    //How far along the ray we must move to cross the first vertical (ray_step_to_vside) / or horizontal (ray_step_to_hside) grid line
    double ray_step_to_vside = (norm_direction.x != 0) ? near_x / norm_direction.x : std::numeric_limits<double>::max();
    double ray_step_to_hside = (norm_direction.y != 0) ? near_y / norm_direction.y : std::numeric_limits<double>::max();

    //How far along the ray we must move for horizontal (dx)/ or vertical (dy) component of such movement to equal the cell size
    double dx = (norm_direction.x != 0) ? _cell_size / norm_direction.x : std::numeric_limits<double>::max();
    double dy = (norm_direction.y != 0) ? _cell_size / norm_direction.y : std::numeric_limits<double>::max();

    //Tracing loop
    std::set<V2i> cells;
    cells.insert(start_cell);

    V2i current_cell = start_cell;

    size_t grid_bound_x = std::abs(last_cell.x - start_cell.x);
    size_t grid_bound_y = std::abs(last_cell.y - start_cell.y);

    size_t counter = 0;

    while (counter != (grid_bound_x + grid_bound_y))
    {
        if (std::abs(ray_step_to_vside) < std::abs(ray_step_to_hside))
        {
            ray_step_to_vside = ray_step_to_vside + dx; //to the next vertical grid line
            current_cell.x = current_cell.x + step_x;
        }
        else
        {
            ray_step_to_hside = ray_step_to_hside + dy;//to the next horizontal grid line
            current_cell.y = current_cell.y + step_y;
        }

        ++counter;

        cells.insert(current_cell);
    };

    return cells;
}

获取所有单元格
template <typename Container>
std::set<V2i> pick_cells(Container&& _points, size_t _cell_size)
{
    if (_points.size() < 2 || _cell_size <= 0)
        return std::set<V2i>();

    Container points = std::forward<Container>(_points);

    auto add_to_set = [](auto& _set, const auto& _to_append)
    {
        _set.insert(std::cbegin(_to_append), std::cend(_to_append));
    };

    //Outline
    std::set<V2i> cells;

    /*
    for (auto it = std::begin(_points); it != std::prev(std::end(_points)); ++it)
        add_to_set(cells, trace_line(*it, *std::next(it), _cell_size));
    add_to_set(cells, trace_line(_points.back(), _points.front(), _cell_size));
    */

    //Maybe this code works faster
    std::vector<std::future<std::set<V2i> > > results;

    using PointType = decltype(points.cbegin())::value_type;

    for (auto it = points.cbegin(); it != std::prev(points.cend()); ++it)           
        results.push_back(std::async(trace_line<PointType>, *it, *std::next(it), _cell_size));

    results.push_back(std::async(trace_line<PointType>, points.back(), points.front(), _cell_size));    

    for (auto& it : results)
        add_to_set(cells, it.get());

    //Inner
    std::set<V2i> to_add;

    int last_x = cells.begin()->x;
    int counter = cells.begin()->y;

    for (auto& it : cells)
    {
        if (last_x != it.x)
        {
            counter = it.y;
            last_x = it.x;
        }

        if (it.y > counter) 
        {
            for (int i = counter; i < it.y; ++i)
                to_add.insert(V2i(it.x, i));
        }

        ++counter;
    }

    add_to_set(cells, to_add);

    return cells;
}

类型

template <typename _T>
struct V2
{
    _T x, y;

    V2(_T _x = 0, _T _y = 0) : x(_x), y(_y)
    {
    };

    V2 operator-(const V2& _rhs) const
    {
        return V2(x - _rhs.x, y - _rhs.y);
    }

    bool operator==(const V2& _rhs) const
    {
        return (x == _rhs.x) && (y == _rhs.y);
    }

    //for std::set sorting
    bool operator<(const V2& _rhs) const
    {
        return (x == _rhs.x) ? (y < _rhs.y) : (x < _rhs.x);
    }
};

using V2d = V2<double>;
using V2i = V2<int>;

使用方法

std::vector<V2d> points = { {200, 200}, {400, 400}, {500,100} };
size_t cell_size = 30;
auto cells = pick_cells(points, cell_size);
for (auto& it : cells)
    ...                 //do something with cells

扫描线追踪是一个不错的方法,但不要使用这个实现。我已经进行了基准测试,它比我实现的另一种算法慢大约130倍,而那个算法本应该更慢。此外,无论你使用什么算法,都要直接使用索引,不要将它们存储在向量或集合中,这会严重影响性能。 - Stefan Fabian
我知道我的实现性能很低。它并不是为在严肃的项目中使用而设计的,只是一个一般的想法。所以我可以确认 - 这是一个非常非常慢和糟糕设计的解决方案。请勿在没有进行良好重构的情况下使用 :) - StrangeOwl

3
您可以使用扫描线方法。由于矩形是一个闭合凸多边形,因此存储每条水平扫描线的最左和最右像素就足够了。(也需要存储顶部和底部扫描线。)
Bresenham算法尝试在较小维度中不使用相邻单元格绘制细且视觉上令人愉悦的线条。我们需要一种算法来访问多边形边缘穿过的每个单元格。基本思路是找到每条边的起始单元格(x,y),然后在边与竖直边界相交时调整x,在边与水平边界相交时调整y。
我们可以通过一种沿着边缘行进并在第一个节点n1处为0.0,在第二个节点n2处为1.0的归一化坐标s来表示交点。
    var x = Math.floor(n1.x / cellsize);
    var y = Math.floor(n1.y / cellsize);
    var s = 0;

垂直交点可以表示为从初始点 sx 开始,每隔 dsx 等距离的步长。
    var dx = n2.x - n1.x;

    var sx = 10;            // default value > 1.0

    // first intersection
    if (dx < 0) sx = (cellsize * x - n1.x) / dx;
    if (dx > 0) sx = (cellsize * (x + 1) - n1.x) / dx;

    var dsx = (dx != 0) ? grid / Math.abs(dx) : 0;

同样适用于水平交叉点。默认值大于1.0可以捕捉水平和垂直线的情况。将第一个点添加到扫描线数据中:
    add(scan, x, y);

然后,我们可以通过查看下一个与最小s相交的交叉点来访问下一个相邻单元格。

    while (sx <= 1 || sy <= 1) {
        if (sx < sy) {
            sx += dsx;
            if (dx > 0) x++; else x--;
        } else {
            sy += dsy;
            if (dy > 0) y++; else y--;
        }
        add(scan, x, y);
    }

对于所有四个边缘和相同的扫描线数据,请执行此操作。然后填充所有单元格:
    for (var y in scan) {
        var x = scan[y].min;
        var xend = scan[y].max + 1;
        while (x < xend) {
            // do something with cell (x, y)
            x++;
        }
    }

我只是大致看了MBo提供的链接。这篇论文中提出的方法似乎与我的方法基本相同。如果是这样,请原谅我多余的答案,但在解决问题后,我认为我可以将其发表出来。


2
这不是最优的,但可能会给出一个大致的想法。
首先将矩形水平或垂直对齐的特殊情况分别处理。这很容易测试并简化其余部分。
您可以将矩形表示为一组4个不等式a1 x + b1 y >= c1 a1 x + b1 y <= c2 a3 x + b3 y >= c3 a3 x + b3 y <= c4,因为矩形的边是平行的,因此某些常数是相同的。您还有(多个)a3=b1b3=-a1。您可以将每个不等式乘以公共因子,以便使用整数进行计算。
现在考虑每个具有固定y值的扫描线。 对于每个y值,找到线与扫描线相交的四个点。也就是找到每条线上面的解。一点逻辑将找到x的最小和最大值。绘制这些值之间的所有像素。
你的要求是所有部分被覆盖的方块都必须包含在内,这使得问题有些棘手。可以通过考虑两个相邻的扫描线来解决。要绘制两条扫描线之间的点,需要找到两条线的最小x和最大x之间的点。例如,假设a1 x+b1 y>=c是图中左下线的不等式。想要找到最大的x使得a1 x + b1 y < c,这将是floor((c-b1 y)/a1),称其为minx(y),还要找到minx(y+1),并且左侧点将是这两个值中的最小值。
有许多简单的优化方法,可以找到上下角的y值,从而减少要测试的y值范围。只需要测试两个边缘。对于每条线的每个端点,需要进行一次乘法、一次减法和一次除法。除法是最慢的部分,大约比其他操作慢4倍。可能可以使用Bresenham或DDA算法来消除这种情况,正如其他人所提到的那样。

1

有一种Amanatides和Woo的方法可以枚举所有相交的单元格(用于光线跟踪的快速体素遍历算法)
这里是实际实现。
作为副作用,您将获得与网格线相交的点 - 如果您需要部分覆盖单元格的区域(用于抗锯齿等),这可能很有用。


网页内容由stack overflow 提供, 点击上面的
可以查看英文原文,
原文链接