如何通过JavaScript动态创建动画路径?

4

我正在制作一个动态背景。

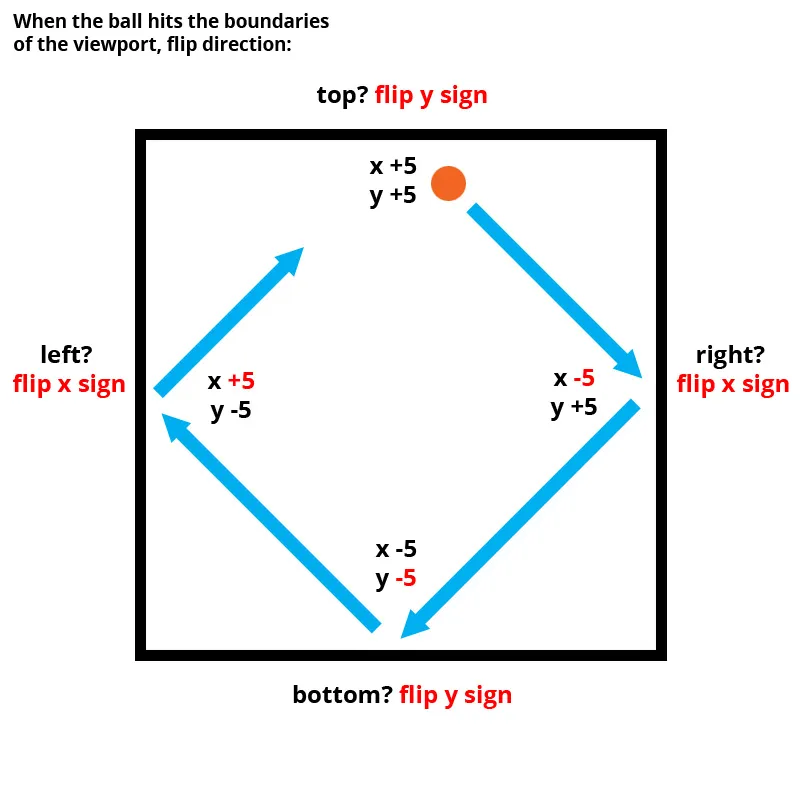
我的目标是让“气泡”以随机轨迹和随机速度移动。到达屏幕边缘时,它会传送回对面继续路径。

我想通过CSS进行动画,但我希望每个“气泡”所跟随的路径都是随机的。

类似于每个元素:

每个元素都会跟随自己的随机生成路径并无限重复

该如何通过JavaScript实现这种效果?
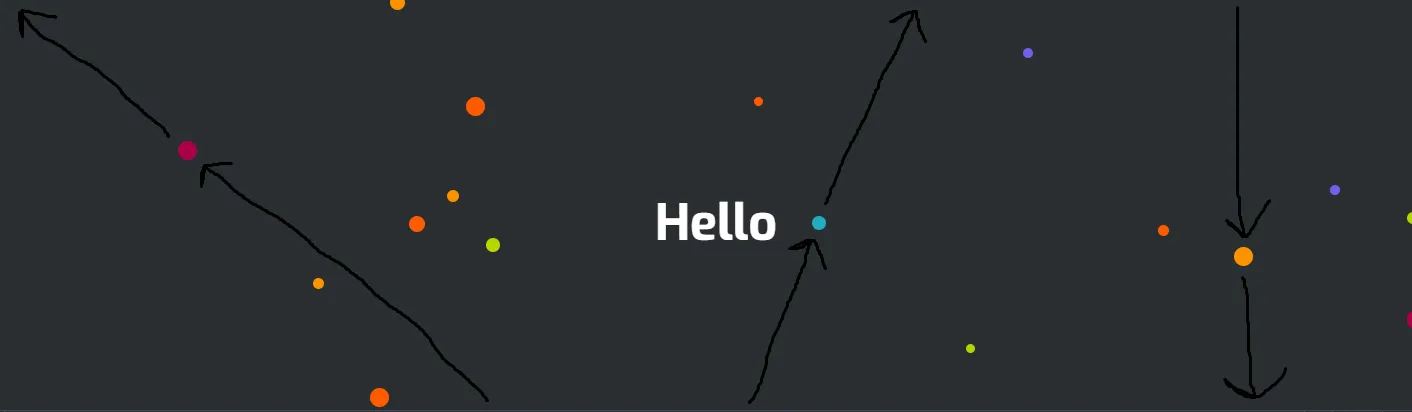
这是当前项目的状态。

Codepen : https://codepen.io/JosephChunta/pen/WNrKxeY

当前的JavaScript:

const orderedNumber = document.querySelectorAll('.backgroundBubble');
var colors = [
  '#ff5b00', '#b8d500', '#795ced', 
  '#ab004a', '#21aec0', '#fe9300' 
];
for (li of orderedNumber) {
  var random_color = colors[Math.floor(Math.random() * colors.length)];
  li.style['background'] = random_color;
  var random_dimensions = Math.floor(Math.random() * 20 + 5);
  li.style['width'] = random_dimensions + "px";
  li.style['height'] = random_dimensions + "px";
  var random_left = Math.floor(Math.random() * 99 + 1);
  li.style['left'] = random_left + "%";
  var random_top = Math.floor(Math.random() * 99 + 1);
  li.style['top'] = random_top + "%";
}

"

气泡式HTML

"
<div class="context">
  <h1>Hello</h1>
</div>

<div class="area">
  <ul class="circles">
    <li class="backgroundBubble"></li>
    <li class="backgroundBubble"></li>
    <li class="backgroundBubble"></li>
    <li class="backgroundBubble"></li>
    <li class="backgroundBubble"></li>
    <li class="backgroundBubble"></li>
    <li class="backgroundBubble"></li>
    <li class="backgroundBubble"></li>
    <li class="backgroundBubble"></li>
    <li class="backgroundBubble"></li>
    <li class="backgroundBubble"></li>
    <li class="backgroundBubble"></li>
    <li class="backgroundBubble"></li>
    <li class="backgroundBubble"></li>
    <li class="backgroundBubble"></li>
    <li class="backgroundBubble"></li>
    <li class="backgroundBubble"></li>
    <li class="backgroundBubble"></li>
    <li class="backgroundBubble"></li>
    <li class="backgroundBubble"></li>
  </ul>
</div>

资源:CSS动画移动 - Tân
我已经在下面发布了一个解决方案。如果您需要进一步的澄清,请告诉我。 - Kostas Minaidis
2个回答

2
这里有一个可能适用于您的解决方案:
  • 使用CSS属性transform: translate( x, y ),每个元素(圆)沿着随机路径移动

  • 每个元素都会获得一个随机的x、y偏移量,以便以稍微不同的轨迹移动

  • 当每个元素碰到视口的极限时(window.innerWidth = 最右边,window.innerHeight = 底部,0 = 顶部和左边),它通过取反初始偏移值offsetXoffsetY来改变方向

  • 该动画目前正在使用setInterval实现,但更好的选择可能是requestAnimationFrame

(请查看我放置的注释和新插入的代码。)

Codepen

const orderedNumber = document.querySelectorAll('.backgroundBubble');
var colors = [
  '#ff5b00', '#b8d500', '#795ced', 
  '#ab004a', '#21aec0', '#fe9300' 
];
const liData = [];

orderedNumber.forEach((li,index)=>{
  
  var random_color = colors[Math.floor(Math.random() * colors.length)];
  li.style['background'] = random_color;
  var random_dimensions = Math.floor(Math.random() * 20 + 5);
  li.style['width'] = random_dimensions + "px";
  li.style['height'] = random_dimensions + "px";
  var random_left = Math.floor(Math.random() * 99 + 1);
  li.style['left'] = random_left + "%";
  var random_top = Math.floor(Math.random() * 99 + 1);
  li.style['top'] = random_top + "%";
  // ADDING MOVEMENT VALUES: In here each element
  // gets some additional data that will be used to define its movement.
  liData[index] = {
    hasFlipped: false, // Has the element hit a viewport boundary? If yes, this property gets flipped: false -> true -> false
    targetX: 0, // Current x position. Starts at 0.
    targetY: 0, // Current y position. Starts at 0.
    offsetX: Math.floor( Math.random() * 10 ), // Random x offset by which the element will move across the x axis
    offsetY: Math.floor( Math.random() * 10 ) // Random y offset by which the element will move across the y axis
  }

});

setInterval(function(){
  orderedNumber.forEach((li,index)=>{
    // Next line will give us the top, left, right and bottom position of the element:
    const { top, left, right, bottom } = li.getBoundingClientRect();
    // Get the offsetX and offsetY so that we can move the element
    let { offsetX, offsetY } = liData[index];
    if ( liData[index].hasFlipped ){
      // Did the element just hit the top or left viewport boundaries?
      if ( top <= 0 || left <= 0 ){
        // ...if so, flip its movement direction
        liData[index].hasFlipped = false;
      }
      liData[index].targetX -= offsetX;
      liData[index].targetY -= offsetY;

    } else {
      // Did the element just hit the bottom, right viewport boundaries?
      // ...if so, flip its movement direction
      if ( bottom >= window.innerHeight || right >= window.innerWidth ){
        liData[index].hasFlipped = true;
      }
      liData[index].targetX += offsetX;
      liData[index].targetY += offsetY;
    }
      li.style.transform = `translate( ${liData[index].targetX}px,  ${liData[index].targetY}px )`;

  });

}, 50 )
@import url('https://fonts.googleapis.com/css?family=Exo:400,700');

*{
    margin: 0px;
    padding: 0px;
}

.context {
    width: 100%;
    position: absolute;
    top:50vh;
}

.context h1{
    text-align: center;
    color: #fff;
    font-size: 50px;
    font-family: 'Exo', sans-serif;
}


.area{
    background: #2a2e31;  
    background: -webkit-linear-gradient(to left, #8f94fb, #4e54c8); // #026e9f #03a9f4
    width: 100%;
    height:100vh;
}

.circles{
    position: absolute;
    top: 0;
    left: 0;
    width: 100%;
    height: 100%;
    overflow: hidden;
}

.circles li{
    position: absolute;
    display: block;
    list-style: none;
    bottom: -150px;
    border-radius: 50%;
}
<div class="context">
  <h1>Hello</h1>
</div>

<div class="area">
  <ul class="circles">
    <li class="backgroundBubble"></li>
    <li class="backgroundBubble"></li>
    <li class="backgroundBubble"></li>
    <li class="backgroundBubble"></li>
    <li class="backgroundBubble"></li>
    <li class="backgroundBubble"></li>
    <li class="backgroundBubble"></li>
    <li class="backgroundBubble"></li>
    <li class="backgroundBubble"></li>
    <li class="backgroundBubble"></li>
    <li class="backgroundBubble"></li>
    <li class="backgroundBubble"></li>
    <li class="backgroundBubble"></li>
    <li class="backgroundBubble"></li>
    <li class="backgroundBubble"></li>
    <li class="backgroundBubble"></li>
    <li class="backgroundBubble"></li>
    <li class="backgroundBubble"></li>
    <li class="backgroundBubble"></li>
    <li class="backgroundBubble"></li>
  </ul>
</div>


如何修改运动代码,使得球体在碰到墙壁后反弹而不是翻转其运动方向?

在这种情况下,我们可以检查球是否撞击到了边界,如果它撞击到左/右两侧之一,我们将翻转X符号(位置 -> 负数 -> 正数 -> ...),否则,如果它撞击到了上/下方的一侧,我们将翻转Y符号。

这里有一个草图以阐明这一点:

enter image description here

以下是修改后的代码实现该功能:

const orderedNumber = document.querySelectorAll('.backgroundBubble');
var colors = [
  '#ff5b00', '#b8d500', '#795ced', 
  '#ab004a', '#21aec0', '#fe9300' 
];
const liData = [];

orderedNumber.forEach((li,index)=>{
  
  var random_color = colors[Math.floor(Math.random() * colors.length)];
  li.style['background'] = random_color;
  var random_dimensions = Math.floor(Math.random() * 20 + 5);
  li.style['width'] = random_dimensions + "px";
  li.style['height'] = random_dimensions + "px";
  var random_left = Math.floor(Math.random() * 99 + 1);
  li.style['left'] = random_left + "%";
  var random_top = Math.floor(Math.random() * 99 + 1);
  li.style['top'] = random_top + "%";
  // ADDING MOVEMENT VALUES:
  liData[index] = {
    targetX: 0,
    targetY: 0,
    offsetX: Math.floor( Math.random() * 10 ),
    offsetY: Math.floor( Math.random() * 10 ),
    directionX: 1, // Define each ball's direction using a multiplier. Positive means left-to-right. Negative means right-to-left.
    directionY: 1  // Same here, but for top-to-bottom and vice versa
  }

});

setInterval(function(){
  orderedNumber.forEach((li,index)=>{
    
    const { top, left, right, bottom } = li.getBoundingClientRect();
    let { offsetX, offsetY } = liData[index];
   
    // If we've just hit the top or bottom boundaries, we'll flip the Y direction:
    if ( top <= 0 || bottom >= window.innerHeight ){ 
      liData[index].directionY = -liData[index].directionY; 
    } 
    // If we've just hit the left or right boundaries, we'll flip the X direction:
    if ( left <= 0 || right >= window.innerWidth){ 
      liData[index].directionX = -liData[index].directionX;
    } 

    // The multiplier, either 1 or -1, defines the balls direction on each axis:
    liData[index].targetX += offsetX * liData[index].directionX; 
    liData[index].targetY += offsetY * liData[index].directionY; 

    li.style.transform = `translate( ${liData[index].targetX}px,  ${liData[index].targetY}px )`;

  });

}, 50 )
@import url('https://fonts.googleapis.com/css?family=Exo:400,700');

*{
    margin: 0px;
    padding: 0px;
}

.context {
    width: 100%;
    position: absolute;
    top:50vh;
}

.context h1{
    text-align: center;
    color: #fff;
    font-size: 50px;
    font-family: 'Exo', sans-serif;
}


.area{
    background: #2a2e31;  
    background: -webkit-linear-gradient(to left, #8f94fb, #4e54c8); // #026e9f #03a9f4
    width: 100%;
    height:100vh;
}

.circles{
    position: absolute;
    top: 0;
    left: 0;
    width: 100%;
    height: 100%;
    overflow: hidden;
}

.circles li{
    position: absolute;
    display: block;
    list-style: none;
    bottom: -150px;
    border-radius: 50%;
}
<div class="context">
  <h1>Hello</h1>
</div>

<div class="area">
  <ul class="circles">
    <li class="backgroundBubble"></li>
    <li class="backgroundBubble"></li>
    <li class="backgroundBubble"></li>
    <li class="backgroundBubble"></li>
    <li class="backgroundBubble"></li>
    <li class="backgroundBubble"></li>
    <li class="backgroundBubble"></li>
    <li class="backgroundBubble"></li>
    <li class="backgroundBubble"></li>
    <li class="backgroundBubble"></li>
    <li class="backgroundBubble"></li>
    <li class="backgroundBubble"></li>
    <li class="backgroundBubble"></li>
    <li class="backgroundBubble"></li>
    <li class="backgroundBubble"></li>
    <li class="backgroundBubble"></li>
    <li class="backgroundBubble"></li>
    <li class="backgroundBubble"></li>
    <li class="backgroundBubble"></li>
    <li class="backgroundBubble"></li>
  </ul>
</div>

Codepen


下一步操作:

  • 您可以使用requestAnimationFrame代替setInterval(),以获得更好的性能。

  • 尝试使用各种随机方案来设置偏移量x和y值,以引入更多轨迹和以不同速度移动的元素。


移动代码如何更改,以便在撞到墙壁时反弹,而不是翻转其移动方向?例如,如果气泡向右上方移动,并撞到顶部,则会继续向右移动,然后开始向下移动。 - Joseph Chunta
我已经更新了答案,并包含了球“弹跳”的解决方案。 - Kostas Minaidis

-1

这个可能会起作用,但是它不是瞬间传送到屏幕的另一端,而是反弹回来,创造出更有趣的动画效果。

 const orderedNumber = document.querySelectorAll('.backgroundBubble');
var colors = [
  '#ff5b00', '#b8d500', '#795ced', 
  '#ab004a', '#21aec0', '#fe9300' 
];
const liData = [];

orderedNumber.forEach((li,index)=>{
  
  var random_color = colors[Math.floor(Math.random() * colors.length)];
  li.style['background'] = random_color;
  var random_dimensions = Math.floor(Math.random() * 20 + 5);
  li.style['width'] = random_dimensions + "px";
  li.style['height'] = random_dimensions + "px";
  var random_left = Math.floor(Math.random() * 99 + 1);
  li.style['left'] = random_left + "%";
  var random_top = Math.floor(Math.random() * 99 + 1);
  li.style['top'] = random_top + "%";
  // ADDING MOVEMENT VALUES:
  liData[index] = {
    hasFlipped: false,
    targetX: 0,
    targetY: 0,
    offsetX: Math.floor( Math.random() * 10 ),
    offsetY: Math.floor( Math.random() * 10 )
  }

});

setInterval(function(){
  orderedNumber.forEach((li,index)=>{
    const { top, left, right, bottom } = li.getBoundingClientRect();
    let { offsetX, offsetY } = liData[index];
    if ( liData[index].hasFlipped ){
      if ( top <= 0 || left <= 0 ){
        liData[index].hasFlipped = false;
      }
      liData[index].targetX -= offsetX;
      liData[index].targetY -= offsetY;

    } else {
      if ( bottom >= window.innerHeight || right >= window.innerWidth ){
        liData[index].hasFlipped = true;
      }
      liData[index].targetX += offsetX;
      liData[index].targetY += offsetY;
    }
      li.style.transform = `translate( ${liData[index].targetX}px,  ${liData[index].targetY}px )`;

  });

}, 50 )

只需用您的JavaScript替换它,它就可以工作了


抄袭别人的解决方案,对任何人都没有帮助。 - Kostas Minaidis

网页内容由stack overflow 提供, 点击上面的
可以查看英文原文,
原文链接