如 style.xml 中所述,出现了一个奇怪的错误,显示“无法解析符号'Theme'”,这是相当奇怪的。
请参见错误图片:

我的项目规格:
使用 Android Studio 3.0
和 gradle 版本 3.0.0
和 distributionUrl=https://services.gradle.org/distributions/gradle-4.1-all.zip
编辑:
尝试通过转到文件 > 使缓存无效/重启 > 无效并重启来清除缓存,但无济于事,错误仍然存在。
如 style.xml 中所述,出现了一个奇怪的错误,显示“无法解析符号'Theme'”,这是相当奇怪的。
请参见错误图片:
我的项目规格:
使用 Android Studio 3.0
和 gradle 版本 3.0.0
和 distributionUrl=https://services.gradle.org/distributions/gradle-4.1-all.zip
编辑:
尝试通过转到文件 > 使缓存无效/重启 > 无效并重启来清除缓存,但无济于事,错误仍然存在。
升级到Android Studio 3.1(编辑:在v3.1.3版本中仍然存在相同的问题)后,我遇到了同样的问题。对我有效的方法是单击文件 > 关闭项目,然后从Studio的对话框中重新打开该项目。
可能的另一个原因是:构建脚本没有设置Google的Maven存储库。
在您项目的主build.gradle中添加此行:
buildscript {
    repositories {
        google()  <-- this
        // Be also sure that google() is before jcenter()
    }
}
如果没有这个,可能无法下载Android Studio Gradle插件3.0+。它不会在jCenter中分发,而是在Google的Maven存储库中。
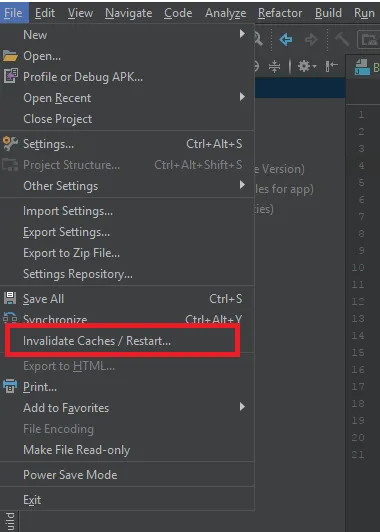
前往 文件 -> 无效缓存/重启... -> 无效并重启
Android Studio 会在某种程度上关闭和删除所有缓存、索引等。然后,Android Studio 将再次打开。索引将被完成,您可以继续进行。
看起来是“注入引用”的设置更新。在设置对话框中搜索这个词并将其“严重性”选项更改为不同的值,然后应用,然后再改回原始选择。编辑器中的错误突出显示将消失。
Solution 1:
- GOTO > 'build.gradle(Module:app)',
- ADD > "buildToolsVersion '28.0.2'" as following :
android {
    signingConfigs {}
    compileSdkVersion 28
    defaultConfig
    {
        applicationId "com.example.project"
        minSdkVersion 21
        targetSdkVersion 28
        versionCode 1
        versionName "1.0"
        testInstrumentationRunner "android.support.test.runner.AndroidJUnitRunner"
    }
    buildTypes
    {
        release
        {
            minifyEnabled false
            proguardFiles getDefaultProguardFile('proguard-android.txt'), 'proguard-rules.pro'
        }
    }

    buildToolsVersion '28.0.1'
}
- Click on 'Sync Now', and it's done.
- GOTO > 'File' > 'Invalidate Cache/Restart'.
- Done.
If That doesn't work, following might help (Solution 2) :
- GOTO > 'SDK Manager' > 'SDK Tools' > Click on 'Show Package Details',
- Check if there is a NEW Version of 'SDK Build-Tools' Available,
- Then Download it and Change to newer version "buildToolsVersion '28.0.x'" in 'build.gradle (Module:app)',
- Sync again.
- GOTO > 'File' > 'Invalidate Cache/Restart'.
- Done.
If That doesn't work, following might help (Solution 3) :
Remove/Cut following dependencies :
implementation 'com.android.support:appcompat-v7:x.x.x'
implementation 'com.android.support:design:x.x.x'
Click on 'Sync Now',
- Add/Paste dependencies again and Sync again.
- Done.
NOTE : You can do Solution 1 then 2 then 3 for better results.
Hope it helped :)
从应用程序的build.gradle中删除'com.android.support:appcompat-v7:27.0.0','com.android.support:design:27.0.0'编译,然后同步,再次粘贴这两个编译并同步... 这将解决问题。