这可以通过使用
RadialGradientPaint和适当的
AlphaComposite来解决。
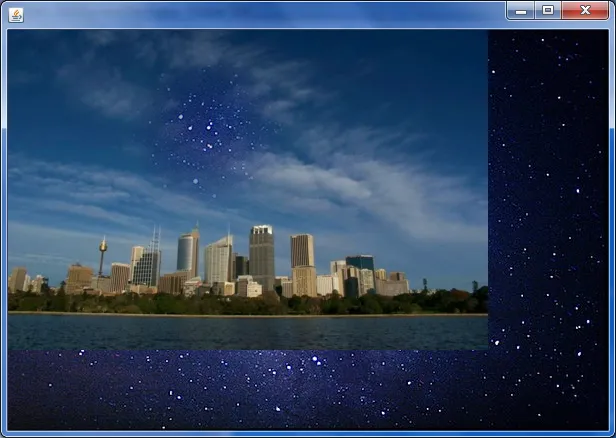
以下是一个
MCVE,展示了如何实现。它使用与
user1803551在他的答案中使用的相同图像,因此截图看起来(几乎)相同。但这个例子添加了一个
MouseMotionListener,允许您移动孔,通过将当前鼠标位置传递给
updateGradientAt方法,在那里创建所需的图像:
- It first fills the image with the original image
- Then it creates a
RadialGradientPaint, which has a fully opaque color in the center, and a completely transparent color at the border (!). This may seen counterintuitive, but the intention is to "cut out" the hole out of an existing image, which is done with the next step:
An AlphaComposite.DstOut is assigned to the Graphics2D. This one causes an "inversion" of the alpha values, as in the formula
Ar = Ad*(1-As)
Cr = Cd*(1-As)
where r stands for "result", s stands for "source", and d stands for "destination"
结果是在所需位置具有径向渐变透明度的图像,中心完全透明,边界完全不透明。这种
Paint和
Composite的组合然后用于填充大小和孔的坐标的椭圆形。 (也可以进行
fillRect调用,填充整个图像-它不会改变结果)。
import java.awt.AlphaComposite;
import java.awt.Color;
import java.awt.Graphics;
import java.awt.Graphics2D;
import java.awt.Point;
import java.awt.RadialGradientPaint;
import java.awt.event.MouseAdapter;
import java.awt.event.MouseEvent;
import java.awt.image.BufferedImage;
import java.io.File;
import java.io.IOException;

import javax.imageio.ImageIO;
import javax.swing.JFrame;
import javax.swing.JPanel;
import javax.swing.SwingUtilities;

public class TransparentGradientInImage
{
    public static void main(String[] args)
    {
        SwingUtilities.invokeLater(new Runnable()
        {
            @Override
            public void run()
            {
                createAndShowGUI();
            }
        });
    }

    private static void createAndShowGUI()
    {
        JFrame f = new JFrame();
        f.setDefaultCloseOperation(JFrame.EXIT_ON_CLOSE);

        TransparentGradientInImagePanel p =
            new TransparentGradientInImagePanel();
        f.getContentPane().add(p);
        f.setSize(800, 600);
        f.setLocationRelativeTo(null);
        f.setVisible(true);
    }

}

class TransparentGradientInImagePanel extends JPanel
{
    private BufferedImage background;
    private BufferedImage originalImage;
    private BufferedImage imageWithGradient;

    TransparentGradientInImagePanel()
    {
        try
        {
            background = ImageIO.read(
                new File("night-sky-astrophotography-1.jpg"));
            originalImage = convertToARGB(ImageIO.read(new File("7bI1Y.jpg")));
            imageWithGradient = convertToARGB(originalImage);
        }
        catch (IOException e)
        {
            e.printStackTrace();
        }

        addMouseMotionListener(new MouseAdapter()
        {
            @Override
            public void mouseMoved(MouseEvent e)
            {
                updateGradientAt(e.getPoint());
            }
        });
    }


    private void updateGradientAt(Point point)
    {
        Graphics2D g = imageWithGradient.createGraphics();
        g.drawImage(originalImage, 0, 0, null);

        int radius = 100;
        float fractions[] = { 0.0f, 1.0f };
        Color colors[] = { new Color(0,0,0,255), new Color(0,0,0,0) };
        RadialGradientPaint paint =
            new RadialGradientPaint(point, radius, fractions, colors);
        g.setPaint(paint);

        g.setComposite(AlphaComposite.DstOut);
        g.fillOval(point.x - radius, point.y - radius, radius * 2, radius * 2);
        g.dispose();
        repaint();
    }

    private static BufferedImage convertToARGB(BufferedImage image)
    {
        BufferedImage newImage =
            new BufferedImage(image.getWidth(), image.getHeight(),
                BufferedImage.TYPE_INT_ARGB);
        Graphics2D g = newImage.createGraphics();
        g.drawImage(image, 0, 0, null);
        g.dispose();
        return newImage;
    }

    @Override
    protected void paintComponent(Graphics g)
    {
        super.paintComponent(g);
        g.drawImage(background, 0, 0, null);
        g.drawImage(imageWithGradient, 0, 0, null);
    }
}
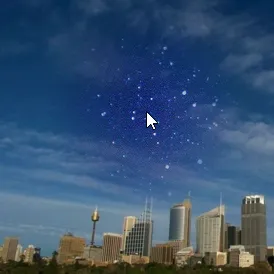
您可以调整 RadialGradientPaint 的 fractions 和 colors 来实现不同的效果。例如,这些值...
float fractions[] = { 0.0f, 0.1f, 1.0f };
Color colors[] = {
    new Color(0,0,0,255),
    new Color(0,0,0,255),
    new Color(0,0,0,0)
};
会造成一个小的、透明的孔,周围有一个大的、柔和的“日冕”:
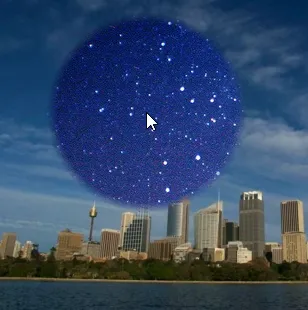
而这些数值则是
float fractions[] = { 0.0f, 0.9f, 1.0f };
Color colors[] = {
    new Color(0,0,0,255),
    new Color(0,0,0,255),
    new Color(0,0,0,0)
};
导致一个大的、明显透明的中心,带有一个小的“日冕”:
RadialGradientPaint JavaDocs 有一些示例可能有助于找到所需的值。
我在以下相关问题上发布了(类似的)答案:
编辑:对于评论中提出的关于性能的问题的回应
确实很有趣,如何比较 Paint/Composite 方法的性能与 getRGB/setRGB 方法的性能。根据我的以往经验,我的直觉是第一种方法比第二种方法快得多,因为通常情况下,getRGB/setRGB 倾向于缓慢,而内置机制高度优化(在某些情况下甚至可能是硬件加速)。
实际上,Paint/Composite 方法比 getRGB/setRGB 方法更快,但并不如我预期的那么快。以下当然不是真正深入的“基准测试”(我没有使用 Caliper 或 JMH 进行测试),但应该能很好地估算实际性能:
import java.awt.AlphaComposite;
import java.awt.Color;
import java.awt.Graphics2D;
import java.awt.Point;
import java.awt.RadialGradientPaint;
import java.awt.image.BufferedImage;
public class TransparentGradientInImagePerformance
{
public static void main(String[] args)
{
int w = 1000;
int h = 1000;
BufferedImage image0 = new BufferedImage(w, h,
BufferedImage.TYPE_INT_ARGB);
BufferedImage image1 = new BufferedImage(w, h,
BufferedImage.TYPE_INT_ARGB);
long before = 0;
long after = 0;
int runs = 100;
for (int radius = 100; radius <=400; radius += 10)
{
before = System.nanoTime();
for (int i=0; i<runs; i++)
{
transparitize(image0, w/2, h/2, radius);
}
after = System.nanoTime();
System.out.println(
"Radius "+radius+" with getRGB/setRGB: "+(after-before)/1e6);
before = System.nanoTime();
for (int i=0; i<runs; i++)
{
updateGradientAt(image0, image1, new Point(w/2, h/2), radius);
}
after = System.nanoTime();
System.out.println(
"Radius "+radius+" with paint "+(after-before)/1e6);
}
}
private static void transparitize(
BufferedImage imgA, int centerX, int centerY, int r)
{
for (int x = centerX - r; x < centerX + r; x++)
{
for (int y = centerY - r; y < centerY + r; y++)
{
double distance = Math.sqrt(
Math.pow(Math.abs(centerX - x), 2) +
Math.pow(Math.abs(centerY - y), 2));
if (distance > r)
continue;
int argb = imgA.getRGB(x, y);
int a = (argb >> 24) & 255;
double factor = distance / r;
argb = (argb - (a << 24) + ((int) (a * factor) << 24));
imgA.setRGB(x, y, argb);
}
}
}
private static void updateGradientAt(BufferedImage originalImage,
BufferedImage imageWithGradient, Point point, int radius)
{
Graphics2D g = imageWithGradient.createGraphics();
g.drawImage(originalImage, 0, 0, null);
float fractions[] = { 0.0f, 1.0f };
Color colors[] = { new Color(0, 0, 0, 255), new Color(0, 0, 0, 0) };
RadialGradientPaint paint = new RadialGradientPaint(point, radius,
fractions, colors);
g.setPaint(paint);
g.setComposite(AlphaComposite.DstOut);
g.fillOval(point.x - radius, point.y - radius, radius * 2, radius * 2);
g.dispose();
}
}
我的电脑时间大致为
...
Radius 390 with getRGB/setRGB: 1518.224404
Radius 390 with paint          764.11017
Radius 400 with getRGB/setRGB: 1612.854049
Radius 400 with paint          794.695199
显示出
Paint/
Composite方法大约是
getRGB/
setRGB方法的两倍快。除了性能外,
Paint/
Composite还有一些其他优点,主要是上面描述的可能的
RadialGradientPaint参数化,这些是我更喜欢这个解决方案的原因。
RadialGradientPaint的复杂性/灵活性 - 您可以使用它实现一些漂亮的效果,而仅仅“切一个洞”只是这个类最简单的情况之一) - Marco13