我刚刚在iOS 5的CoreImage框架上看到,发现很容易给整个图像添加效果。我想知道是否可以在图像的特定部分(一个矩形)上添加效果。例如,在图像的一部分上添加灰度效果。
期待您的帮助。
谢谢, Huy
我刚刚在iOS 5的CoreImage框架上看到,发现很容易给整个图像添加效果。我想知道是否可以在图像的特定部分(一个矩形)上添加效果。例如,在图像的一部分上添加灰度效果。
期待您的帮助。
谢谢, Huy
CIImage的技术。您需要学习如何将滤镜链接在一起。特别是要注意以下内容:
CICrop,CILinearGradient,CIRadialGradient(可用于创建蒙版)CISourceOverCompositing(将蒙版图像放在一起)CIBlendWithMask(创建最终图像)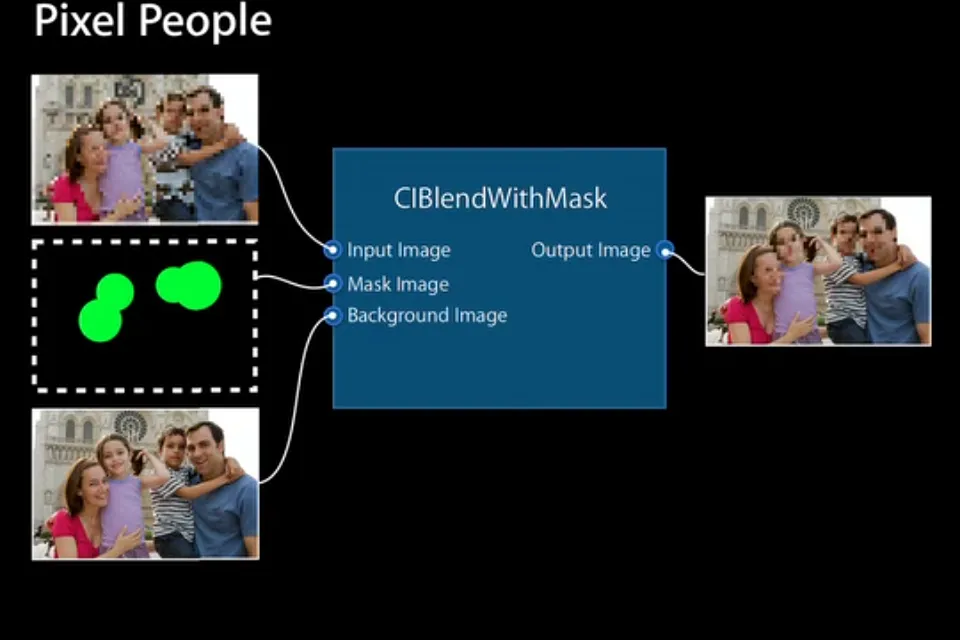
这里记录了过滤器的文档:
你最好的选择是复制CIImage(这样你现在有两个),将复制的CIImage裁剪到你想要影响的矩形,对该裁剪版本执行效果,然后使用叠加效果基于两个旧CIImages创建一个新的CIImage。
看起来需要很多努力,但当你理解所有这些都被设置为一堆GPU着色器时,它就更有意义了。
     typedef enum {
   ALPHA = 0,
   BLUE = 1,
   GREEN = 2,
  RED = 3
} 像素;
- (UIImage *)convertToGrayscale:(UIImage *) originalImage inRect: (CGRect) rect{
       CGSize size = [originalImage size];
   int width = size.width;
  int height = size.height;

// the pixels will be painted to this array
uint32_t *pixels = (uint32_t *) malloc(width * height * sizeof(uint32_t));

// clear the pixels so any transparency is preserved
memset(pixels, 0, width * height * sizeof(uint32_t));

CGColorSpaceRef colorSpace = CGColorSpaceCreateDeviceRGB();

// create a context with RGBA pixels
CGContextRef context = CGBitmapContextCreate(pixels, width, height, 8, width * sizeof(uint32_t), colorSpace,
                                             kCGBitmapByteOrder32Little | kCGImageAlphaPremultipliedLast);

// paint the bitmap to our context which will fill in the pixels array
CGContextDrawImage(context, CGRectMake(0, 0, width, height), [originalImage CGImage]);

for(int y = 0; y < height; y++) {
    for(int x = 0; x < width; x++) {
        uint8_t *rgbaPixel = (uint8_t *) &pixels[y * width + x];

        if(x > rect.origin.x && y > rect.origin.y && x < rect.origin.x + rect.size.width && y < rect.origin.y + rect.size.height) {

            // convert to grayscale using recommended method: http://en.wikipedia.org/wiki/Grayscale#Converting_color_to_grayscale

            uint32_t gray = 0.3 * rgbaPixel[RED] + 0.59 * rgbaPixel[GREEN] + 0.11 * rgbaPixel[BLUE];

            // set the pixels to gray in your rect

            rgbaPixel[RED] = gray;
            rgbaPixel[GREEN] = gray;
            rgbaPixel[BLUE] = gray;
          }
    }
}

// create a new CGImageRef from our context with the modified pixels
CGImageRef image = CGBitmapContextCreateImage(context);

// we're done with the context, color space, and pixels
CGContextRelease(context);
CGColorSpaceRelease(colorSpace);
free(pixels);

// make a new UIImage to return
UIImage *resultUIImage = [UIImage imageWithCGImage:image];

// we're done with image now too
CGImageRelease(image);

return resultUIImage;
}
你可以在 UIImageView 中进行测试:
imageview.image = [self convertToGrayscale:imageview.image inRect:CGRectMake(50, 50, 100, 100)];