构建工具版本 Android 失败。

4
我尝试在新安装的Android Studio(今天)中打开一个旧项目,但出现了以下错误:
failed to find build tools revision 23.0.0 rc2
install build tools 23.0.0 rc2 and sync project

我在互联网上搜索并尝试将此内容添加到gradle文件中:
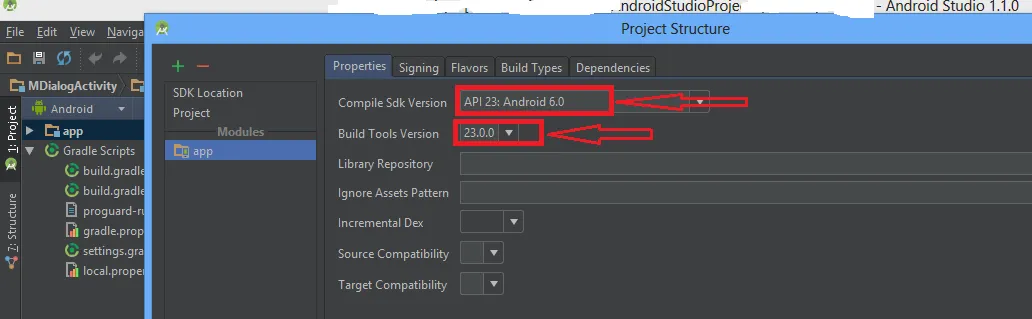
android {
compileSdkVersion 22
buildToolsVersion "22.0.0"
}

然后它给了我另一个错误:

gradle DSL method not found: 'android()'
possible causes:
the project may be using a version of gradle that does not contain the method.
gradle settings.
the build file may be missing a gradle plugin.
apply gradle plugin.

这是我的Gradle文件:

// Top-level build file where you can add configuration options common to all sub-projects/modules.
buildscript {
repositories {
    jcenter()
}
dependencies {
    classpath 'com.android.tools.build:gradle:1.2.3'
  }
}

allprojects {
repositories {
    jcenter()
  }
}
android {
compileSdkVersion 22
buildToolsVersion "22.0.0"
}

我实际上把它误认为另一个gradle文件了,我没有改变项目的build.gradle,而是在libraries build.gradle中编写。 - Amine Al
6个回答

3

右键单击您的项目 > 打开模块设置 > 属性选项卡,然后更改:

Compile Sdk Verion to API 23: Android 6.0
Build Tools Version 23.0.0

enter image description here


2

我检查了在我的Android Studio中安装的构建工具版本,我有Android SDK Build-Tools rc3,而不是rc2。我在build.gradle(Module App)中将其更改为: android { compileSdkVersion 22 buildToolsVersion "23.0.0 rc3"} 之后它可以正常工作。 请检查您是否存在相同的问题。


1
在您的顶层build.gradle中,您需要删除android块。
android {
   compileSdkVersion 22
   buildToolsVersion "22.0.0"
}

只需使用:

    // Top-level build file where you can add configuration options common to all sub-projects/modules.

    buildscript {
       repositories {
          jcenter()
       }
       dependencies {
          classpath 'com.android.tools.build:gradle:1.2.3'
       }
    }

    allprojects {
       repositories {
         jcenter()
       }
    }

你需要在 app/build.gradle 中使用 android 块,定义类似以下内容:
apply plugin: 'com.android.application'

android {
    compileSdkVersion XX
    buildToolsVersion "XX.X.X"

    defaultConfig {
       minSdkVersion XX
       targetSdkVersion XX
       versionCode 1
       versionName "1.0"
    } 
    buildTypes {
      release {
         //......
      }
    }
}
dependencies {
  //......
}

0

这取决于您安装的Android SDK Build-tools版本,您可以通过SDK Manager进行检查。在我的情况下,我没有安装23.0.0 rc2,而是安装了23.0.1,因此您需要编辑您的app/build.gradle

对于我来说,它是这样的:

android {
    compileSdkVersion 22
    buildToolsVersion "23.0.1"
}

0
在我的情况下,我尝试了所有的方法,最终我不得不对这个进行一个简单的更改。
apply plugin: 'com.android.application'

android {
    compileSdkVersion 22
    buildToolsVersion "23.0.0 rc2"
}

转换成这个

apply plugin: 'com.android.application'

android {
    compileSdkVersion 22
    buildToolsVersion "23.0.0" //DELETE rc2 AND SYNC PROJECT 
}

0

有两个Gradle文件

你需要修改的是在这个目录下的那个: 应用程序名称 / APP / BUILD.GRADLE

apply plugin: 'com.android.application'

android {
    compileSdkVersion 22
    buildToolsVersion "PUT THE CODE YOU WANT HERE EX "23.0.0 r3""

    defaultConfig {
        applicationId "org.app.appname"
        minSdkVersion 10
        targetSdkVersion 22
        versionCode 9
        versionName "1.10.3"
    }
    buildTypes {
        release {
            minifyEnabled false
            proguardFiles getDefaultProguardFile('proguard-android.txt'), 'proguard-rules.pro'
        }
    }
}

dependencies {
    compile 'com.google.android.gms:play-services:7.5.0'
    compile fileTree(dir: 'libs', include: ['*.jar'])
    compile 'com.android.support:appcompat-v7:22.2.1'
    compile 'com.android.support:support-v4:22.2.1'
    compile files('libs/volley.jar')
}

不是看起来像这样的那个

// Top-level build file where you can add configuration options common to all sub-projects/modules.

buildscript {
    repositories {
        jcenter()
    }
    dependencies {
        classpath 'com.android.tools.build:gradle:1.3.0'

        // NOTE: Do not place your application dependencies here; they belong
        // in the individual module build.gradle files
    }
}

allprojects {
    repositories {
        jcenter()
    }
}

网页内容由stack overflow 提供, 点击上面的
可以查看英文原文,
原文链接