你如何配置mupen64plus的控制器?

我使用Synaptic从软件库中安装了mupen64plus。我喜欢这个模拟器(大部分时间都很好,只有在TLOZ Ocarina of Time上有一些图形故障),尤其是在我的旧机器上的性能表现,但是我无法弄清楚如何为自己配置控制器。我尝试查看Google Code的指南here,但是我找不到需要编辑的文件,而且带有密钥ID的链接也无效,所以即使我找到了文件,我也无法更改任何内容。因此,我需要一个包含密钥ID和需要编辑的文件位置的资源。
我正在运行Ubuntu 12.10 32位。 2GB内存, Intel CORE 2 DUO @ 2.00GHz
这里还有一个额外的问题。M64py是一个受欢迎的选项。然而,它要求您输入它所需的各种文件的路径。默认位置在哪里?请提供32位系统和64位系统的默认位置。(所需文件是库文件、插件目录和数据目录。)
4个回答

您可以使用配置文件来配置控制器。最好的方法是使用一个具有控制器设置的前端界面。
M64py
M64py 是 Mupen64Plus 的 Qt 前端界面。您可以从 这里 下载它。
它有一个如下图所示的控制器配置界面。
您可以在这里配置控制器,然后从这里启动游戏,或者在终端中实际运行 mupen64plus /path/to/rom

7爱上了依赖的兔子洞啊。Python:它就是好用。但是,在此之前,你需要安装pyqt5,而为了安装pyqt5,你必须编译sip4,而为了编译sip4,你需要libpython2.7,而为了安装libpython2.7...当然了,即使在我成功构建和安装了那五百万个依赖项之后,m64py仍然拒绝运行,因为它期望从M64PY自己的仓库中找到的"about.ui"文件并不存在。Python真是让人无法理解。 - Braden Best
2这个应用程序在SDL输入页面中没有保存所做的更改。我本来希望有一个漂亮的图形用户界面来帮助进行映射,但如果它不能保存到文件,那还有什么意义呢? - Kalamalka Kid
我们真正关心的链接是:http://m64py.sourceforge.net和https://github.com/mupen64plus/mupen64plus-ui-python。 - Andrew

我自己无法在mupen上运行图形用户界面,所以最后我找到了如何在终端中配置和运行它的方法。我用来配置控制器的文件是:
~/.config/mupen64plus/mupen64plus.cfg

在那里,我找到了关于操纵杆的部分,并通过试错发现,如果我在我的控制器上看到一个数字(按钮是按顺序编号的),我就在配置文件中输入该数字减一,对于我没有使用的按钮,我只需将其留空,如""。我会附上我使用的代码:
    [Input-SDL-Control1]
    # Mupen64Plus SDL Input Plugin config parameter version number.  Please don't change
    version = 1
    # Specifies whether this controller is 'plugged in' to the simulated N64
    plugged = True
    # Specifies which type of expansion pak is in the controller: 1=None, 2=Mem pak, 5=Rumble pak
    plugin = 2
    # If True, then mouse buttons may be used with this controller
    mouse = False
    # Specifies which joystick is bound to this controller: -2=Keyboard/mouse, -1=Auto config, 0 or more= SDL Joystick number
    device = 1
    # SDL joystick name (name check disabled if this is empty string)
    name = "DragonRise Inc.   Generic   USB  Joystick  "
    # Scaling factor for mouse movements.  For X, Y axes.
    MouseSensitivity = "2.00,2.00"
    # The minimum absolute value of the SDL analog joystick axis to move the N64 controller axis value from 0.  For X, Y axes.
    AnalogDeadzone = "4096,4096"
    # An absolute value of the SDL joystick axis >= AnalogPeak will saturate the N64 controller axis value (at 80).  For X, Y axes. For each axis, this must be greater than the corresponding AnalogDeadzone value
    AnalogPeak = "32768,32768"
    # Digital button configuration mappings
    DPad R = ""
    DPad L = ""
    DPad D = ""
    DPad U = ""
    Start = "button(9)"
    Z Trig = "button(6)"
    B Button = "button(1)"
    A Button = "button(0)"
    C Button R = "axis(3+)"
    C Button L = "axis(3+)"
    C Button D = "axis(4+)"
    C Button U = "axis(4+)"
    R Trig = "button(7)"
    L Trig = ""
    Mempak switch = ""
    Rumblepak switch = ""
    # Analog axis configuration mappings
    X Axis = "axis(0-,0+)"
    Y Axis = "axis(1-,1+)"


很遗憾,对我来说m64py不是一个有效的解决方案,“试错法”太麻烦了。这里有一个解决方案,任何当前运行mupen64plus的人都可以使用,无论是否带有图形界面。
您需要手柄校准工具jscal来确定每个按钮的功能。如果需要帮助,请参考Ubuntu论坛-游戏与休闲-HOWTO:在Ubuntu下使用游戏手柄

假设您已经设置好并且手柄已经正确校准,您只需要运行jstest-gtk /dev/input/js0 &,其中js0是您当前测试的设备的校准文件。

您将看到一个带有编号轴和按钮的图形界面。它看起来类似于这样:

jscal controller and joystick button mapping for mupen linux

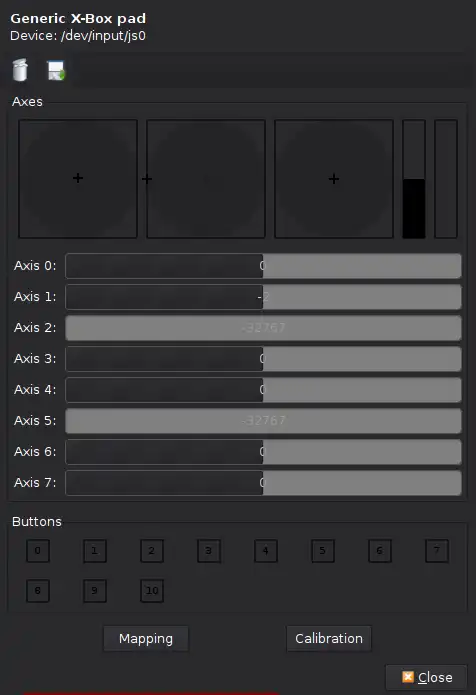
现在您可以按下控制器上的按钮,查看它对应的轴或按钮。

将自定义控制器配置应用于mupen

找到InputAutoCfg.ini
运行locate InputAutoCfg.ini。对我来说,它位于目录/usr/share/games/mupen64plus/InputAutoCfg.ini中。

使用您喜欢的文本编辑器打开InputAutoCfg.ini
vim /usr/share/games/mupen64plus/InputAutoCfg.ini

找到您的设备并编辑设置。
您可以通过在命令行终端上运行mupen64plus并找到您控制器的名称来确定mupen正在使用哪个设备(控制器)。

我的显示为Input: N64 Controller #1: Using auto-config with SDL joystick 0 ('Generic X-Box pad')。所以对我来说,设置可以在[Generic X-Box pad]下找到。

保存/写入更改到文件中,下次运行mupen64plus时,更改将生效。

经过一些更改后,我的文件看起来像这样:

[Generic X-Box pad]
plugged = True
plugin = 2
mouse = False
AnalogDeadzone = "4096,4096"
AnalogPeak = "32768,32768"
DPad R = "hat(0 Right)"
DPad L = "hat(0 Left)"
DPad D = "hat(0 Down)"
DPad U = "hat(0 Up)"
Start = "button(7)"
Z Trig = "button(4)"
B Button = "button(2)"
A Button = "button(0)"
C Button R = "axis(3+)"
C Button L = "axis(3-)"
C Button D = "axis(4+)"
C Button U = "axis(4-)"
R Trig = "button(5)"
L Trig = "axis(2+)"
Mempak switch = "axis(5+)"
Rumblepak switch = "button(2)"
X Axis = "axis(0-,0+)"
Y Axis = "axis(1-,1+)"

使用 jstest,你应该能够弄清楚如何配置 InputAutoCfg.ini 来自定义你的输入设置,使用 输入事件词
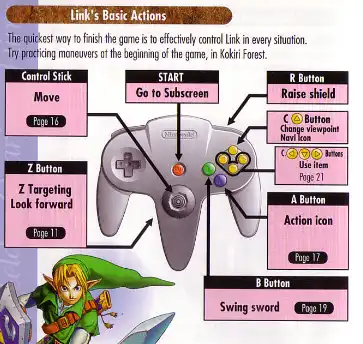
有时候查看 N64 控制器布局可以帮助你弄清楚你想要映射的参数。

N64 controller buttons layout configuration


当你说“运行mupen64plus并查看打印到终端的输入信息”时,你指的是哪个终端? - Kalamalka Kid
@kalamalka kid,我是指在命令行终端中运行它。答案已经被编辑过了。谢谢。 - iyrin

刚刚尝试了使用mupen64plus 2.5.0的manjaro/kde。在这里有一个配置文件。
~/.config/mupen64plus/mupen64plus.cfg

但是当启动mupen64plus时,它会被覆盖。实际上,要编辑的文件是
/usr/share/mupen64plus/InputAutoCfg.ini

这个文件在mupen64plus启动时被读取,并且使用的配置被写入上面的cfg文件。当你打开一个ROM时,你可以在打印输出中看到mupen正在使用哪个控制器配置。
Input: N64 Controller #1: Using auto-config with SDL joystick 0 ('Generic X-Box pad')

所以在我的情况下,我不得不在 InputAutoCfg.ini 中寻找 通用 X-Box 手柄。为了完整起见:对于我的 Xbox 手柄,我找到了以下映射:

Button(0) = A
Button(1) = B
Button(2) = X
Button(3) = Y
button(4) = LB
button(5) = RB
button(6) = the small settings button (with the two rectangles) to the top
           left of the  topright of the left joystick
Button(7) = the three-line settings button to the upper left of X and Y
Button(8) = The "x-box button"  
hat (0 Up) = The "+" button, up
axis (5+) = RT

对于马里奥64,我最终改变了:
Z trig = axis(5+)
R Trig =
Start = button(8)

将“x-box按钮”设置为启动按钮,将Z键设置为RT键(经过这么多年后,将Z键放在该按钮上感觉“正确”)。我尝试安装了mupen64plus-ui-python(从requirements.txt中删除了特定版本的pyqt后可以正常工作),但我没有看到更改按键映射的选项。