嗨,我正在寻找一个VPN监控/断开开关应用程序,以确保我的VPN连接始终保持连接。如果我的安全连接中断,该应用程序将关闭它所监控的应用程序,以防止数据泄漏。我知道Windows有这样的应用程序。然而,我还没有找到适用于Linux的合适替代品。
4个回答
我有同样的设置,"VPN断开时关闭应用程序"比人们想象的要棘手。
根据您的规范,即"当VPN断开时关闭特定应用程序",有一个简单的解决方案。
在Ubuntu上,网络监视器具有网络事件的回调功能,因此您可以编写一个脚本来关闭您想要关闭的应用程序。以下是示例:
编辑
将其设置为可执行:
这个脚本是用Ruby编写的(所以需要安装ruby),但可以很容易地转换成shell脚本。
它还假设VPN适配器是
根据您的规范,即"当VPN断开时关闭特定应用程序",有一个简单的解决方案。
在Ubuntu上,网络监视器具有网络事件的回调功能,因此您可以编写一个脚本来关闭您想要关闭的应用程序。以下是示例:
编辑
/etc/NetworkManager/dispatcher.d/50vpndownkillapps.rb:#!/usr/bin/env ruby
if ARGV == [ 'tun0', 'vpn-down' ]
`pkill -f transmission`
`pkill -f deluge`
end
将其设置为可执行:
chmod 755 /etc/NetworkManager/dispatcher.d/50vpndownkillapps.rb,然后尽情享受吧 :-)这个脚本是用Ruby编写的(所以需要安装ruby),但可以很容易地转换成shell脚本。
它还假设VPN适配器是
tun0,这是OpenVPN配置的标准。- Marcus
1
我有同样的需求,因为在Linux上似乎没有专门的工具来解决这个问题,所以我开发了自己的解决方案。不需要关闭已打开的应用程序!:)
您需要设置iptables防火墙,这样您的机器只能连接到指定的VPN服务器(除了本地流量外,不允许其他流量通过,以避免"泄漏")。以下是一个脚本(在网上找到的):
(使用
它支持TCP和UDP连接,如果您只需要其中一种,请从
使用例如
如果您希望在启动时加载它(iptables通常在重新启动后重置),请将类似于
下一部分是VPN自动连接器和监视器。这是我自己的装置:
它将在启动时自动连接,并以给定的间隔(
使用
您可以将其添加到自动启动中(不需要sudo权限)。以下是如何在终端中启动它的示例:
...这是在终端中运行的效果:
您需要设置iptables防火墙,这样您的机器只能连接到指定的VPN服务器(除了本地流量外,不允许其他流量通过,以避免"泄漏")。以下是一个脚本(在网上找到的):
#!/bin/bash

# iptables setup on a local pc
# dropping all traffic not going trough vpn
# allowes traffic in local area network
# special rules for UPNP and Multicast discovery

FW="/sbin/iptables"
LCL="192.168.1.0/24"
VPN="10.0.0.0/12"
local_interface="eno1"
virtual_interface="tun0"

# VPN Servers
servers=(
123.123.123.123
124.124.124.124
)

#---------------------------------------------------------------
# Remove old rules and tables
#---------------------------------------------------------------
echo "Deleting old iptables rules..."
iptables -F
iptables -X
iptables -t nat -F
iptables -t nat -X
iptables -t mangle -F
iptables -t mangle -X

echo "Setting up new rules..."

#---------------------------------------------------------------
# Default Policy - Drop anything!
#---------------------------------------------------------------
$FW -P INPUT DROP
$FW -P FORWARD DROP
$FW -P OUTPUT DROP

#---------------------------------------------------------------
# Allow all local connections via loopback.
#---------------------------------------------------------------
$FW -A INPUT  -i lo  -j ACCEPT
$FW -A OUTPUT -o lo  -j ACCEPT

#---------------------------------------------------------------
# Allow Multicast for local network.
#---------------------------------------------------------------
$FW -A INPUT  -j ACCEPT -p igmp -s $LCL -d 224.0.0.0/4 -i $local_interface
$FW -A OUTPUT -j ACCEPT -p igmp -s $LCL -d 224.0.0.0/4 -o $local_interface

#---------------------------------------------------------------
# UPnP uses IGMP multicast to find media servers.
# Accept IGMP broadcast packets.
# Send SSDP Packets.
#---------------------------------------------------------------
$FW -A INPUT  -j ACCEPT -p igmp -s $LCL -d 239.0.0.0/8  -i $local_interface
$FW -A OUTPUT -j ACCEPT -p udp  -s $LCL -d 239.255.255.250 --dport 1900  -o $local_interface

#---------------------------------------------------------------
# Allow all bidirectional traffic from your firewall to the
# local area network
#---------------------------------------------------------------
$FW -A INPUT  -j ACCEPT -s $LCL -i $local_interface
$FW -A OUTPUT -j ACCEPT -d $LCL -o $local_interface

#---------------------------------------------------------------
# Allow all bidirectional traffic from your firewall to the
# virtual privat network
#---------------------------------------------------------------

$FW -A INPUT  -j ACCEPT -i $virtual_interface
$FW -A OUTPUT -j ACCEPT -o $virtual_interface

#---------------------------------------------------------------
# Connection to VPN servers (UDP 443)
#---------------------------------------------------------------
server_count=${#servers[@]}
for (( c = 0; c < $server_count; c++ ))
do
    $FW -A INPUT  -j ACCEPT -p udp -s ${servers[c]} --sport 1194 -i $local_interface
    $FW -A OUTPUT -j ACCEPT -p udp -d ${servers[c]} --dport 1194 -o $local_interface
    $FW -A INPUT  -j ACCEPT -p tcp -s ${servers[c]} --sport 443 -i $local_interface
    $FW -A OUTPUT -j ACCEPT -p tcp -d ${servers[c]} --dport 443 -o $local_interface
done

#---------------------------------------------------------------
# Log all dropped packages, debug only.
# View in /var/log/syslog or /var/log/messages
#---------------------------------------------------------------
#iptables -N logging
#iptables -A INPUT -j logging
#iptables -A OUTPUT -j logging
#iptables -A logging -m limit --limit 2/min -j LOG --log-prefix "IPTables general: " --log-level 7
#iptables -A logging -j DROP


# Disable internet for "no-internet" user
#iptables -A OUTPUT -m owner --gid-owner no-internet -j DROP
您需要设置表格 servers=()。只需在那里指定您喜爱的 VPN 服务器的 IP 地址。
还要检查脚本开头的其他变量是否正确设置,否则它将阻塞您的整个连接。
请确保使用以下命令创建 iptables 备份:
sudo iptables-save > working.iptables.rules
(使用
sudo iptables-restore < working.iptables.rules进行恢复)它支持TCP和UDP连接,如果您只需要其中一种,请从
for ()循环中删除不需要的两行。还要检查您的提供商是否使用相同的端口 - 可能会有所不同。使用例如
sudo /home/user/vpn.sh运行此脚本。如果您希望在启动时加载它(iptables通常在重新启动后重置),请将类似于
bash /home/user/vpn.sh的行添加到您的/etc/rc.local文件中。
下一部分是VPN自动连接器和监视器。这是我自己的装置:
#!/bin/bash

# CONNECTIONS
# Those values can be checked by running `nmcli con show`

vpn=(
85e60352-9e93-4be4-8b80-f6aae28d3c94
)

# NUMBER OF CONNECTIONS
total=${#vpn[@]}

# SLEEP
amount=10 # number of seconds to wait after each connection checking cycle
countdown=true # enable/disable animated countdown
skip=1 # how many seconds to substract between each animated countdown iteration

# LOGS
dir='/home/user/logs-vpn' # directory for storing logs
name='vpn' # prefix/name for a log file
seperate=true # create a seperate log file for each init session or log to single file
init=false # log init event (with logging setup)
start=false # log vpn start event
yes=false # log connected events
no=false # log disconnected events

# STYLE
clean='\e[1A\033[K' # clean & move to previous line
default='\e[0m' # default
blink='\e[5m' # blinking (works only in couple terminals, e.g. XTerm or tty)
dim='\e[2m' # dim/half-bright
disconnected='\e[91m' # light red
connected='\e[92m' # light green
count='\e[94m' # light blue
reconnecting='\e[96m' # light cyan
initializing='\e[93m' # light yellow
connection='\e[1m\e[91m' # bold light red

# SETUP
time=$(date +"%Y-%m-%d_%H-%M-%S")
if $separate; then
    file="$dir/$time.log"
else
    file="$dir/$name.log"
fi

# RESET
reset # reset screen
tput civis -- invisible # disable cursor

# RE-TIME
time=$(date +"%Y.%m.%d %H:%M:%S")

# INITIALIZATION
if $init; then
    printf "$time INIT" >> $file
    if $yes; then
        printf " -y" >> $file
    fi
    if $no; then
        printf " -n" >> $file
    fi
    printf "\n" >> $file
fi

# START CONNECTION
con=$(nmcli con show --active | grep "  vpn")
if [[ $con == '' ]]; then

    if $start; then
        printf "$time START\n" >> $file
    fi

    time=$(date +"%H:%M:%S")
    echo -e "${dim}[$time]${default} ${initializing}INITIALIZING...${default}"
    echo ""
    echo ""

    random=$(((RANDOM % $total)-1))
    try=${vpn[$random]}

    (sleep 1s && nmcli con up uuid $try) >& /dev/null
    sleep 10s
fi

# LOOP
while [ "true" ]; do
        time=$(date +"%H:%M:%S")

        # CLEAN AFTER COUNTDOWN
        if $countdown; then
            echo -en $clean
            echo -en $clean
        fi

        # CHECK CONNECTION
        con=$(nmcli con show --active | grep "  vpn" | cut -f1 -d " ")

        if [[ $con == '' ]]; then
                if $no; then
                    printf "$time NO\n" >> $file
                fi
                echo -e "${dim}[$time]${default} ${disconnected}DISCONNECTED !!${default}"
                echo -e "${blink}${reconnecting}re-connecting ...${default}"

                random=$(((RANDOM % $total)-1))
                try=${vpn[$random]}

                (sleep 1s && nmcli con up uuid $try) >& /dev/null
        else
                if $yes; then
                    printf "$time YES\n" >> $file
                fi

                arr=(${con//./ })

                echo -en $clean
                echo -e "${dim}[$time]${default} ${connected}CONNECTED${default} (${connection}${arr[0]^^}${default})"
        fi

        # SLEEP
        if $countdown; then
            echo -e "${count}$amount${default}"
            for (( c=$amount; c>=1; c=c-$skip )); do
                echo -en $clean
                echo -e "${count}$c${default}"
                sleep $skip
            done
            echo -e "${count}0${default}"
        else
            sleep $amount
        fi
done
它将在启动时自动连接,并以给定的间隔(
amount=10表示10秒间隔)监视您的连接,并在连接丢失时重新连接。具有日志记录功能和其他一些选项。使用
nmcli con show检查您的连接UUID,并将与防火墙中添加的IP匹配的收藏夹添加到vpn=()表中。每次它都会在此表中随机选择一个指定的连接。您可以将其添加到自动启动中(不需要sudo权限)。以下是如何在终端中启动它的示例:
mate-terminal --command="/home/user/vpn-reconnect.sh"
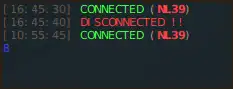
...这是在终端中运行的效果:
- GreggD
3
1关于在启动时加载脚本,为什么不直接使用
/etc/rc.local呢? - Andrea Lazzarotto美妙的想法(像魔法一样有效!),谢谢 :) - GreggD
太棒了,非常感谢你。截至2017年7月,已经验证仍然有效。 - Norr
我已经能够使用UFW设置一个简单的VPN断开开关。
它适用于我所有的VPN。
这是我的UFW设置:
完全适用于我:)
这是我的UFW设置:
sudo ufw default deny outgoing
sudo ufw default deny incoming`
sudo ufw allow out 443/tcp
sudo ufw allow out 1194/udp
sudo ufw allow out on tun0 from any to any port 80
sudo ufw allow out on tun0 from any to any port 53
sudo ufw allow out on tun0 from any to any port 67
sudo ufw allow out on tun0 from any to any port 68
完全适用于我:)
- Reeby
1
看起来还可以,但是我猜
sudo ufw allow out 443/tcp在VPN未连接时允许安全网站泄漏。你不想阻止这种情况吗?一个使用AJAX或WebSockets的HTTPS网站可能会通过JavaScript定时器自动重新连接。 - halfer我通过设置Ufw来阻止所有出站流量,并通过引用各个VPN节点的IP地址来将其列入白名单,从而解决了这个问题。这并不像听起来那么繁琐:根据我的经验,VPN允许使用DNS查找来获取它们的各种IP地址。
我编写了一个名为ufw-vpn的PHP程序来实现这一点。我已经使用它几年了,并随着时间的推移进行了一些小的改进。当然,您需要安装PHP,并且如果您希望克隆而不是下载它,则还需要Git。
您也可以使用wget来获取它:
然后运行命令来检查它是否正常(不带参数只会显示语法错误信息):
这样应该会给你一个很长的防火墙规则列表需要添加。为了方便安装它们,你可以这样做:
有时候VPN供应商会更新他们的IP地址,所以你需要更新你的IP地址以匹配。你可以通过一个差异文件来进行更新。
对于 diff 来说,在执行之前值得检查一下规则,因为它会删除所有不属于 VPN 的内容。所以,如果您有一些自定义规则,运行之前需要将其删除。
更多文档可以在仓库中找到,而且它是开源的,所以您可以检查代码是否存在安全问题。欢迎提出错误报告和功能建议。
我编写了一个名为ufw-vpn的PHP程序来实现这一点。我已经使用它几年了,并随着时间的推移进行了一些小的改进。当然,您需要安装PHP,并且如果您希望克隆而不是下载它,则还需要Git。
您也可以使用wget来获取它:
cd /path/to/a/folder
wget https://github.com/halfer/ufw-vpn/archive/master.zip
unzip master.zip
cd ufw-vpn-master
然后运行命令来检查它是否正常(不带参数只会显示语法错误信息):
php ufw-vpn.php
现在,假设您的VPN支持它,您可以使用完全限定域名获取某个地区的服务器列表(您需要在提供商的文档中找到此信息,或者可能从他们的支持部门获得):
php ufw-vpn.php earth.all.vpn.example.org add
这样应该会给你一个很长的防火墙规则列表需要添加。为了方便安装它们,你可以这样做:
php ufw-vpn.php earth.all.vpn.example.org add > add-rules.sh
chmod u+x add-rules.sh && sudo add-rules.sh
有时候VPN供应商会更新他们的IP地址,所以你需要更新你的IP地址以匹配。你可以通过一个差异文件来进行更新。
php ufw-vpn.php earth.all.vpn.example.org diff > diff-rules.sh
chmod u+x diff-rules.sh && sudo diff-rules.sh
对于 diff 来说,在执行之前值得检查一下规则,因为它会删除所有不属于 VPN 的内容。所以,如果您有一些自定义规则,运行之前需要将其删除。
更多文档可以在仓库中找到,而且它是开源的,所以您可以检查代码是否存在安全问题。欢迎提出错误报告和功能建议。
- halfer
ARGV在很长一段时间内始终以'tun0'开始,突然间又在没有任何通知的情况下变成了'tun1'。因此,为了确保即使在这个第一个(无用的)变化值出现时,紧急断开功能仍然正常工作,我不得不将测试条件更改为if ARGV.last == 'vpn-down'。 - zezollo