将活动的Ubuntu分区克隆到克隆分区的Bash脚本
clone-ubuntu.sh Bash脚本可以无缝且安全地复制16.04 LTS并升级到18.04 LTS的分区:
重要考虑事项:
- 你必须创建一个足够大的空的
ext4分区来容纳一个Ubuntu 16.04克隆
- 在调用脚本
clone-ubuntu.sh时,分区不能被挂载。脚本会自动挂载和卸载分区。
- 使用命令
rsync将文件从/复制到克隆分区。第一次运行clone-ubuntu.sh需要几分钟。第二次运行脚本时,只有文件更改会被更新,所以应该只需不到一分钟。
- 您可能会多次运行此脚本并重新启动。为了与当前的
/文件和目录保持一致,克隆目标上的任何新数据都将被删除。
- 所有Cron
/etc/cron.d(重启)作业都被移动到一个名为/etc/cron.d/hold的新子目录中。在启动克隆后,请记得运行sudo crontab -e以防止选定的cron作业运行。
- 克隆文件
/etc/fstab被修改为适当的分区UUID。
- 克隆文件
/boot/grub/grub.cfg被修改为适当的UUID以实现成功克隆引导。克隆文件的quiet splash被更改为nosplash,这样您就可以看到滚动的终端消息。这样可以在引导克隆而不是"真实"版本时获得视觉感知。
- 运行
update-grub以使用指向克隆分区的新菜单选项更新Grub。
- 克隆文件
/etc/update-manager/release-upgrades被修改为将Prompt=never更改为Prompt=lts。当您启动克隆并执行do-release-upgrade -d时,这将允许将Ubuntu 16.04升级到18.04。
- 在克隆之前,会显示一个确认屏幕(在下一部分中显示),您必须输入y/Y才能继续。
确认屏幕
在选择目标克隆分区后,首先会验证其是否为ext4分区类型,并且尚未挂载。如果通过了这个测试,将出现一个确认消息:
=====================================================================
Mounting clone partition /dev/nvme0n1p8 as /mnt/clone16.04

=====================================================================
PLEASE: Carefully confirm Source (Live) and Target (Clone) partitions

SOURCE (BOOT /):  /dev/nvme0n1p5      TARGET (CLONE):  /dev/nvme0n1p8
ID:               Ubuntu              ID:              Ubuntu
RELEASE:          16.04               RELEASE:         16.04
CODENAME:         xenial              CODENAME:        xenial
DESCRIPTION:      Ubuntu 16.04.3 LTS  DESCRIPTION:     Ubuntu 16.04.3 LTS
 Size  Used Avail Use%                 Size  Used Avail Use%
  44G   17G   26G  40%                  24G   17G  5.8G  74%

NOTE: If you are recloning, new files in clone will be deleted,
      modified files are reset to current source content and,
      files deleted from clone are added back from source.

Type Y (or y) to proceed. Any other key to exit:
在这个例子中,已经选择了一个先前的克隆进行再次克隆。克隆上的可用空间是一个无关紧要的问题,因为我们已经知道有足够的空间可用。
如果您有多个Ubuntu安装,请确保您选择了正确的分区来克隆当前引导的Ubuntu,挂载为
/(根目录)。
这是您最后一次中止的机会,按下除
y或
Y之外的任意键即可。
输出列表
当你运行脚本时,你将得到以下输出(不包括上面已列出的输出):
=====================================================================
Using rsync to clone / to /dev/nvme0n1p8 mounted as /mnt/clone16.04
          6.11G  38%   86.46MB/s    0:01:07 (xfr#139123, to-chk=0/647700)

Number of files: 647,700 (reg: 470,100, dir: 104,694, link: 72,903, special: 3)
Number of created files: 127,824 (reg: 72,472, dir: 15,825, link: 39,526, special: 1)
Number of deleted files: 73,318 (reg: 59,766, dir: 9,701, link: 3,847, special: 4)
Number of regular files transferred: 139,123
Total file size: 15.92G bytes
Total transferred file size: 6.11G bytes
Literal data: 6.11G bytes
Matched data: 0 bytes
File list size: 8.50M
File list generation time: 0.001 seconds
File list transfer time: 0.000 seconds
Total bytes sent: 6.14G
Total bytes received: 7.82M

sent 6.14G bytes  received 7.82M bytes  89.74M bytes/sec
total size is 15.92G  speedup is 2.59

Time to clone files: 68 Seconds

=====================================================================
Making changes in: /mnt/clone16.04/etc/update-manager/release-upgrades
     from Prompt=: never
       to Prompt=: lts
Allows running 'do-release-upgrade -d' when rebooting clone target
Consider 'do-release-upgrade -d -f DistUpgradeViewNonInteractive' This
allows you to go to bed or go to lunch whilst upgrade runs.

* * *  When you Upgrade, TURN OFF screen locking for inactivity. * * *

=====================================================================
Making changes in: /mnt/clone16.04/etc/fstab
        from UUID: f3f8e7bc-b337-4194-88b8-3a513f6be55b
          to UUID: 113f9955-a064-4ce2-9cae-74f2a9518550

=====================================================================
Making changes in: /mnt/clone16.04/boot/grub/grub.cfg
        from UUID: f3f8e7bc-b337-4194-88b8-3a513f6be55b
          to UUID: 113f9955-a064-4ce2-9cae-74f2a9518550
Also change 'quiet splash' to 'nosplash' for environmental awareness
Suggest first time booting clone you make wallpaper unique

=====================================================================
Calling 'update-grub' to create new boot menu
Generating grub configuration file ...
Found background: /home/rick/Pictures/1600x900/21.jpg
Found background image: /home/rick/Pictures/1600x900/21.jpg
Found linux image: /boot/vmlinuz-4.14.34-041434-generic
Found initrd image: /boot/initrd.img-4.14.34-041434-generic
Found linux image: /boot/vmlinuz-4.14.31-041431-generic
Found initrd image: /boot/initrd.img-4.14.31-041431-generic
Found linux image: /boot/vmlinuz-4.14.30-041430-generic
Found initrd image: /boot/initrd.img-4.14.30-041430-generic
Found linux image: /boot/vmlinuz-4.14.27-041427-generic
Found initrd image: /boot/initrd.img-4.14.27-041427-generic
Found linux image: /boot/vmlinuz-4.14.15-041415-generic
Found initrd image: /boot/initrd.img-4.14.15-041415-generic
Found linux image: /boot/vmlinuz-4.14.10-041410-generic
Found initrd image: /boot/initrd.img-4.14.10-041410-generic
Found linux image: /boot/vmlinuz-4.14.4-041404-generic
Found initrd image: /boot/initrd.img-4.14.4-041404-generic
Found linux image: /boot/vmlinuz-4.14.2-041402-generic
Found initrd image: /boot/initrd.img-4.14.2-041402-generic
Found linux image: /boot/vmlinuz-4.13.9-041309-generic
Found initrd image: /boot/initrd.img-4.13.9-041309-generic
Found linux image: /boot/vmlinuz-4.10.0-42-generic
Found initrd image: /boot/initrd.img-4.10.0-42-generic
Found linux image: /boot/vmlinuz-4.9.77-040977-generic
Found initrd image: /boot/initrd.img-4.9.77-040977-generic
Found linux image: /boot/vmlinuz-4.4.0-104-generic
Found initrd image: /boot/initrd.img-4.4.0-104-generic
Found linux image: /boot/vmlinuz-3.16.53-031653-generic
Found initrd image: /boot/initrd.img-3.16.53-031653-generic
Found Windows Boot Manager on /dev/nvme0n1p2@/EFI/Microsoft/Boot/bootmgfw.efi
Found Ubuntu 16.04.3 LTS (16.04) on /dev/nvme0n1p8
Found Windows Boot Manager on /dev/sda1@/efi/Microsoft/Boot/bootmgfw.efi
Adding boot menu entry for EFI firmware configuration
done

=====================================================================
Unmounting /dev/nvme0n1p8 as /mnt/clone16.04
rsync新克隆状态显示
当首次克隆时,rsync将会显示从0到100%的所有已创建文件的更新。由于克隆为空,不会删除或更改任何文件:
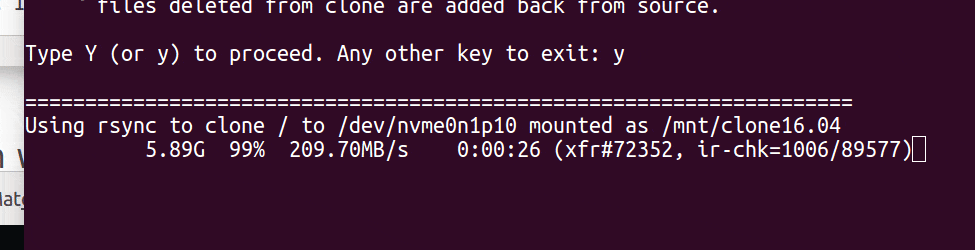
rsync重新克隆时的状态显示
当rsync重新克隆时,它永远不会达到100%,因为未更改的文件不会被复制。在更新进度中,rsync会出现延迟,因为它会扫描下一个要复制的文件,并删除在克隆中创建但原始文件中从未存在的新文件:
Bash脚本 -
clone-ubuntu.sh
#!/bin/bash
# NAME: clone-ubuntu.sh
# PATH: /usr/local/bin
# DESC: Written for AU Q&A: https://askubuntu.com/questions/1028604/bash-seemless-safe-script-to-upgrade-16-04-to-18-04/1028605#1028605
# DATE: Apr 27, 2018. Modified May 6, 2018.
# UPDT: May 02 2018 - Display selected parition and get confirmation.
# May 06 2018 - Revise `do-release-upgrade -d` instructions.
# Correct listing of files in empty target partition.
# Aug 09 2018 - Add --inplace parameter to `rsync`
# Comment out disabling `/etc/cron.d` on clone target.
# Users may uncomment and/or revise to their needs.
# $TERM variable may be missing when called via desktop shortcut
CurrentTERM=$(env | grep TERM)
if [[ $CurrentTERM == "" ]] ; then
notify-send --urgency=critical \
"$0 cannot be run from GUI without TERM environment variable."
exit 1
fi
# Must run as root
if [[ $(id -u) -ne 0 ]] ; then echo "Usage: sudo $0" ; exit 1 ; fi
#
# Create unqique temporary file names
#
tmpPart=$(mktemp /tmp/clone-ubuntu.XXXXX) # Partitions list
tmpMenu=$(mktemp /tmp/clone-ubuntu.XXXXX) # Menu list
tmpInf1=$(mktemp /tmp/clone-ubuntu.XXXXX) # Soucre (Booted) Ubuntu Info
tmpInf2=$(mktemp /tmp/clone-ubuntu.XXXXX) # Target (Cloned) Ubuntu Info
tmpInf3=$(mktemp /tmp/clone-ubuntu.XXXXX) # Work file used by DistInfo ()
#
# Function Cleanup () Removes temporary files
#
CleanUp () {
[[ -f "$tmpPart" ]] && rm -f "$tmpPart" # If we created temp files
[[ -f "$tmpMenu" ]] && rm -f "$tmpMenu" # at various program stages
[[ -f "$tmpInf1" ]] && rm -f "$tmpInf1" # then remove them before
[[ -f "$tmpInf2" ]] && rm -f "$tmpInf2" # exiting.
[[ -f "$tmpInf3" ]] && rm -f "$tmpInf3"
if [[ -d "$TargetMnt" ]]; then # Did we create a clone mount?
umount "$TargetMnt" -l # Unmount the clone
rm -d "$TargetMnt" # Remove clone directory
fi
}
#
# Function GetUUID () gets UUIDs of source and clone target partitions in menu.
#
GetUUID () {
SrchLine="$1" # menu line passed to function
UUID_col=0 # start column of UUID in line
lsblk -o NAME,UUID > "$tmpPart" # Get list of UUID's
while read -r UUID_Line; do # Read through UUID list
# Establish UUID position on line
if [[ $UUID_col == 0 ]] ; then # First time will be heading
UUID_col="${UUID_Line%%UUID*}" # Establish column number
UUID_col="${#UUID_col}" # where UUID appears on line
NameLen=$(( UUID_col - 1 )) # Max length of partition name
continue # Skip to read next line
fi
# Check if Passed line name (/dev/sda1, /nvme01np8, etc.) matches.
if [[ "${UUID_Line:0:$NameLen}" == "${SrchLine:0:$NameLen}" ]] ; then
FoundUUID="${UUID_Line:UUID_col:999}"
break # exit function
fi
done < "$tmpPart" # Read next line & loop back
}
#
# Function DistInfo () builds information about source & target partitions
#
DistInfo () {
Mount="$1" # Mount name is '/' or $TargetMnt
FileName="$2" # "$tmpInf1" or "$tmpInf2" work file
cat "$Mount"/etc/lsb-release >> "$FileName"
sed -i 's/DISTRIB_//g' "$FileName" # Remove DISTRIB_ prefix.
sed -i 's/=/:=/g' "$FileName" # Change "=" to ":="
sed -i 's/"//g' "$FileName" # Remove " around "Ubuntu 16.04...".
# Align columns from "Xxxx:=Yyyy" to "Xxxx: Yyyy"
cat "$FileName" | column -t -s '=' > "$tmpInf3"
cat "$tmpInf3" > "$FileName"
}
#
# Mainline
#
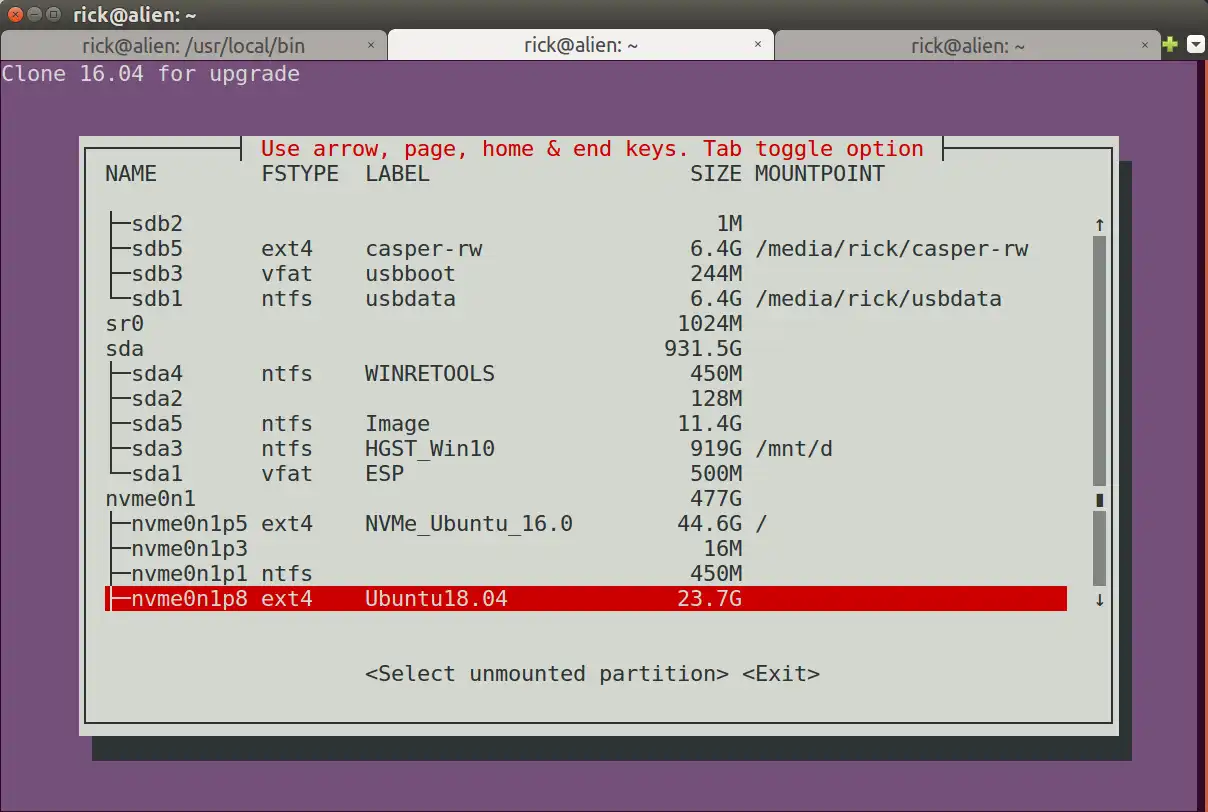
lsblk -o NAME,FSTYPE,LABEL,SIZE,MOUNTPOINT > "$tmpMenu"
i=0
SPACES=' '
DoHeading=true
AllPartsArr=() # All partitions.
# Build whiptail menu tags ($i) and text ($Line) into array
while read -r Line; do
if [[ $DoHeading == true ]] ; then
DoHeading=false # First line is the heading.
MenuText="$Line" # Heading for whiptail.
FSTYPE_col="${Line%%FSTYPE*}"
FSTYPE_col="${#FSTYPE_col}" # Required to ensure `ext4`.
MOUNTPOINT_col="${Line%%MOUNTPOINT*}"
MOUNTPOINT_col="${#MOUNTPOINT_col}" # Required to ensure not mounted.
continue
fi
Line="$Line$SPACES" # Pad extra white space.
Line=${Line:0:74} # Truncate to 74 chars for menu.
if [[ "${Line:MOUNTPOINT_col:4}" == "/ " ]] ; then
GetUUID "$Line"
SourceUUID=$FoundUUID
# Build "/dev/Xxxxx" FS name from "├─Xxxxx" lsblk line
SourceDev="${Line%% *}"
SourceDev=/dev/"${SourceDev:2:999}"
fi
AllPartsArr+=($i "$Line") # Menu array entry = Tag# + Text.
(( i++ ))
done < "$tmpMenu" # Read next "lsblk" line.
#
# Display whiptail menu in while loop until no errors, or escape,
# or valid partion selection .
#
DefaultItem=0
while true ; do
# Call whiptail in loop to paint menu and get user selection
Choice=$(whiptail \
--title "Use arrow, page, home & end keys. Tab toggle option" \
--backtitle "Clone 16.04 for upgrade. ONLY CLONES / PARTITION" \
--ok-button "Select unmounted partition" \
--cancel-button "Exit" \
--notags \
--default-item "$DefaultItem" \
--menu "$MenuText" 24 80 16 \
"${AllPartsArr[@]}" \
2>&1 >/dev/tty)
clear # Clear screen.
if [[ $Choice == "" ]]; then # Escape or dialog "Exit".
CleanUp
exit 0;
fi
DefaultItem=$Choice # whiptail start option.
ArrNdx=$(( $Choice * 2 + 1)) # Calculate array offset.
Line="${AllPartsArr[$ArrNdx]}" # Array entry into $Line.
# Validation - Don't wipe out Windows or Ubuntu 16.04:
# - Partition must be ext4 and cannot be mounted.
if [[ "${Line:FSTYPE_col:4}" != "ext4" ]] ; then
echo "Only 'ext4' partitions can be clone targets."
read -p "Press <Enter> to continue"
continue
fi
if [[ "${Line:MOUNTPOINT_col:4}" != " " ]] ; then
echo "A Mounted partition cannot be a clone target."
read -p "Press <Enter> to continue"
continue
fi
GetUUID "$Line" # Get UUID of target partition.
TargetUUID=$FoundUUID
# Build "/dev/Xxxxx" FS name from "├─Xxxxx" menu line
TargetDev="${Line%% *}"
TargetDev=/dev/"${TargetDev:2:999}"
break # Validated: Break menu loop.
done # Loop while errors.
#
# Mount Clone Target partition
#
Release=$(lsb_release -rs) # Source version ie: '16.04'
TargetMnt="/mnt/clone$Release"
echo ""
echo "====================================================================="
echo "Mounting clone partition $TargetDev as $TargetMnt"
mkdir -p "$TargetMnt" # '-p' directory may already exist
mount -t auto -v $TargetDev "$TargetMnt" > /dev/null
# Confirm partition is empty. If not empty confirm it's Ubuntu. If not exit.
# If Ubuntu display prompt with the version it contains and get confirmation.
echo ""
echo "====================================================================="
echo "PLEASE: Carefully confirm Source (Live) and Target (Clone) partitions"
# Build source information (our current boot partition)
echo "SOURCE (BOOT /)=$SourceDev" > "$tmpInf1"
DistInfo "/" "$tmpInf1" # /etc/lsb_release information
df -h --output=size,used,avail,pcent "$SourceDev" >> "$tmpInf1"
# Build target information (the partition selected for cloning to)
LineCnt=$(ls "$TargetMnt" | wc -l)
if (( LineCnt > 1 )) ; then
# More than /Lost+Found exist so it's not an empty partition.
if [[ -f "$TargetMnt"/etc/lsb-release ]] ; then
echo "TARGET (CLONE)=$TargetDev" > "$tmpInf2"
DistInfo "$TargetMnt" "$tmpInf2" # /etc/lsb_release information
else
# TO-DO: might be cloning /boot or /home on separate partitions.
# the source partition is still `/` so can display message.
echo "Selected partition has data which is not Ubuntu OS. Aborting."
CleanUp # Remove temporary files
exit 1
fi
else
echo "Target (Clone) partition appears empty" > "$tmpInf2"
echo "/Lost+Found normal in empty partition" >> "$tmpInf2"
echo "Head of '/Clone/' files & directories:" >> "$tmpInf2"
ls "$TargetMnt" | head -n2 >> "$tmpInf2"
fi
# Target device free bytes
df -h --output=size,used,avail,pcent "$TargetDev" >> "$tmpInf2"
# Display source and target partitions side-by-side using bold text.
echo $(tput bold) # Set to bold text
paste -d '|' "$tmpInf1" "$tmpInf2" | column -t -s '|'
echo $(tput sgr0) # Reset to normal text
echo "NOTE: If you are recloning, new files in clone will be deleted,"
echo " modified files are reset to current source content and,"
echo " files deleted from clone are added back from source."
echo ""
read -p "Type Y (or y) to proceed. Any other key to exit: " -n 1 -r
echo # (optional) move to a new line
if [[ ! $REPLY =~ ^[Yy]$ ]] ; then
CleanUp # Remove temporary files
exit 0
fi
# Copy non-virtual directories to clone. Credit to TikTak's Ask Ubuntu answer:
# https://askubuntu.com/questions/319805/is-it-safe-to-clone-the-current-used-disk?utm_medium=organic&utm_source=google_rich_qa&utm_campaign=google_rich_qa
SECONDS=0
echo ""
echo "====================================================================="
echo "Using rsync to clone / to $TargetDev mounted as $TargetMnt"
rsync -haxAX --stats --delete --info=progress2 --info=name0 --inplace \
/* "$TargetMnt" \
--exclude={/dev/*,/proc/*,/sys/*,/tmp/*,/run/*,/mnt/*,/media/*,/lost+found}
# For 16GB on Samsung Pro 960: First time 98 seconds, second time 27 seconds.
rsyncTime=$SECONDS
echo ""
echo "Time to clone files: $rsyncTime Seconds"
# Change /etc/update-manager/release-upgrades prompt from never to LTS
echo ""
echo "====================================================================="
echo "Making changes in: $TargetMnt/etc/update-manager/release-upgrades"
echo " from Prompt=: never"
echo " to Prompt=: lts"
echo "Allows running 'do-release-upgrade -d' when rebooting clone target"
echo "Consider 'do-release-upgrade -d -f DistUpgradeViewNonInteractive' This"
echo "allows you to go to bed or go to lunch whilst upgrade runs."
echo ""
echo "* * * When you Upgrade, TURN OFF screen locking for inactivity. * * *"
echo ""
sed -i 's/Prompt=never/Prompt=lts/' "$TargetMnt"/etc/update-manager/release-upgrades
## This section commented out to prevent surprises. You may uncomment.
## You may want to revise to include `cron.daily`, `cron.hourly`, etc.
# Move `/etc/cron.d` reboot jobs to `/etc/cron.d/hold` to prevent running
# scripts such as daily backup or Ubuntu 16.04 specific problem fixes.
#echo ""
#echo "====================================================================="
#echo "Moving '$TargetMnt/etc/cron.d' to '.../hold' to prevent running."
#echo "After booting clone, move back individual files you want to run"
#if [[ ! -d "$TargetMnt"/etc/cron.d/hold ]]; then
# mkdir "$TargetMnt"/etc/cron.d/hold
#fi
#cp -p "$TargetMnt"/etc/cron.d/* "$TargetMnt"/etc/cron.d/hold/
#rm -fv "$TargetMnt"/etc/cron.d/*
# Update /etc/fstab on clone partition with clone's UUID
echo ""
echo "====================================================================="
echo "Making changes in: $TargetMnt/etc/fstab"
echo " from UUID: $SourceUUID"
echo " to UUID: $TargetUUID"
sed -i "s/$SourceUUID/$TargetUUID/g" "$TargetMnt"/etc/fstab
# Update /boot/grub/grub.cfg on clone partition with clone's UUID
echo ""
echo "====================================================================="
echo "Making changes in: $TargetMnt/boot/grub/grub.cfg"
echo " from UUID: $SourceUUID"
echo " to UUID: $TargetUUID"
echo "Also change 'quiet splash' to 'nosplash' for environmental awareness"
echo "Suggest first time booting clone you make wallpaper unique"
sed -i "s/$SourceUUID/$TargetUUID/g" "$TargetMnt"/boot/grub/grub.cfg
sed -i "s/quiet splash/nosplash/g" "$TargetMnt"/boot/grub/grub.cfg
# Update grub boot menu
echo ""
echo "====================================================================="
echo "Calling 'update-grub' to create new boot menu"
update-grub
# Unmount and exit
echo ""
echo "====================================================================="
echo "Unmounting $TargetDev as $TargetMnt"
CleanUp # Remove temporary files
exit 0
将上面的bash代码复制并粘贴到一个名为
/usr/local/bin/clone-ubuntu.sh的新文件中。然后使用以下命令使新文件可执行:
sudo chmod a+x /usr/local/bin/clone-ubuntu.sh
调用脚本使用:
sudo clone-ubuntu.sh
如何将16.04 LTS克隆升级到Ubuntu 18.04 LTS
这是一个可能会吸引很多人的“额外”部分。
重新启动您的机器。 grub 菜单中将包含指向克隆分区的新菜单选项。您还可以从克隆的高级选项菜单中选择特定的内核版本。
将克隆的16.04 LTS转换为18.04 LTS的一种方法是运行:
sudo do-release-upgrade
请注意,在2018年7月26日之前,需要使用
-d标志,但现在不再需要。
仔细阅读18.04升级确认事项。
在继续之前,请确保关闭非活动屏幕锁定。如果您的计算机因键盘不活动而进入锁屏状态,升级过程可能会崩溃。
18.04升级流程摘要
此部分将根据不同用户安装的不同应用程序进行具体说明。以下是我根据笔记和记忆制作的简要摘要:
确认继续进行:输入ENTER
将删除软件包:Y
替换longind.conf文件:Y
配置文件'/etc/sane.d/dll.conf',默认为N,选择Y
'/etc/NetworkManager/conf.d/default-wifi-powersave-on.conf'文件选择默认值N
配置文件'/etc/pulse/default.pa',默认为N,选择Y
配置文件'/etc/grub.d/30_os-prober',默认为N,选择N
全屏grub菜单配置出现。选择选项:保留当前安装的本地版本
配置文件'/etc/cron.d/anacron',默认为N,选择Y以查看内容
多次出现错误消息:/sbin/ldconfig.real: 警告:忽略无法打开的配置文件:/etc/ld.so.conf.d/x86_64-linux-gnu_EGL.conf: 没有此文件或目录
非标准:配置文件'/etc/vnstat.conf'(显示差异1.13与1.18),选择Y
将删除220个软件包。(可能需要几个小时)输入Y
完成升级需要重新启动。选择Y
注意第10步,大多数人都看不到。我在我的Ubuntu 16.04上安装了一个旧的nVidia驱动程序,但从未完全删除。这是因为您可能有类似的旧软件包没有完全删除。
Grub将引导菜单更改为UEFI下的克隆
与18.04升级不同,我发现18.04.1升级将Grub UEFI配置更改为使用克隆的grub菜单,而不是原始的grub菜单,如此答案所述:
Dual boot and the files /boot/grub/grub.cfg -- which one is used?
$ sudo cat /boot/efi/EFI/ubuntu/grub.cfg
search.fs_uuid b40b3925-70ef-447f-923e-1b05467c00e7 root
set prefix=($root)'/boot/grub'
configfile $prefix/grub.cfg

$ sudo grub-install
Installing for x86_64-efi platform.
Installation finished. No error reported.
在启动原始分区后运行
sudo update-grub并不足以更改由grub加载的
grub.cfg。您需要使用
sudo grub-install强制grub使用原始分区的配置。
原始分区和克隆分区都可以使用
update-grub来维护自己的
/boot/grub/grub.cfg文件,但只能在启动时使用一个。
当然,如果您希望grub使用Clone的grub菜单,则不要在原始分区上执行上述步骤。
编辑历史
编辑于2018年5月6日 - 修正了空克隆(目标)分区的信息显示。
编辑于2018年8月26日 - 使用--inplace选项和rsync一起,以便在复制过程中不会重复复制大文件(如2 GB大小的垃圾文件)到克隆中。这可能导致"磁盘空间不足"错误。注释掉/etc/cron.d覆盖,因为用户可能想要保留或者选择一个不同的目录。更新指南,使用不带-d标志的do-release-upgrade,因为Ubuntu 18.04.1 LTS已经发布。