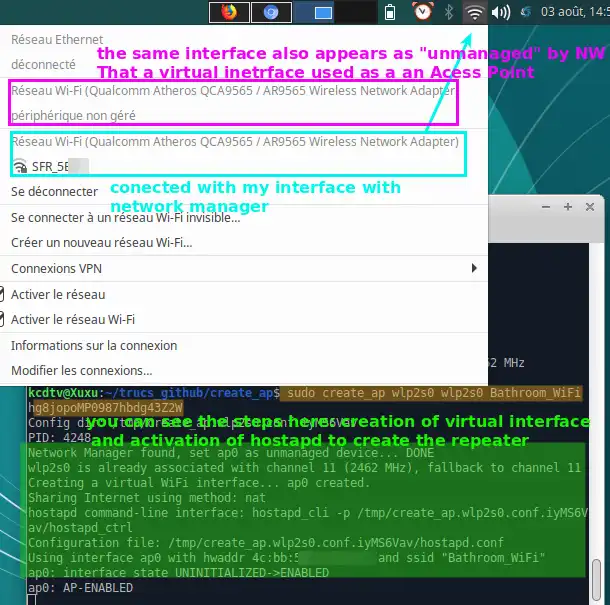
在我看到这个链接由vasishath提供后,我成功地设置了一个无线热点,以共享来自同一单一无线接口设备的互联网连接。这个无线设备必须使用已经构建有Atheros驱动程序并支持nl80211的驱动程序。接下来我将向您展示如何操作。
检测您的无线设备是否适用于此方法
在终端中运行以下命令:
lsmod | grep ath
如果输出为空或输出中不包含字符串
cfg80211,继续操作没有意义,你应该注意
this answer中的第二和第三点。
所需工具
检查以下提到的软件包是否已安装:iw,hostapd,iptables,udhcpd,udhcpc,macchanger。
你可以使用以下命令安装它们:
sudo apt-get install iw hostapd iptables udhcpd udhcpc macchanger
编辑一些文件
在终端中运行以下命令以编辑相应的文件:
sudo -H gedit /etc/hostapd.conf /etc/udhcpd.conf /etc/default/udhcpd /etc/wpa_supplicant.conf
在
hostapd.conf文件中添加以下代码:
interface=new1
driver=nl80211
ssid=my_wifi_hotspot      #根据您的喜好更改ssid名称
channel=11                #建议使用与您的无线网络相同的信道
hw_mode=g
wme_enabled=1
macaddr_acl=0
auth_algs=1
ignore_broadcast_ssid=0
wpa=3
wpa_passphrase=1234567890 #根据您的喜好更改密码短语
wpa_key_mgmt=WPA-PSK
wpa_pairwise=TKIP
rsn_pairwise=CCMP
在
udhcpd.conf文件中注释掉所有当前行(在行前面添加
#字符),并添加以下新行:
start 192.168.0.102         #这些IP地址必须与您当前默认路由的子网相同
end 192.168.0.117
interface new1

opt dns 192.168.0.1         #您当前默认路由(网关)
option subnet 255.255.255.0
opt router 192.168.0.101    #此IP地址必须与您当前默认路由的子网相同
option  domain  localhost
在/etc/default/udhcp中,注释掉包含的行。
在
wpa_supplicant.conf中,您必须提供当前无线网络的设置。请参阅
man wpa_supplicant以获取一些快速示例。您可能还可以在
/usr/share/doc/wpa_supplicant/目录中找到更多示例。我使用了类似以下的设置:
ctrl_interface=/var/run/wpa_supplicant
network={
  ssid="my_wifi_network"
  key_mgmt=WPA-PSK
  proto=WPA
  pairwise=CCMP
  group=CCMP
  psk="mypassphrase"
}
保存所有文件并关闭它们。
注意:所有这些编辑都不会影响您当前的网络配置。
创建一个shell脚本
在终端中运行mkdir -p bin - 这个命令将在您的home文件夹中创建一个bin目录,如果您还没有它。
然后运行gedit ~/bin/hotspotsetup.sh - 这将在gedit中创建一个名为hotspotsetup.sh的新文件。
复制并粘贴以下脚本到新创建的文件中:
#!/bin/bash

service network-manager stop
sleep 1

pkill -15 nm-applet
sleep 1

ifconfig wlan0 down             #wlan0 - the name of your wireless adapter
sleep 1

iw phy phy0 interface add new0 type station
iw phy phy0 interface add new1 type __ap
sleep 2

ifconfig new0 down
macchanger --mac 00:11:22:33:44:55 new0
ifconfig new1 down
macchanger --mac 00:11:22:33:44:66 new1
ifconfig new0 up
ifconfig new1 up

ifconfig new1 192.168.0.101 up  #192.168.0.101 - the same IP defined for router in 'udhcpd.conf' file
hostapd /etc/hostapd.conf &
sleep 2

service udhcpd start

wpa_supplicant -inew0 -c/etc/wpa_supplicant.conf &
sleep 10

udhcpc -i new0

echo "1" > /proc/sys/net/ipv4/ip_forward
iptables --table nat --append POSTROUTING --out-interface new0 -j MASQUERADE
iptables --append FORWARD --in-interface new1 -j ACCEPT
- 保存文件并关闭。
- 返回终端并运行:
chmod +x ~/bin/hotspotsetup.sh - 为脚本授予执行权限。
在与同一无线适配器连接的无线网络中启动无线热点
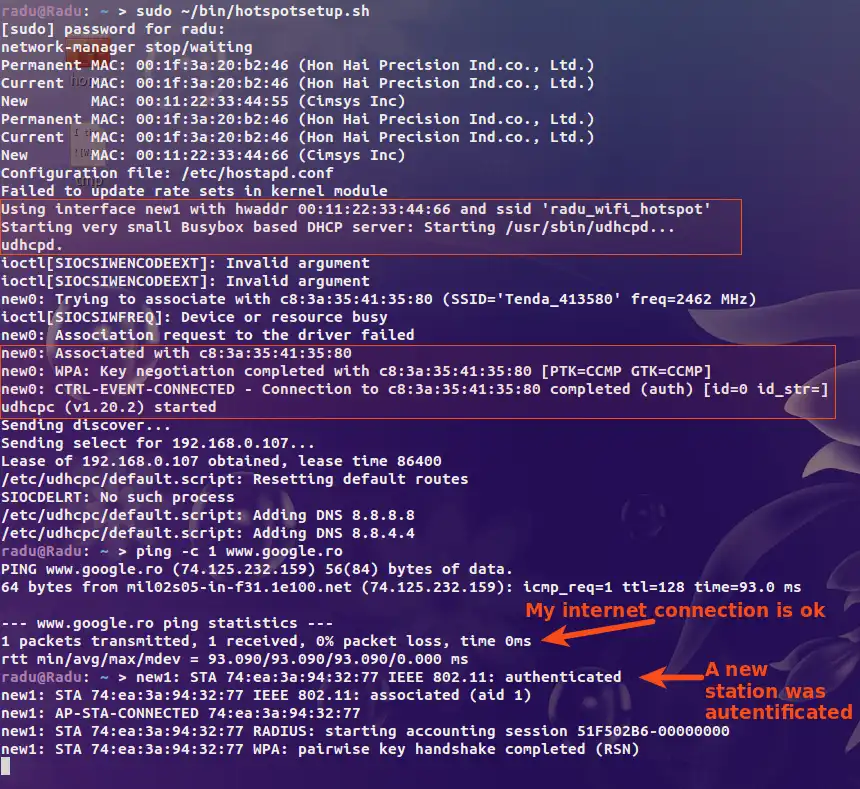
以 root 权限在终端中运行上述脚本:
sudo ~/bin/hotspotsetup.sh
证明
请注意:要重新启动网络管理器服务,使其在运行 hotspotsetup.sh 脚本之前的状态,需要重启您的计算机(sudo reboot)。
来源:
Connectify for Linux with Single wireless interface。